Bulk Email Verification Guide
Got a list of hundreds—or hundreds of thousands—of emails to verify?
Single verification won't cut it. You need bulk email verification.
Valid Email Checker lets you upload entire email lists and verify them all at once. Whether you have 50 contacts or 1 million, our bulk email checker processes your list quickly and delivers detailed results for every address.
Here's how to clean your email list in minutes.
Three Ways to Verify in Bulk
Valid Email Checker gives you three options for bulk email verification:
| Method | Best For |
|---|---|
| Upload a file | CSV or TXT files from your computer |
| Paste emails | Quick verification of a handful of addresses |
| Connect platform | Direct import from Mailchimp, HubSpot, etc. |
Choose whichever works best for your workflow. Let's walk through each one.
Method 1: Upload a File
This is the most common way to verify email lists in bulk. If you have a CSV or TXT file with email addresses, this is for you.
Step 1: Go to Bulk Upload
Click Bulk Upload in the left sidebar. You'll see the bulk verification page:
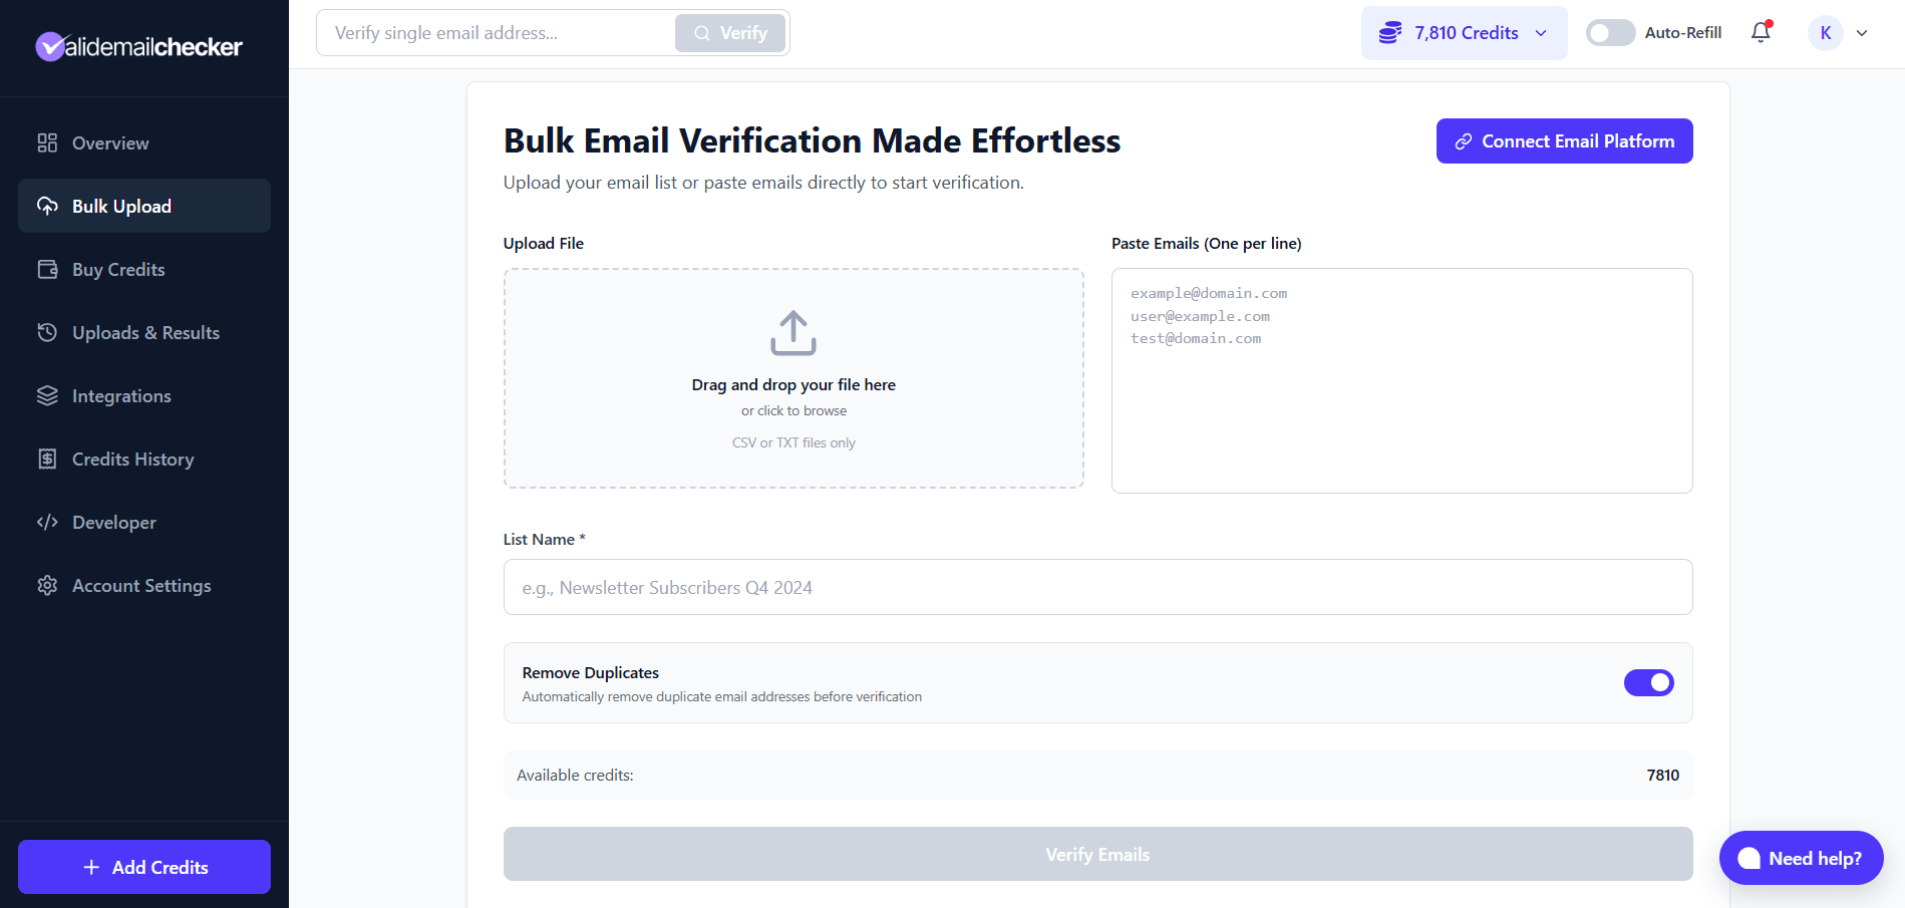
The bulk upload page with file upload, paste emails, and platform connection options
Step 2: Upload Your File
You have two options:
- Drag and drop your file into the upload area
- Click to browse and select your file
Supported file formats:
- CSV (Comma Separated Values)
- TXT (Plain Text)
Limits:
- Maximum file size: 100 MB
- Maximum emails per upload: 1 million
Have more than 1 million emails? Split your list into multiple files and upload them separately. Each upload runs independently, so you can process multiple files at once.
Step 3: Name Your List
Once your file uploads, the system automatically populates the List Name field with your filename.
You can customize this to something more descriptive:
Newsletter Subscribers Q1 2026Trade Show Leads - ChicagoCustomer Database Cleanup
A clear name helps you find results later, especially if you verify multiple lists.
Step 4: Remove Duplicates (Recommended)
The Remove Duplicates toggle is enabled by default—and you should keep it on.
Here's why:
- Saves credits — You only pay for unique emails
- Faster processing — Smaller list = quicker results
- Cleaner data — No repeated entries in your results
When you upload with this toggle enabled, we first scan for duplicates. You'll see a notification showing how many duplicates were removed before verification begins.
Example: Upload 1,000 emails with 50 duplicates → We verify 950 emails → You're charged 950 credits.
Step 5: Check Your Credits
Before clicking verify, check the Available credits displayed at the bottom of the form.
Make sure you have enough credits for your list size. If not, click + Add Credits in the sidebar to purchase more.
Step 6: Click "Verify Emails"
Hit the Verify Emails button. You'll be automatically redirected to the Uploads & Results page to watch your verification progress in real-time.
Method 2: Paste Emails Directly
Don't have a file? No problem.
You can paste email addresses directly into Valid Email Checker—perfect for quick bulk verification of a small batch.
How to Paste Emails
- Go to Bulk Upload
- Look for the Paste Emails (One per line) text area on the right
- Paste your emails, one per line:
john@example.com
sarah@company.org
mike@business.net
support@startup.io
- Enter a List Name
- Click Verify Emails
When you paste emails, the file upload area is disabled (and vice versa). You can use one method or the other per verification—not both at the same time.
This method is great when you:
- Have a quick list from a spreadsheet
- Want to verify emails from an email thread
- Don't want to create a file for a small batch
- Need to spot-check some addresses
Method 3: Connect Your Email Platform
Why download a file just to upload it again?
Valid Email Checker integrates directly with popular email marketing platforms. Click Connect Email Platform to see available integrations:
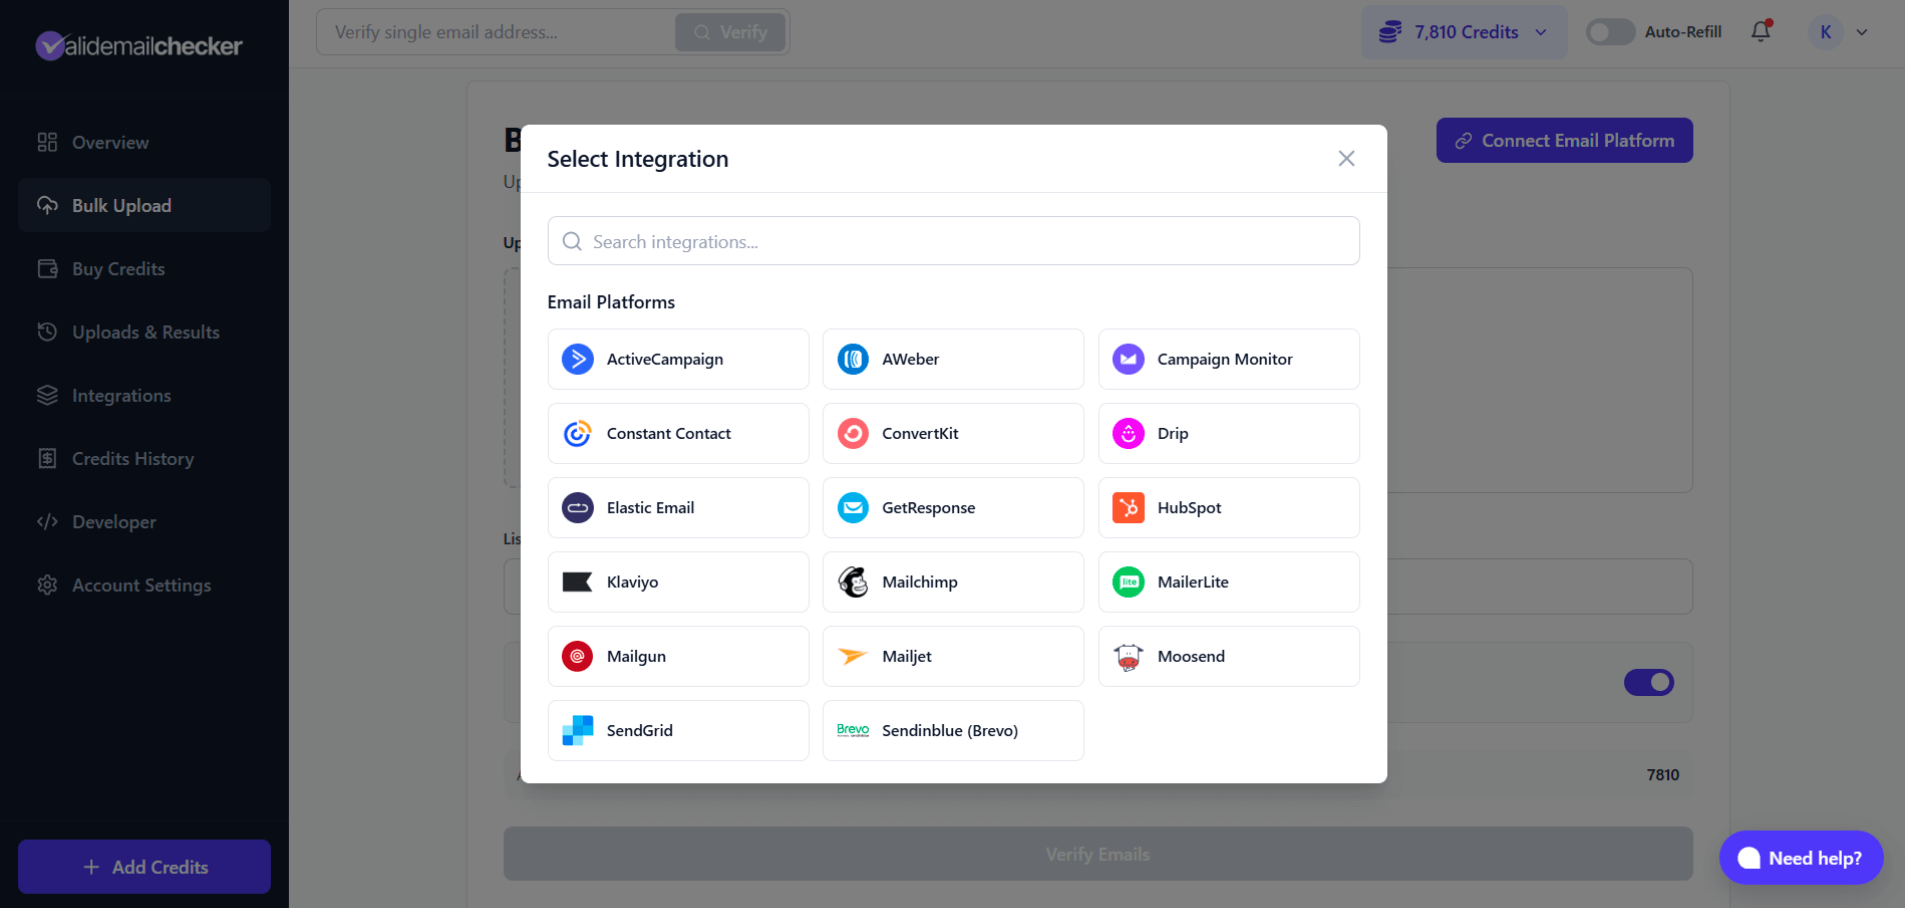
Direct integrations with 17+ email marketing platforms
Available Integrations
| Platform | Platform | Platform |
|---|---|---|
| ActiveCampaign | AWeber | Campaign Monitor |
| Constant Contact | ConvertKit | Drip |
| Elastic Email | GetResponse | HubSpot |
| Klaviyo | Mailchimp | MailerLite |
| Mailgun | Mailjet | Moosend |
| SendGrid | Sendinblue (Brevo) |
How Platform Integration Works
- Click Connect Email Platform
- Select your platform from the modal
- Authorize the connection (one-time setup)
- Choose which list or segment to verify
- Results sync back to your platform automatically
This is the most seamless way to clean your email list—no file downloads, no uploads, no manual work.
Tracking Your Verification Progress
After clicking Verify Emails, you're redirected to the Uploads & Results page.
Here you can monitor your bulk email verification in real-time:
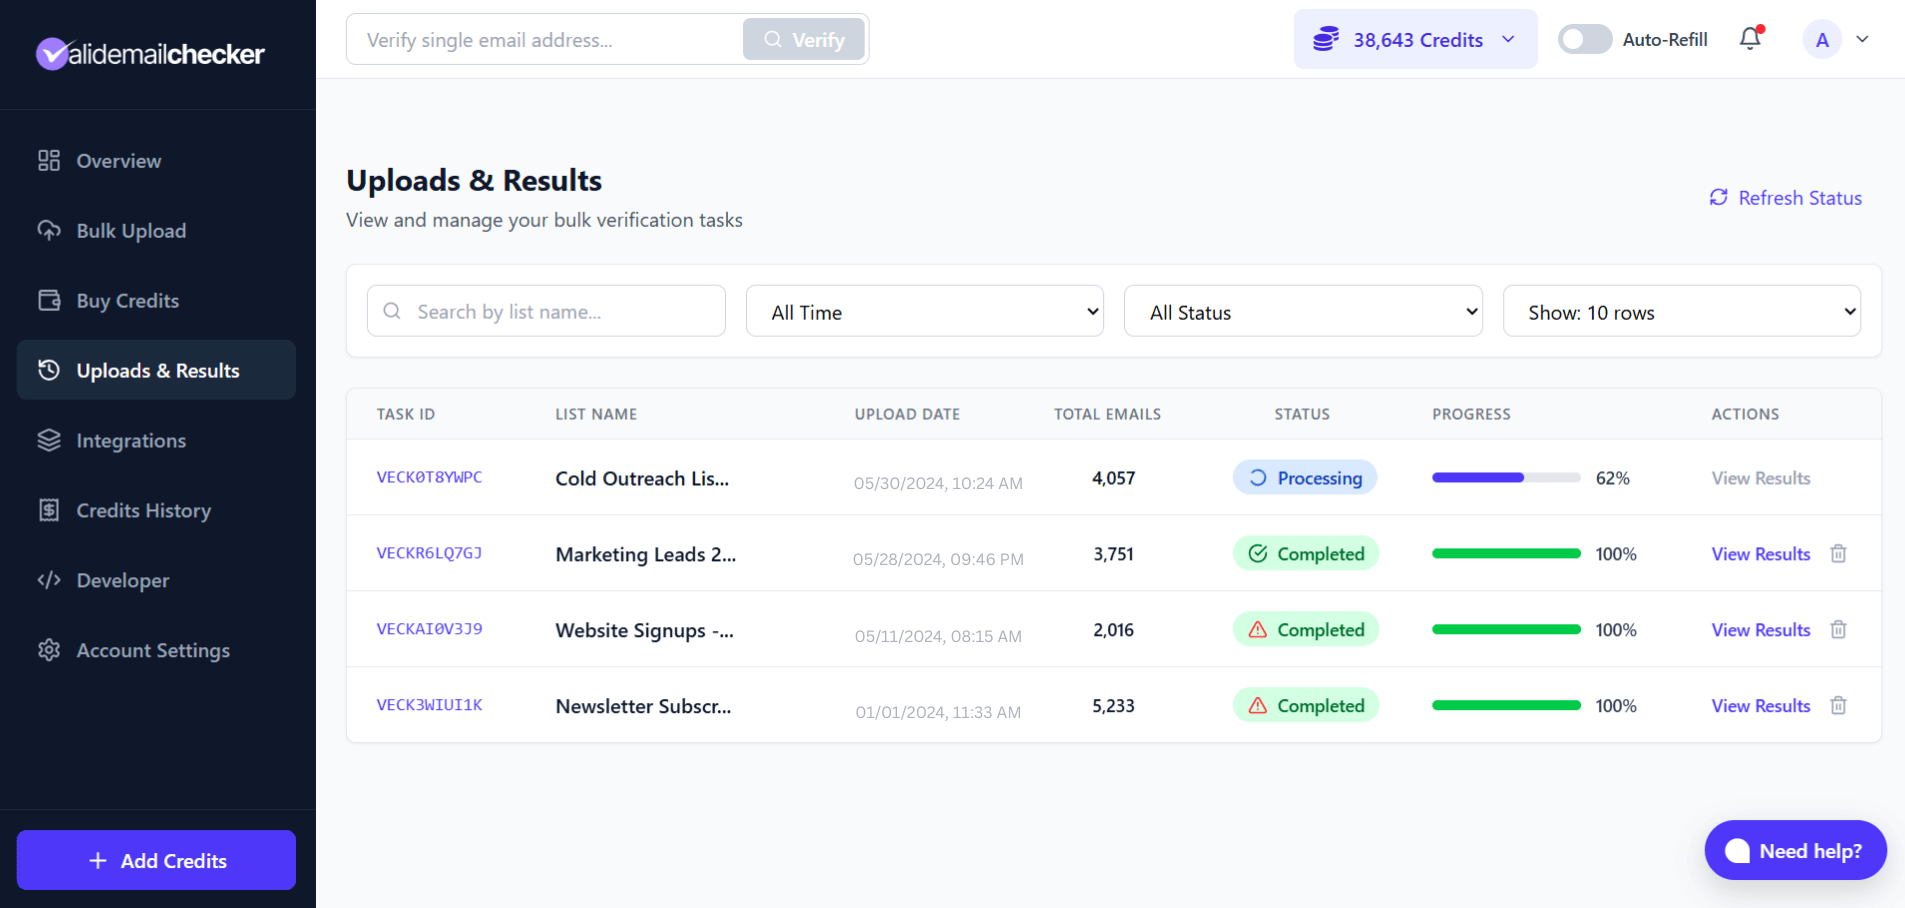
Real-time progress tracking with status indicators—notice the warning icons on some completed verifications
What You'll See
| Column | Description |
|---|---|
| Task ID | Unique identifier for your verification job |
| List Name | The name you gave your upload |
| Upload Date | When you started the verification |
| Total Emails | Number of emails being verified |
| Status | Processing, Completed, or Failed |
| Progress | Visual progress bar with percentage |
| Actions | View Results, Delete |
Status Indicators
- 🔄 Processing — Verification in progress (percentage shown)
- ✅ Completed — All done! Every email was verified successfully. Click "View Results" to see details.
- ⚠️ Completed with Warning — Verification finished, but some emails couldn't be processed (more on this below)
- ❌ Failed — Something went wrong (rare—usually connection issues)
- 🗑️ Deleted — Data removed after 15-day retention period
What Does "Completed with Warning" Mean?
Sometimes you'll see a completed status with a small warning icon. Don't panic—this is actually good news.
Here's what happened: We verified your list, but some email servers were temporarily unreachable. Maybe they were down for maintenance, experiencing high traffic, or just being unresponsive. Instead of marking these as "Unknown" and leaving you guessing, we handle it differently.
What we do:
- Verify what we can — All emails that responded get full verification results
- Separate the rest — Emails we couldn't reach are grouped into a separate file
- Refund your credits — You're automatically refunded for every unprocessed email
- Let you retry — Download the unprocessed list and verify again later
Example:
You upload 500,000 emails. We successfully verify 450,000, but 50,000 email servers didn't respond.
| What Happens | Count |
|---|---|
| Emails verified | 450,000 |
| Emails unprocessed | 50,000 |
| Credits refunded | 50,000 |
Your results show the 450,000 verified emails. The 50,000 unprocessed emails are saved in a separate downloadable file on the verification details page. Re-upload that file anytime to try again—those servers might be back online.
Why this approach?
We could have just marked unresponsive emails as "Unknown" and called it a day. But that's not helpful. By separating them out and refunding your credits, you get:
- Accurate results — No guessing about what "Unknown" means
- Your money back — Credits refunded automatically, no support ticket needed
- A second chance — Download and retry the unprocessed batch later
This is our way of being transparent. You paid for verification—you should get verification, not question marks.
Real-Time Updates
You don't need to refresh the page. The progress bar and percentage update automatically as emails are verified.
- Small lists (under 100 emails): Seconds
- Medium lists (1,000-10,000 emails): A few minutes
- Large lists (100,000+ emails): 15-30 minutes
Want to manually refresh? Click the Refresh Status button in the top right corner of the page.
Once status shows Completed, the View Results link becomes active.
How We Handle Your Data
When you upload a file for bulk email verification, here's what happens to your original data:
Your Columns Are Preserved
If your file has additional columns (names, company, notes, etc.), we keep them. Your data isn't lost or rearranged—we simply append our verification results to the end.
Example:
Your original file:
email,first_name,company
john@acme.com,John,Acme Inc
sarah@corp.net,Sarah,Corp LLC
Your results file:
email,first_name,company,Status,Score,Domain,Safe to Send,...
john@acme.com,John,Acme Inc,safe,98,acme.com,Yes,...
sarah@corp.net,Sarah,Corp LLC,invalid,3,corp.net,No,...
Files Without Headers
Don't have column headers? No problem.
We auto-detect the email column and label any other columns as Column2, Column3, etc. The email column is always clearly labeled as Email in your results.
What Gets Added
We append these verification columns to your results:
| Column | What It Shows |
|---|---|
| Status | safe, invalid, catch_all, disposable, etc. |
| Score | Confidence score (0-100) |
| Domain | Email domain (gmail.com, company.com) |
| Safe to Send | Yes or No |
| Deliverable | Yes or No |
| Free Email | Yes or No (Gmail, Yahoo, etc.) |
| Disposable | Yes or No |
| Catch-All | Yes or No |
| Role Account | Yes or No |
| Spam Trap | Yes or No |
| Inbox Full | Yes or No |
| Disabled | Yes or No |
| MX Found | Yes or No |
| Verified Date | Timestamp of verification |
→ Understanding all result columns
How Long Does Bulk Verification Take?
Processing time depends on your list size:
| List Size | Estimated Time |
|---|---|
| 100 emails | Seconds |
| 1,000 emails | 1-2 minutes |
| 10,000 emails | 5-10 minutes |
| 100,000 emails | 15-30 minutes |
| 1,000,000 emails | 1-2 hours |
Why the variation?
Some email servers respond quickly. Others are slow or use greylisting (intentionally delaying responses). We wait for accurate results rather than rushing and giving you unreliable data.
You can safely close your browser while verification runs. Come back anytime to check progress or download results.
Filtering and Managing Results
The Uploads & Results page includes filters to help you find specific verifications:
Search
Type in the search bar to find lists by name. Great when you've run dozens of verifications.
Time Filter
Filter by:
- All Time
- Last 7 Days
- Last 30 Days
- Custom range
Status Filter
Show only:
- All Status
- Processing
- Completed
- Completed with Warning
- Failed
- Deleted
Rows Per Page
Control how many results display:
- 10 rows
- 25 rows
- 50 rows
- 100 rows
Deleting Your Data
Every completed verification shows a trash icon in the Actions column.
Click it to permanently delete that verification and all associated data.
When you delete:
- Results file is removed from our servers
- Data cannot be recovered
- Credits are NOT refunded (verification already completed)
Why delete?
- Data hygiene—remove old verifications you no longer need
- Privacy—ensure sensitive data doesn't linger
- Organization—keep your results page clean
Even if you don't manually delete, all verification data is automatically removed after 15 days. Download your results promptly!
Credits and Billing for Bulk Verification
How Credits Work
- 1 email = 1 credit (same as single verification)
- Duplicates removed before charging (if toggle enabled)
- Unknown results are automatically refunded
Example
| Scenario | Credits Charged |
|---|---|
| Upload 1,000 emails, no duplicates | 1,000 credits |
| Upload 1,000 emails, 100 duplicates removed | 900 credits |
| Upload 1,000 emails, 50 return "Unknown" | 950 credits (50 refunded) |
Not Enough Credits?
If you upload a list larger than your available credits:
- You'll see a warning before verification starts
- Click + Add Credits to purchase more
- Or verify a smaller list first
File Preparation Tips
Before uploading, a little preparation goes a long way.
Supported Formats
| Format | Extension | Notes |
|---|---|---|
| CSV | .csv | Comma-separated, most common |
| TXT | .txt | One email per line |
Not supported: XLSX, XLS, Google Sheets (export to CSV first)
Best Practices
Remove obvious junk first If you know certain rows are garbage (test data, placeholder emails), delete them before uploading. Why waste credits?
Check your column structure Make sure your email column is consistent. Mixed formats in a single column can cause issues.
Use UTF-8 encoding If your file has special characters (accents, non-Latin characters), save as UTF-8 to avoid encoding issues.
Keep file size reasonable Under 100 MB, under 1 million rows. Larger? Split into multiple files.
Common Issues
| Problem | Solution |
|---|---|
| "Invalid file format" | Make sure it's .csv or .txt, not .xlsx |
| Emails not detected | Check that emails are in a proper column |
| Strange characters in results | Re-save original file as UTF-8 |
| Verification stuck | Large files take time—check back in 15-30 min |
Bulk vs. Single: When to Use Each
| Use Bulk When... | Use Single When... |
|---|---|
| Cleaning an email list | Checking one prospect |
| Importing contacts to CRM | Verifying before sending important email |
| Regular list maintenance | Testing the service |
| Processing form submissions in batches | Quick one-off check |
| More than 10 emails | Fewer than 10 emails |
Rule of thumb: If you're copying and pasting more than 10 emails, just upload a file. It's faster.
Next Steps After Verification
Once your bulk email verification completes:
- Download your results — Get the cleaned file with all verification data
- Filter by status — Separate safe emails from risky ones
- Remove bad addresses — Delete invalid, disposable, and spam traps
- Import clean list — Upload to your email platform
- Start sending — Enjoy lower bounce rates!
Quick Reference
| Feature | Details |
|---|---|
| File formats | CSV, TXT |
| Max file size | 100 MB |
| Max emails per upload | 1 million |
| Cost | 1 credit per email |
| Duplicate handling | Auto-removed (toggle on by default) |
| Processing time | Seconds to hours (depends on list size) |
| Data retention | 15 days (auto-delete) |
| Platform integrations | 17+ email marketing tools |
Start Verifying
Ready to clean your email list?