GetResponse Integration
Connect your GetResponse account to Valid Email Checker and keep your email lists clean without the hassle of manual exports and imports.
GetResponse is a powerful all-in-one marketing platform with email marketing, automation, landing pages, and webinars. With our integration, you can verify your GetResponse contacts directly and automatically remove problematic addresses to protect your sender reputation.
What You Can Do
Once connected, you can:
- Import lists directly from GetResponse without downloading files
- Verify all contacts or specific lists with subscriber counts shown
- Auto-clean your lists by removing invalid, disposable, or risky emails
- Keep your original list intact with verify-only mode
- Connect multiple accounts if you manage several GetResponse workspaces
Before You Start
Make sure you have:
- A Valid Email Checker account with available credits
- A GetResponse account (any plan)
- Access to generate API keys in GetResponse
Each email verified uses one credit from your balance. A list of 250 contacts uses 250 credits.
Step 1: Find Your GetResponse API Key
First, you'll need to generate an API key in GetResponse.
In GetResponse:
- Log in to your GetResponse account
- Click Tools in the top navigation
- Select Integrations and API
- Click the API tab
- Click Generate API key
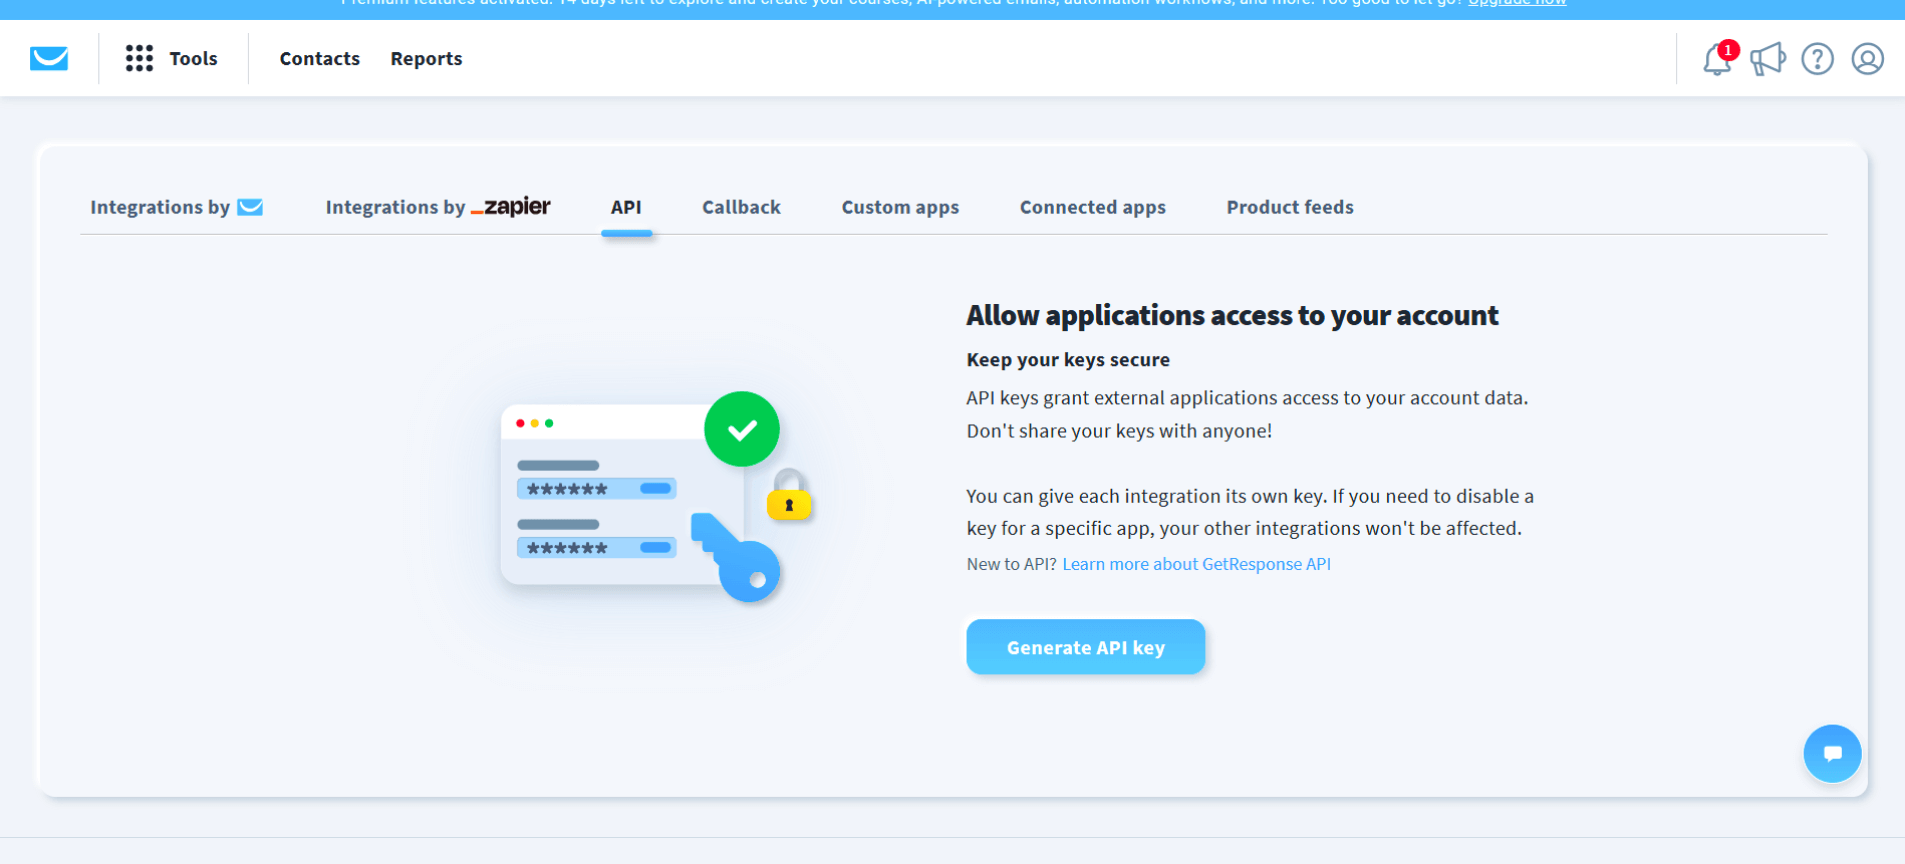
GetResponse recommends creating a separate API key for each integration. This way, if you ever need to revoke access for one app, your other integrations keep working.
- Give your key a name (like "Valid Email Checker")
- Copy the generated API key
Keep this key secure - you'll need it in the next step.
Step 2: Connect GetResponse to Valid Email Checker
Now let's link your accounts.
In Valid Email Checker:
- Go to Integrations in the sidebar (or click Bulk Upload → Connect Email Platform)
- Find and click GetResponse
- Enter your details:
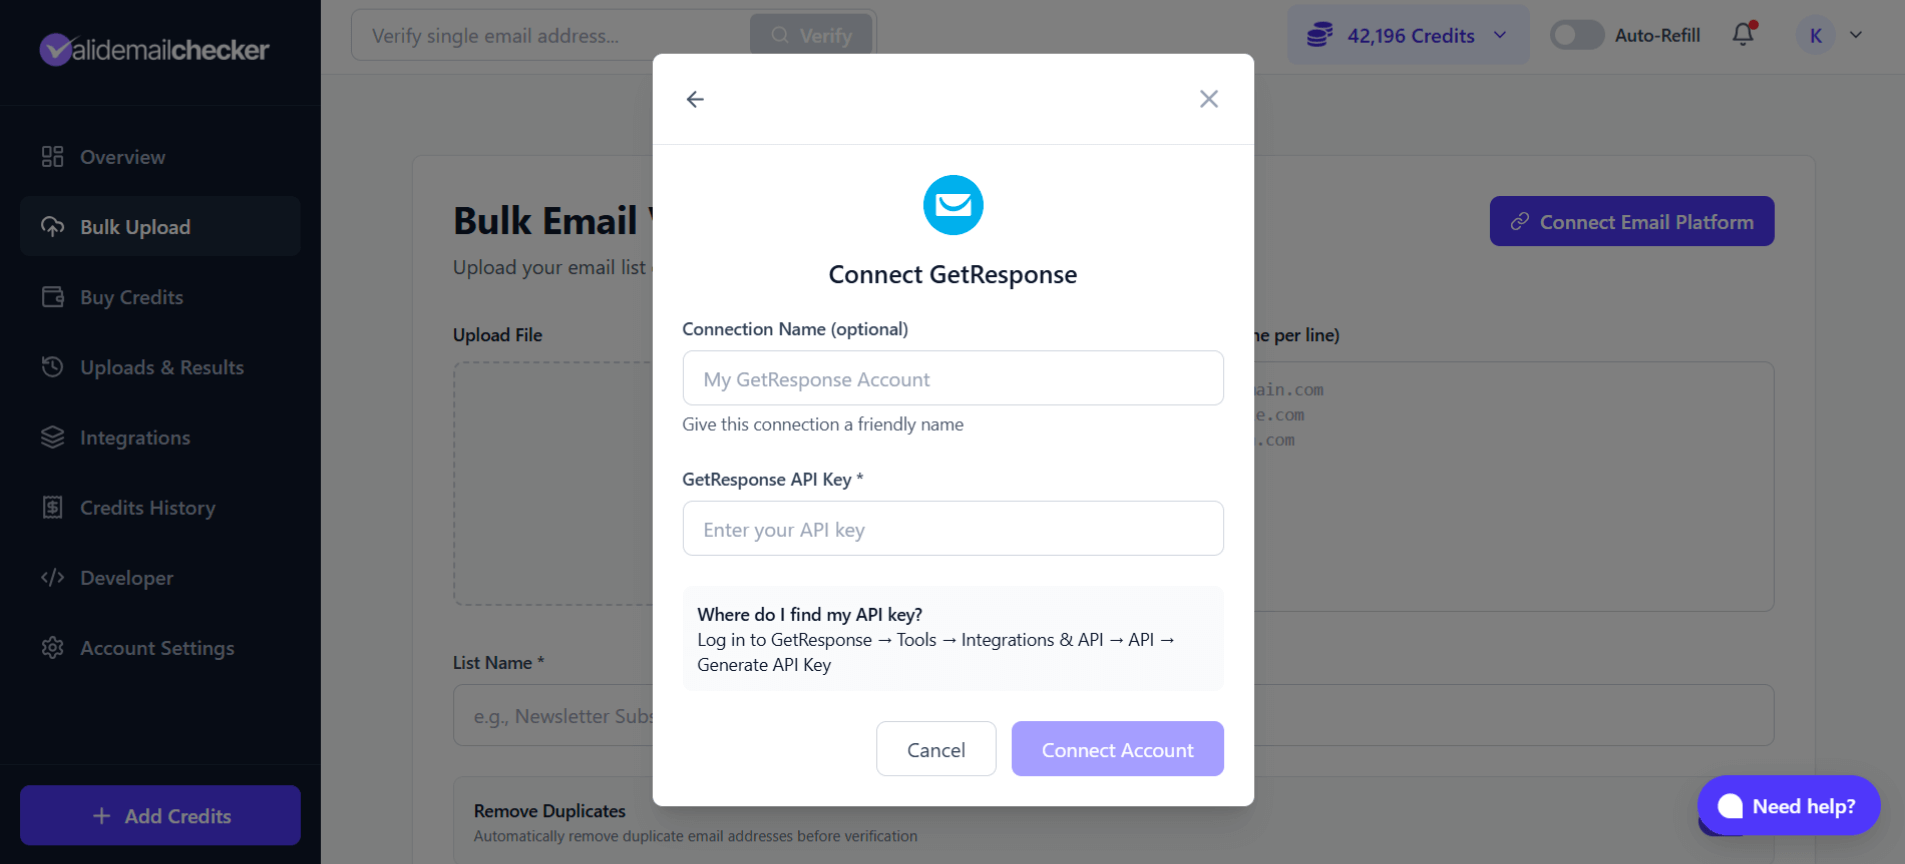
| Field | Description |
|---|---|
| Connection Name | A friendly name like "My GetResponse Account" (optional) |
| GetResponse API Key | Paste the API key you generated |
- Click Connect Account
Valid Email Checker will verify your API key and sync your lists. You'll see a success message when connected.
Step 3: Select a List to Verify
After connecting, you'll see all your GetResponse lists with subscriber counts.
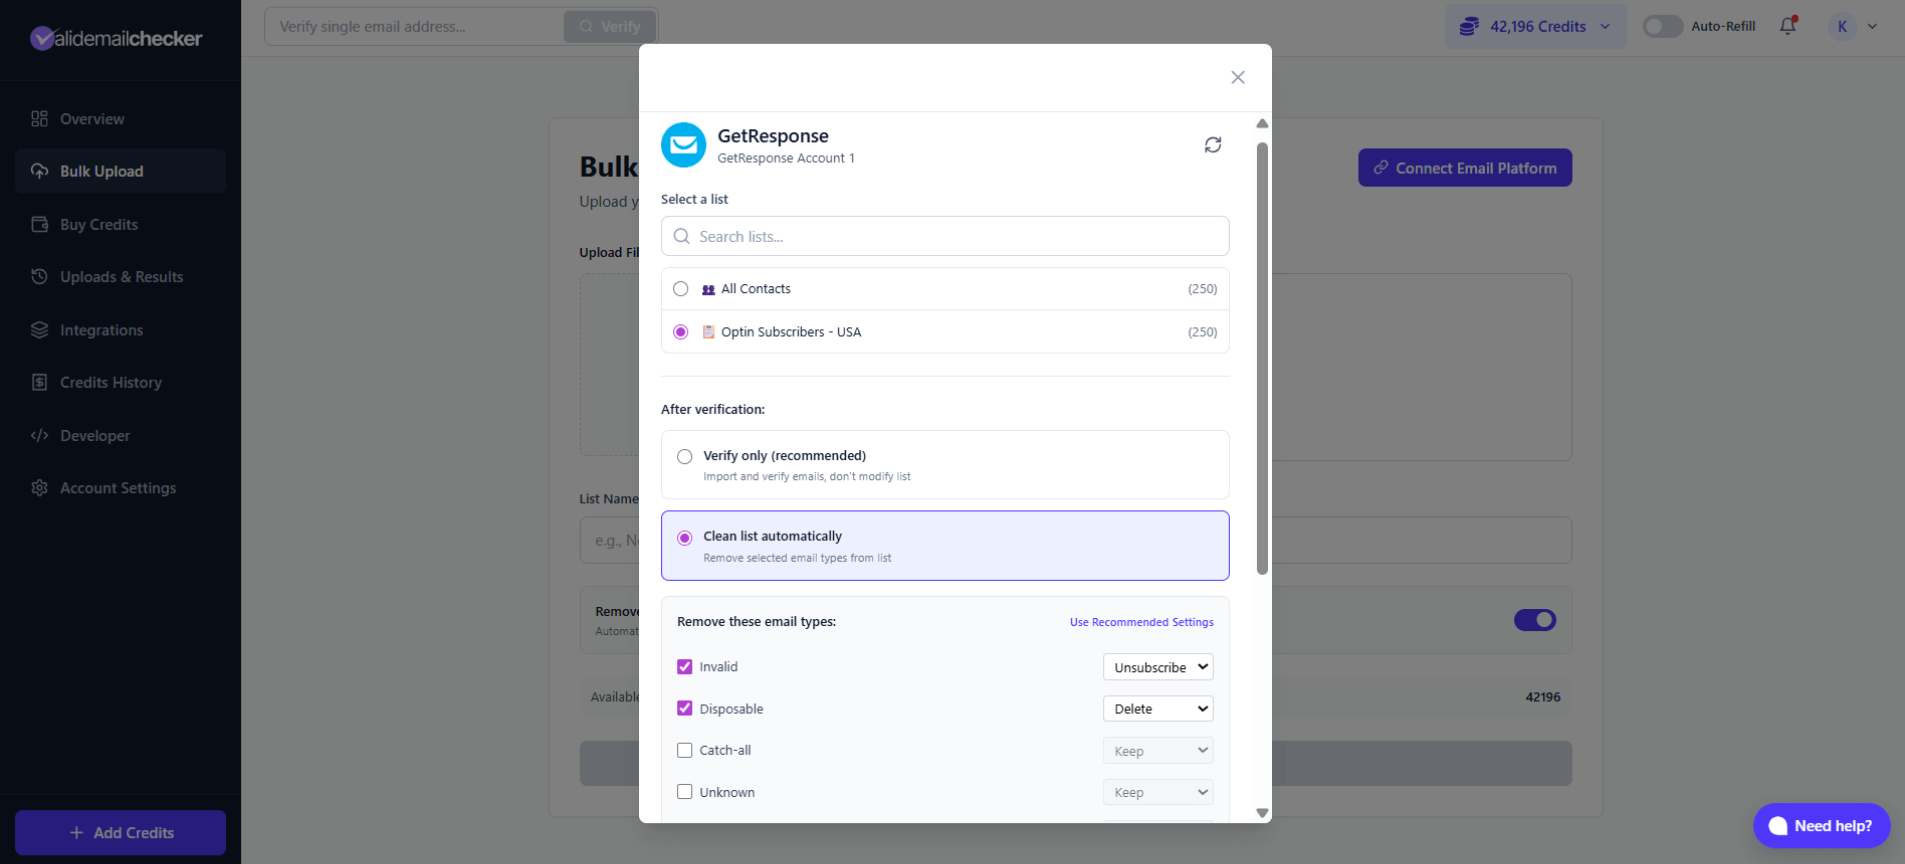
Choose your list:
- Browse or search your available lists
- Each list shows the number of contacts (e.g., "Optin Subscribers - USA (250)")
- Click to select the list you want to verify
Step 4: Choose Your Verification Mode
You have two options for what happens after verification:
Option A: Verify Only
- Imports and verifies your emails
- Does not modify your GetResponse list
- You review results and decide what to do
- Best for: Understanding your list quality first
Option B: Clean List Automatically
- Verifies emails AND automatically updates your GetResponse list
- Removes or unsubscribes problematic addresses based on your settings
- Best for: Ongoing list maintenance once you trust the process
When you select "Clean list automatically," you can configure actions for each email type:
| Email Type | Options | Default | What It Means |
|---|---|---|---|
| Invalid | Keep / Unsubscribe / Delete | Unsubscribe | Emails that don't exist and will bounce |
| Disposable | Keep / Unsubscribe / Delete | Delete | Temporary emails that expire |
| Catch-all | Keep / Unsubscribe / Delete | Keep | Servers that accept any address |
| Unknown | Keep / Unsubscribe / Delete | Keep | Couldn't be verified either way |
When you delete contacts from GetResponse through auto-cleaning, they're removed from that list. Make sure you're comfortable with the settings before proceeding.
Step 5: Start Verification
Once you've selected your list and chosen your mode:
- Click Import List
- You'll be redirected to Uploads & Results
- Watch the progress in real-time
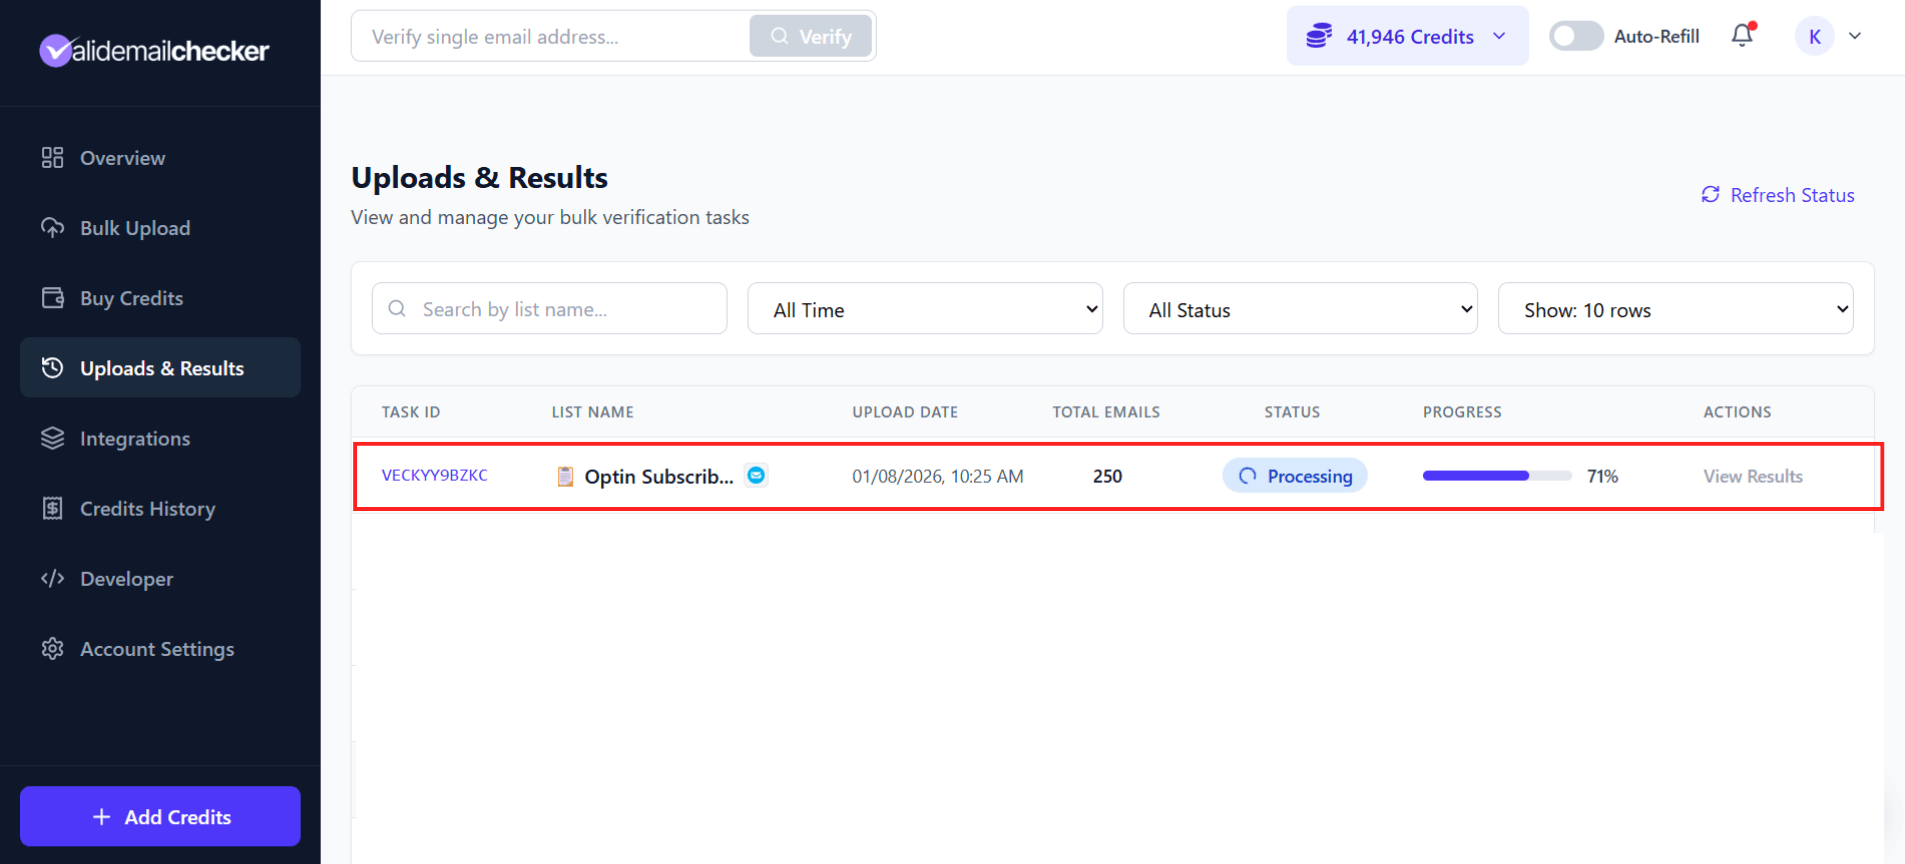
What you'll see:
| Column | Description |
|---|---|
| Task ID | Unique identifier (e.g., VECKYY9BZKC) |
| List Name | Your GetResponse list name |
| Upload Date | When verification started |
| Total Emails | Number of contacts being verified |
| Status | Processing, Completed, Failed, or Deleted |
| Progress | Percentage complete with progress bar |
| Actions | View Results when complete |
The page updates automatically - no need to refresh. Once complete, click View Results to see the breakdown.
Managing Your GetResponse Connection
View All Connections
Go to Integrations in the sidebar to see all your connected platforms.
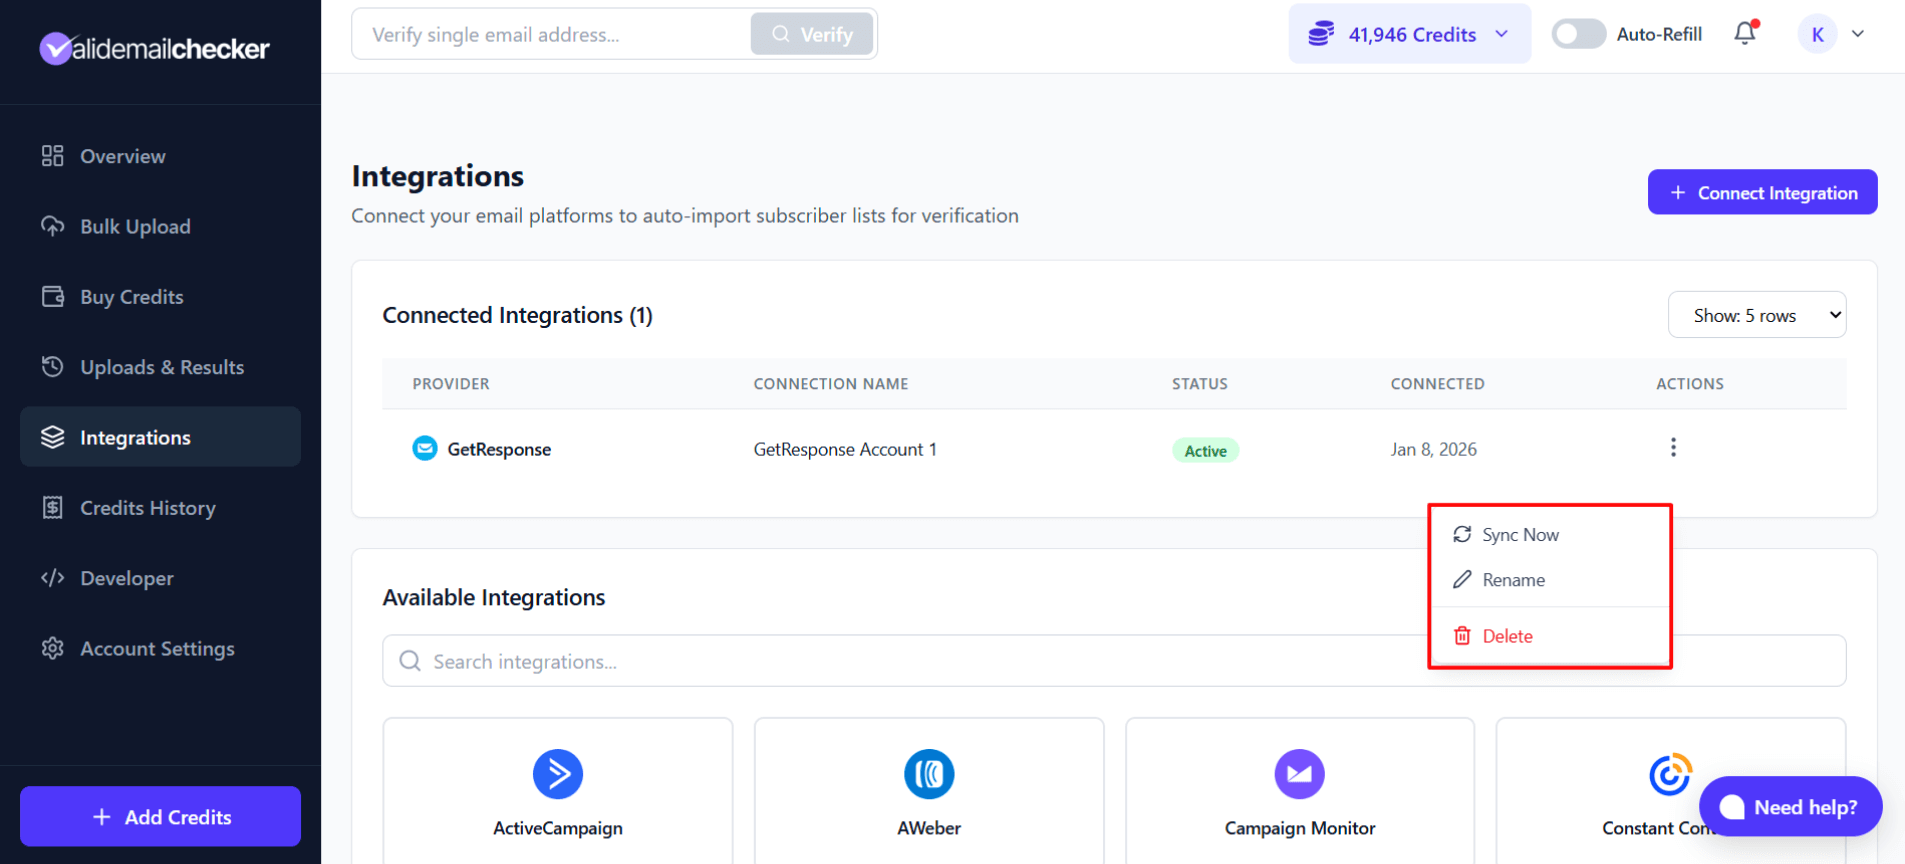
Available Actions
Click the three-dot menu (⋮) next to any connection for options:
| Action | What It Does |
|---|---|
| Sync Now | Refresh your lists from GetResponse (picks up new lists or subscriber count changes) |
| Rename | Change the connection's display name |
| Delete | Remove the connection entirely |
Use Sync Now if you've added new lists in GetResponse or your subscriber counts have changed significantly since connecting.
Connecting Multiple GetResponse Accounts
Managing multiple GetResponse accounts? No problem.
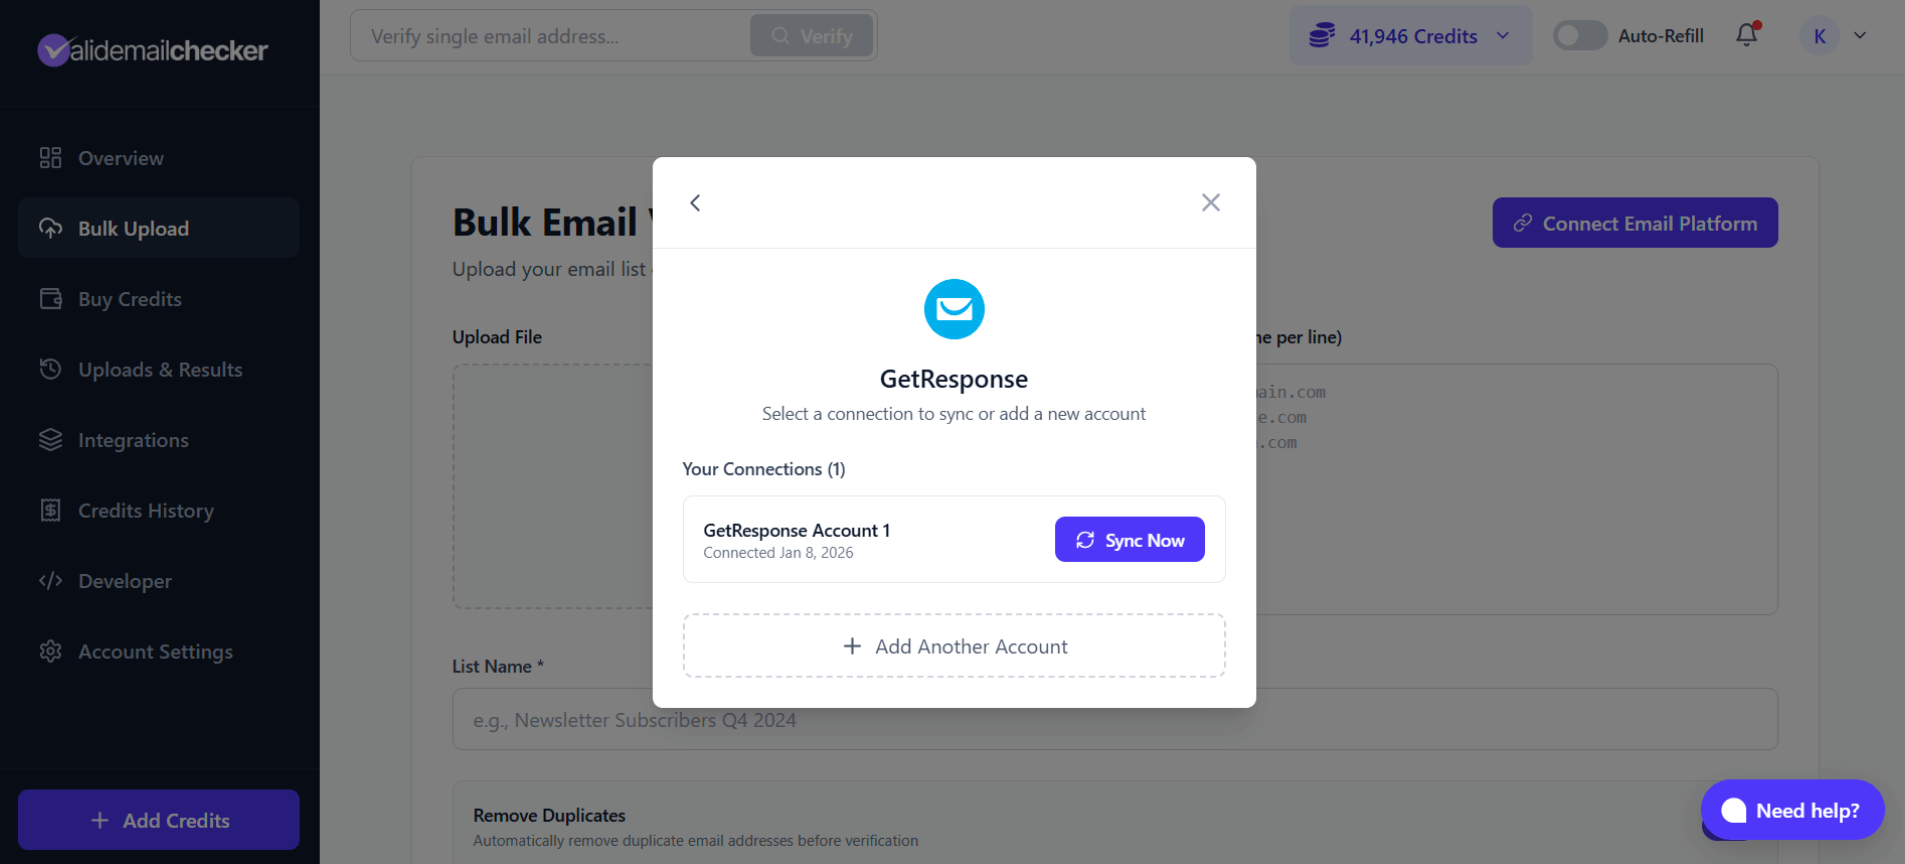
To add another account:
- Go to Integrations or Bulk Upload → Connect Email Platform
- Click GetResponse
- You'll see your existing connections listed
- Click + Add Another Account
- Enter a unique name and the new account's API key
- Click Connect Account
Each connection shows when it was added and has its own Sync Now button.
GetResponse Tips
API Key Best Practices
| Do | Don't |
|---|---|
| Create a dedicated key for Valid Email Checker | Share keys across multiple services |
| Give your key a descriptive name | Use your main account API key |
| Regenerate if you suspect compromise | Share your API key publicly |
GetResponse-Specific Notes
- All Contacts appears as an option - this includes contacts from all your lists
- Lists show accurate subscriber counts synced from GetResponse
- Verification doesn't affect your GetResponse automations or workflows
- Contacts removed via auto-clean are removed from the specific list only
Troubleshooting
"Invalid API key" Error
- Double-check you copied the entire key (no extra spaces)
- Make sure the API key is active in GetResponse
- Generate a new key if the current one isn't working
Lists Not Showing Up
- Click Sync Now to refresh your lists
- Check that your lists have at least one contact in GetResponse
- Verify your API key has proper permissions
Connection Shows "Disconnected"
Your API key may have been revoked or expired in GetResponse:
- Log in to GetResponse
- Go to Tools → Integrations & API → API
- Check if your key is still active
- Generate a new key if needed
- Delete the old connection in Valid Email Checker
- Reconnect with the new key
Verification Taking Too Long
Large lists take longer to process. Estimated times:
| List Size | Estimated Time |
|---|---|
| 100 emails | Seconds |
| 1,000 emails | 1-2 minutes |
| 10,000 emails | 5-10 minutes |
| 100,000 emails | 15-30 minutes |
| 1,000,000 emails | 1-2 hours |
Frequently Asked Questions
Does this affect my GetResponse billing?
No. Valid Email Checker only reads your contact data and optionally removes contacts. It doesn't affect your GetResponse plan or costs.
Can I verify contacts in automations or workflows?
The integration verifies contacts in your lists. Contacts in active automations are included if they're part of a synced list.
What happens to removed contacts?
Contacts removed via auto-clean are:
- Unsubscribed: Marked as unsubscribed in that list
- Deleted: Permanently removed from that list
Unsubscribed contacts can be found in your GetResponse suppression list.
Can I undo auto-cleaning?
Unsubscribed contacts can be resubscribed manually in GetResponse. Deleted contacts cannot be recovered - they would need to opt in again.
How often should I verify my GetResponse lists?
We recommend:
- Monthly for active lists receiving new subscribers
- Before major campaigns for maximum deliverability
- Quarterly for lists with minimal new additions
Next Steps
- Understanding Your Results - Learn what each status means
- Catch-All Emails Explained - Special handling for catch-all addresses
- Credits & Billing - How credits work with integrations