Drip Integration
Drip is an ecommerce-focused email marketing automation platform known for its powerful workflows, visual campaign builders, and deep integrations with online stores. If you're running automated sequences, abandoned cart emails, or customer lifecycle campaigns, your subscriber quality directly impacts your results.
Here's the thing about marketing automation: bad emails don't just bounce—they can break your entire workflow. An invalid email entering a 10-step nurture sequence means 10 wasted sends, skewed analytics, and potentially damaged sender reputation.
Valid Email Checker's Drip integration lets you verify your entire subscriber base or specific tagged segments, then automatically clean your lists without leaving your dashboard.
What You Can Do
With the Drip integration, you can:
- Import all active subscribers for verification (your entire Drip database)
- Import subscribers by tag for targeted verification
- Verify only — Check email quality and download results
- Clean automatically — Remove or unsubscribe invalid emails directly in Drip
- Connect multiple Drip accounts — Manage several accounts from one dashboard
Before You Start
Make sure you have:
- A Drip account with subscribers
- Access to your Drip API Token (we'll show you where to find it)
- Enough Valid Email Checker credits for your list size
1 credit = 1 email verified. Check your subscriber count in Drip before importing.
Finding Your Drip API Token
Drip uses an API Token for authentication. Here's how to find yours:
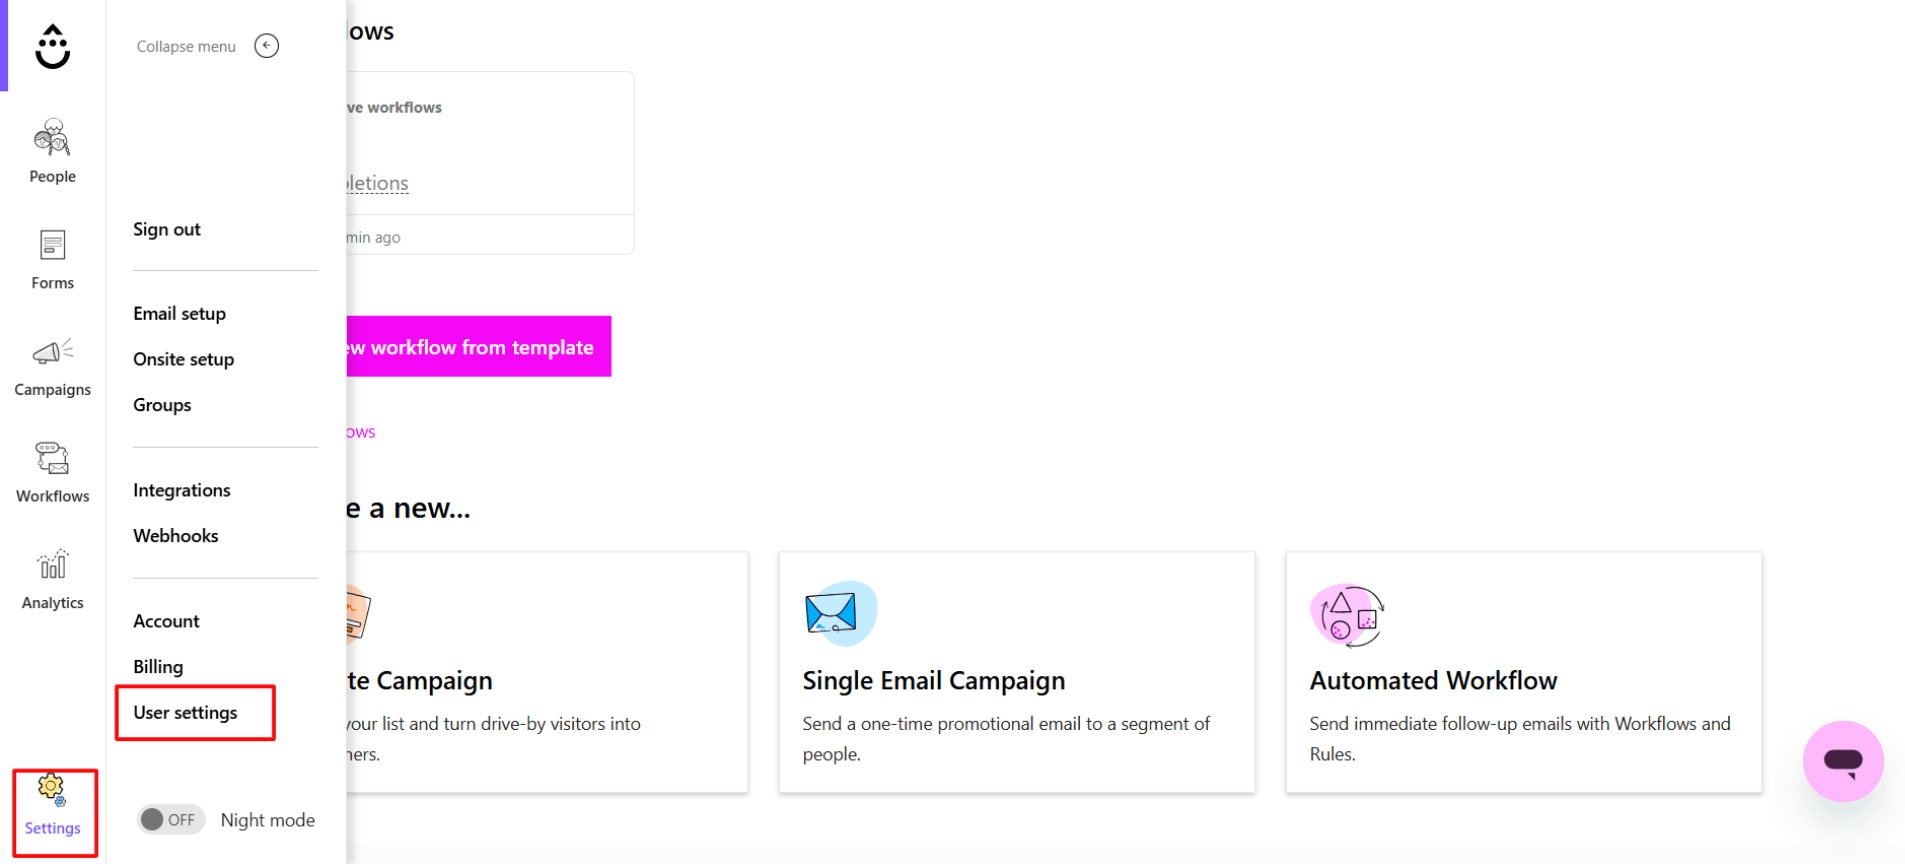
Step 1: Access Settings
Log in to your Drip account and click Settings (gear icon) in the bottom-left corner of the sidebar. Then click User settings.
Step 2: Copy Your API Token
In the User Info section, scroll down to find your API Token. This is a long string of characters—copy it exactly as shown.
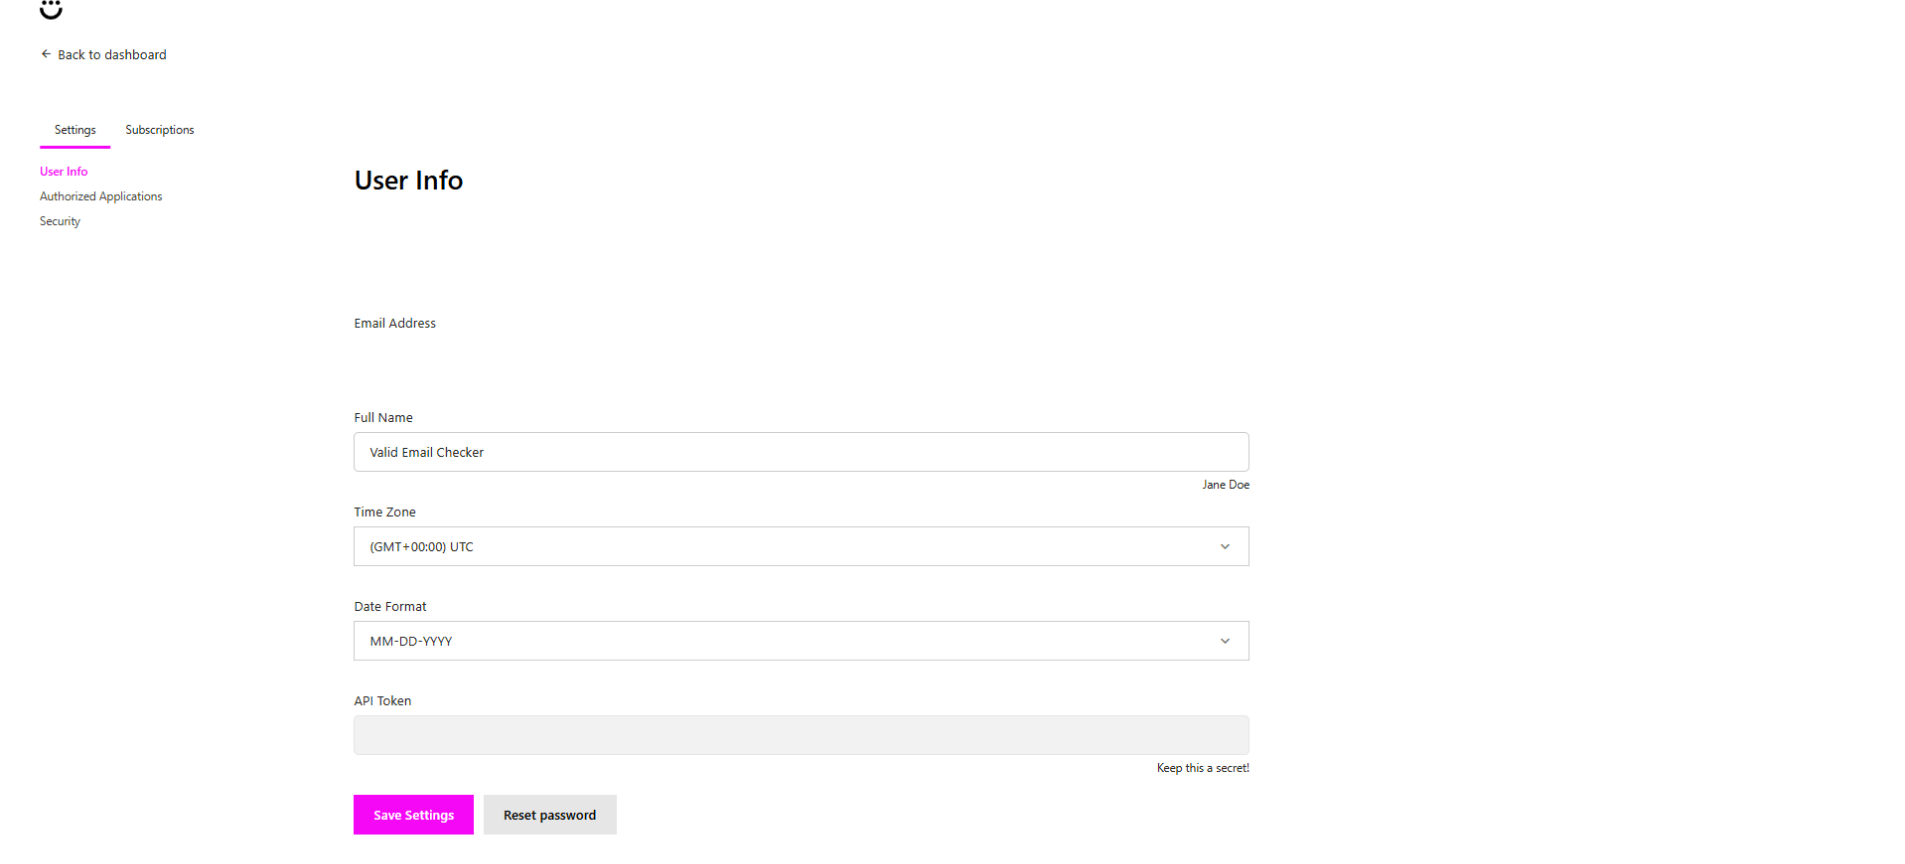
Your API Token provides full access to your Drip account. Never share it publicly or commit it to version control. If you think it's been compromised, regenerate it immediately in Drip.
Connecting Your Drip Account
Now let's connect Drip to Valid Email Checker.
Option A: From the Integrations Page
- Go to Integrations in the Valid Email Checker sidebar
- Find Drip in the Available Integrations section
- Click to open the connection modal
Option B: From Bulk Upload
- Go to Bulk Upload
- Click Connect Email Platform in the top-right
- Select Drip from the platform list
Enter Your Credentials
In the connection modal:
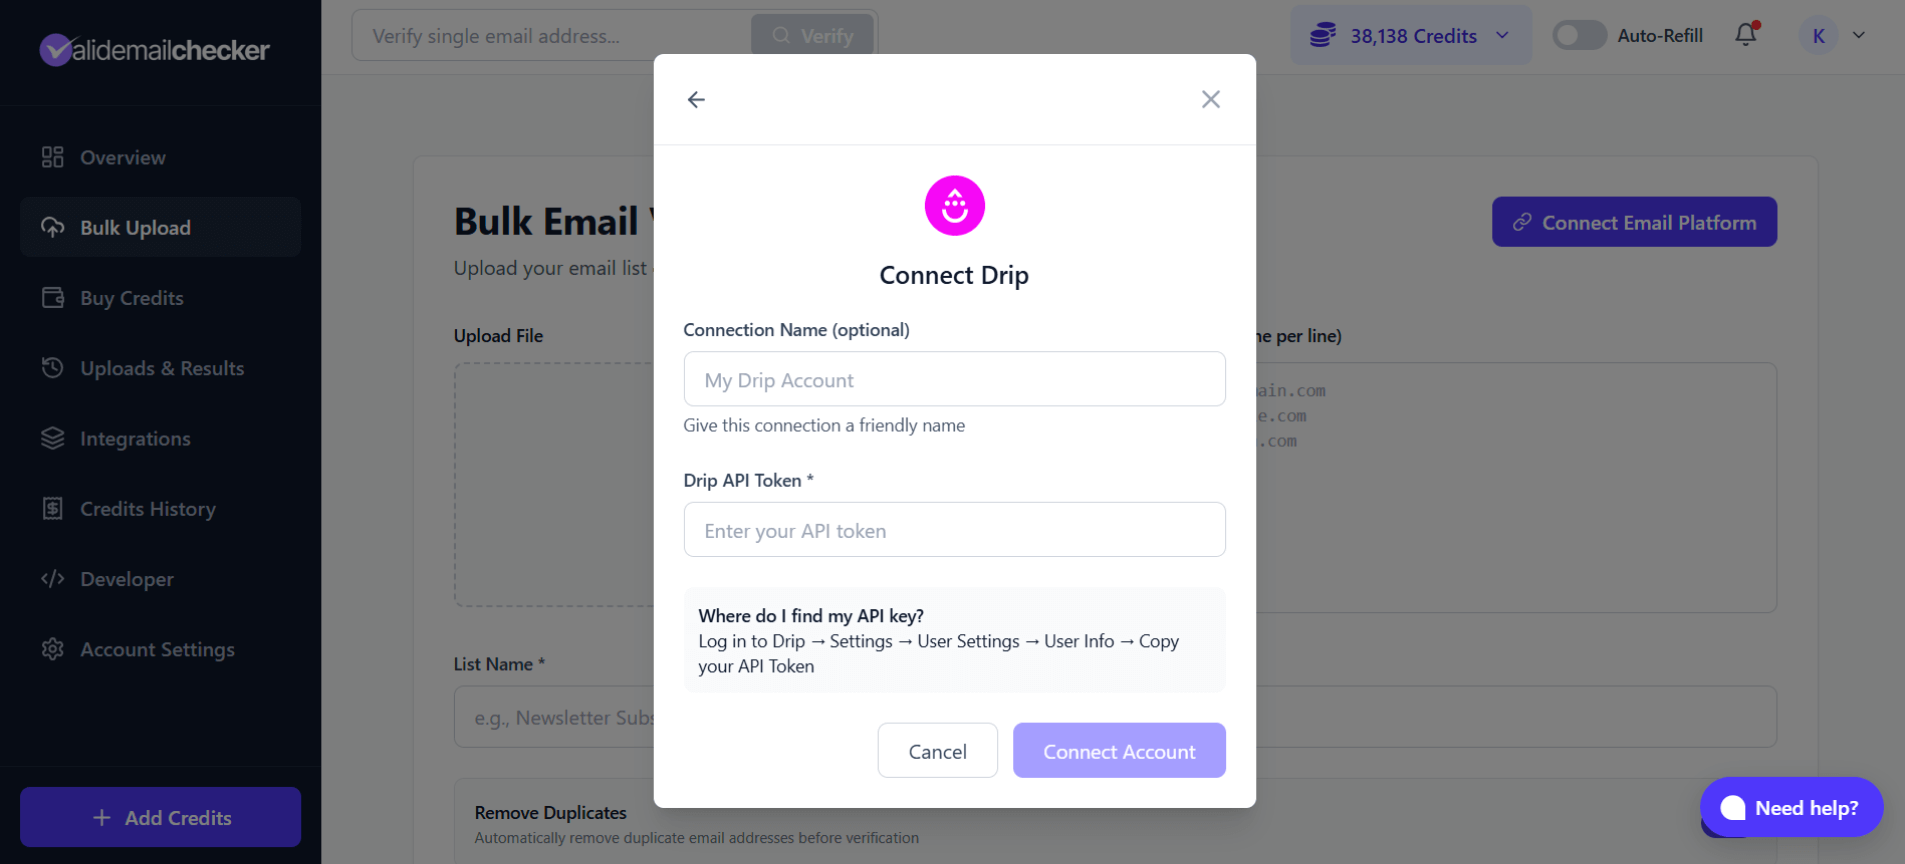
| Field | What to Enter |
|---|---|
| Connection Name | A friendly name like "Main Drip Account" or "Ecommerce Store" (optional but recommended) |
| Drip API Token | Paste your API Token from User Settings |
Click Connect Account and Valid Email Checker will verify your credentials and sync your available lists.
Understanding Drip's List Structure
Drip organizes subscribers differently than traditional list-based platforms. Instead of separate lists, Drip uses:
- All Active Subscribers — Your entire subscriber database
- Tags — Labels applied to subscribers for segmentation
When you connect, Valid Email Checker shows both options:
| Option | What It Contains |
|---|---|
| All Active Subscribers | Every active subscriber in your Drip account |
| Tag: [Tag Name] | Only subscribers with that specific tag |
If you have subscribers organized by tags like "Newsletter," "Purchased," or "Lead Magnet," you can verify each segment independently. This is great for prioritizing your most engaged subscribers.
Verifying Your Drip Subscribers
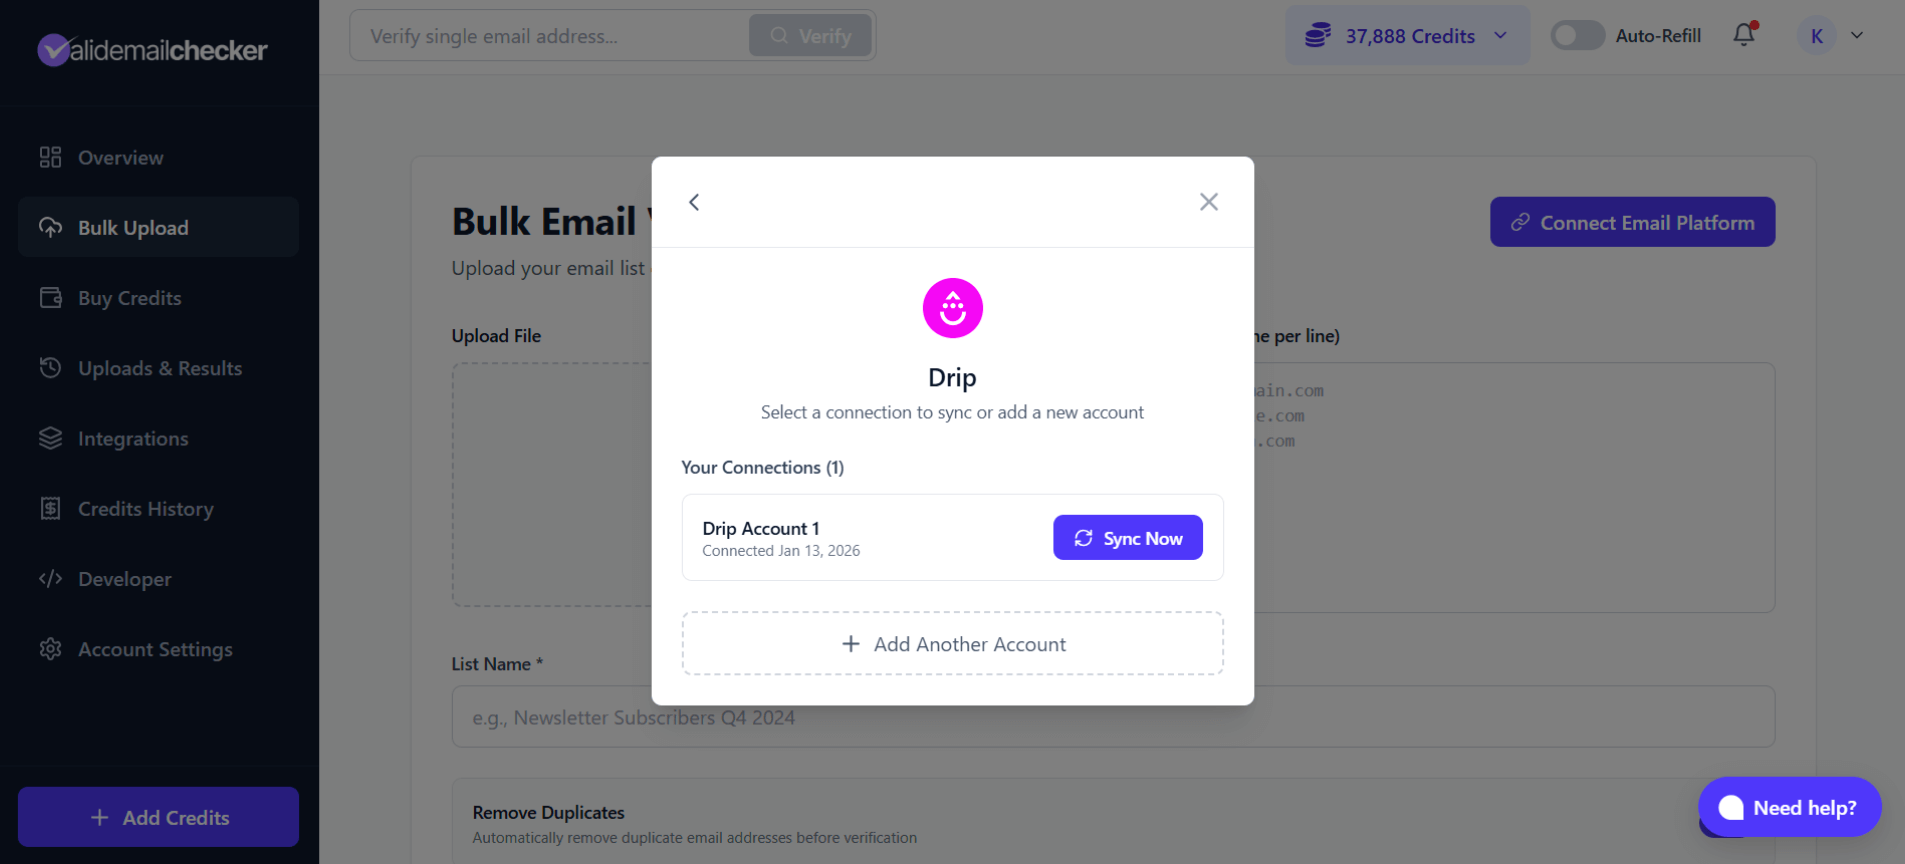
Step 1: Select a List
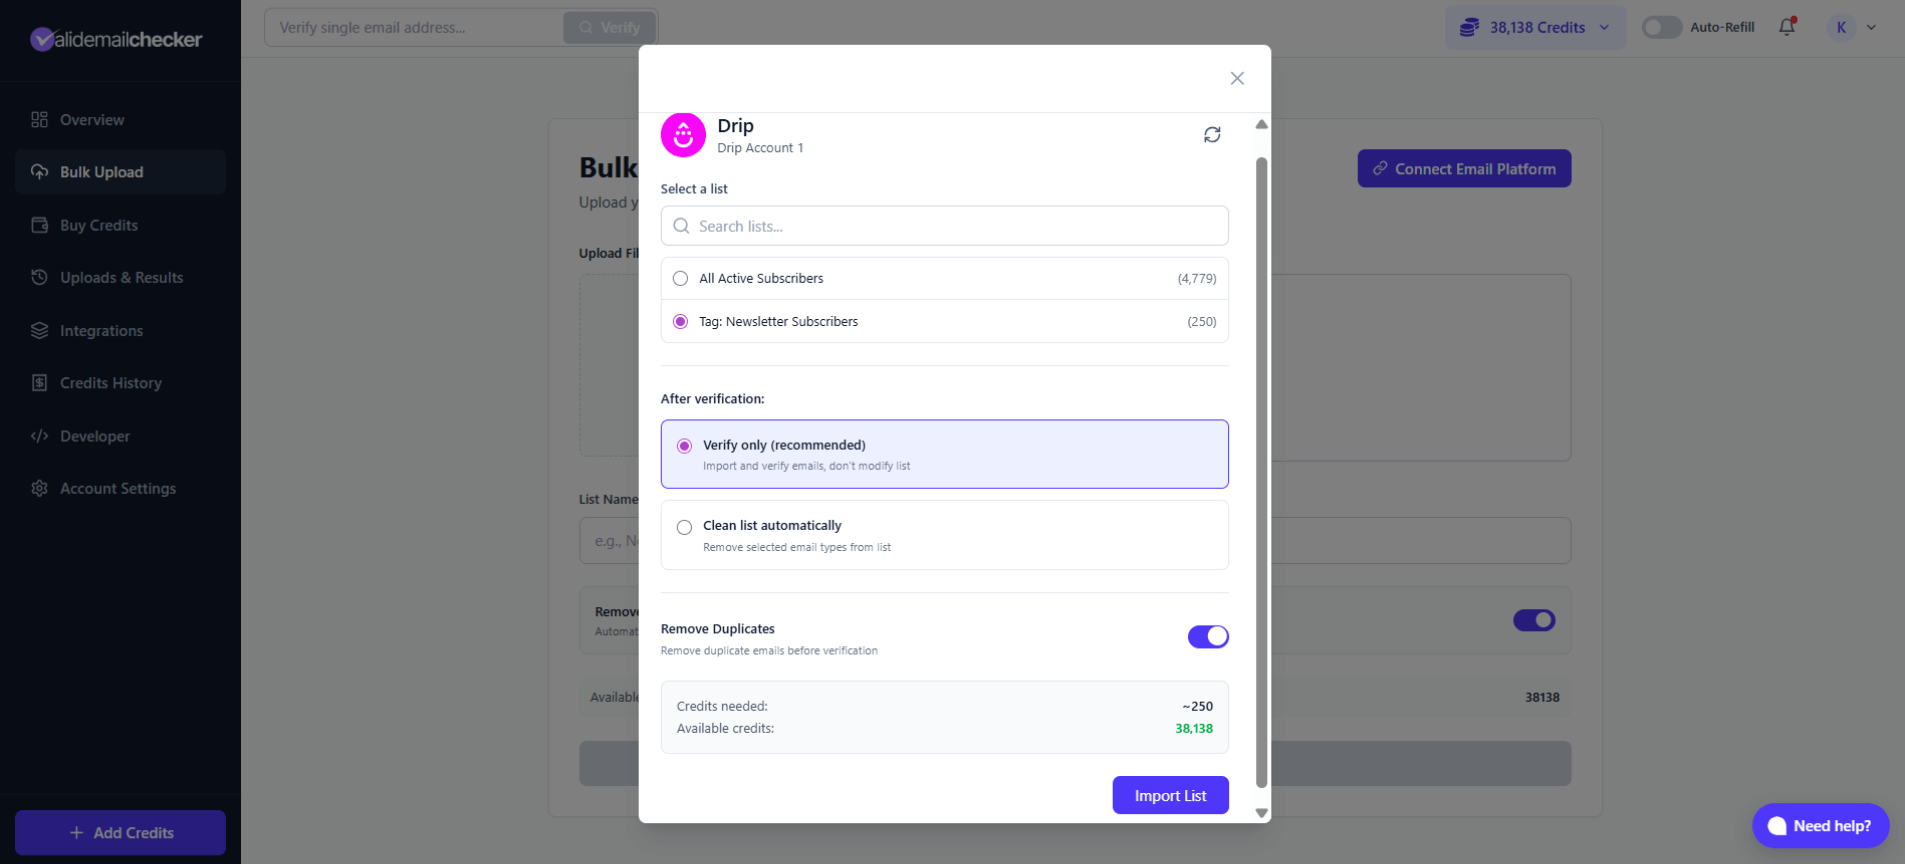
After connecting, click Sync Now to refresh your subscriber data, then select:
- All Active Subscribers — Verify everyone
- Tag: [Name] — Verify a specific segment
The subscriber count appears next to each option.
Step 2: Choose Your Verification Option
Verify only
- Imports and verifies all emails
- No changes made to your Drip account
- Download results to review before taking action
- Best for: Understanding your list quality first
Clean list automatically
- Verifies AND removes/unsubscribes bad emails
- Changes are made directly in Drip
- Best for: Regular maintenance once you trust the process
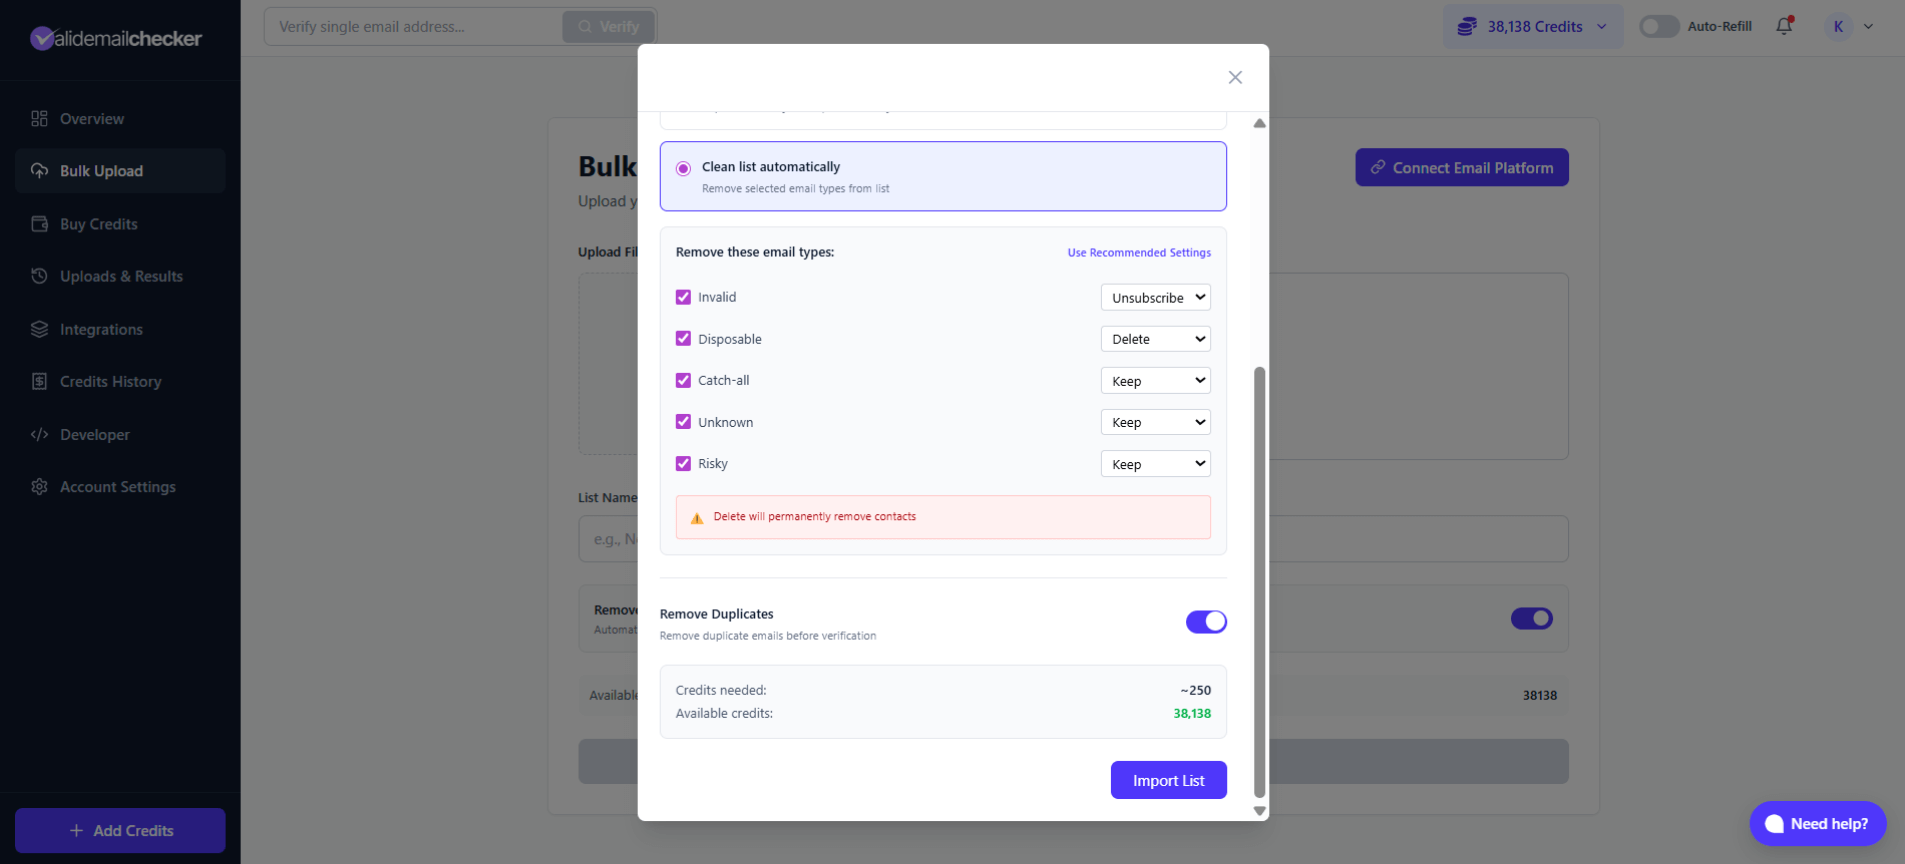
Step 3: Configure Automatic Cleaning (If Selected)
If you choose "Clean list automatically," you'll see options for each email type:
| Email Type | Default | What Happens in Drip |
|---|---|---|
| Invalid | Unsubscribe | Globally unsubscribed from all mailings |
| Disposable | Delete | Permanently removed from Drip |
| Catch-all | Keep | No action (risky but might be valid) |
| Unknown | Keep | No action (couldn't verify) |
| Risky | Keep | No action (proceed with caution) |
- Delete permanently removes the subscriber from Drip entirely
- Unsubscribe keeps the record but stops all email communications
For most cases, Unsubscribe is safer for Invalid emails (maintains history), while Delete works well for Disposable emails (fake/temporary addresses you don't want in your database).
Step 4: Import and Verify
- Toggle Remove Duplicates (recommended)
- Review the credits needed
- Click Import List
You'll be redirected to the Uploads & Results page to monitor progress.
Monitoring Your Verification
After importing, track your verification in real-time:
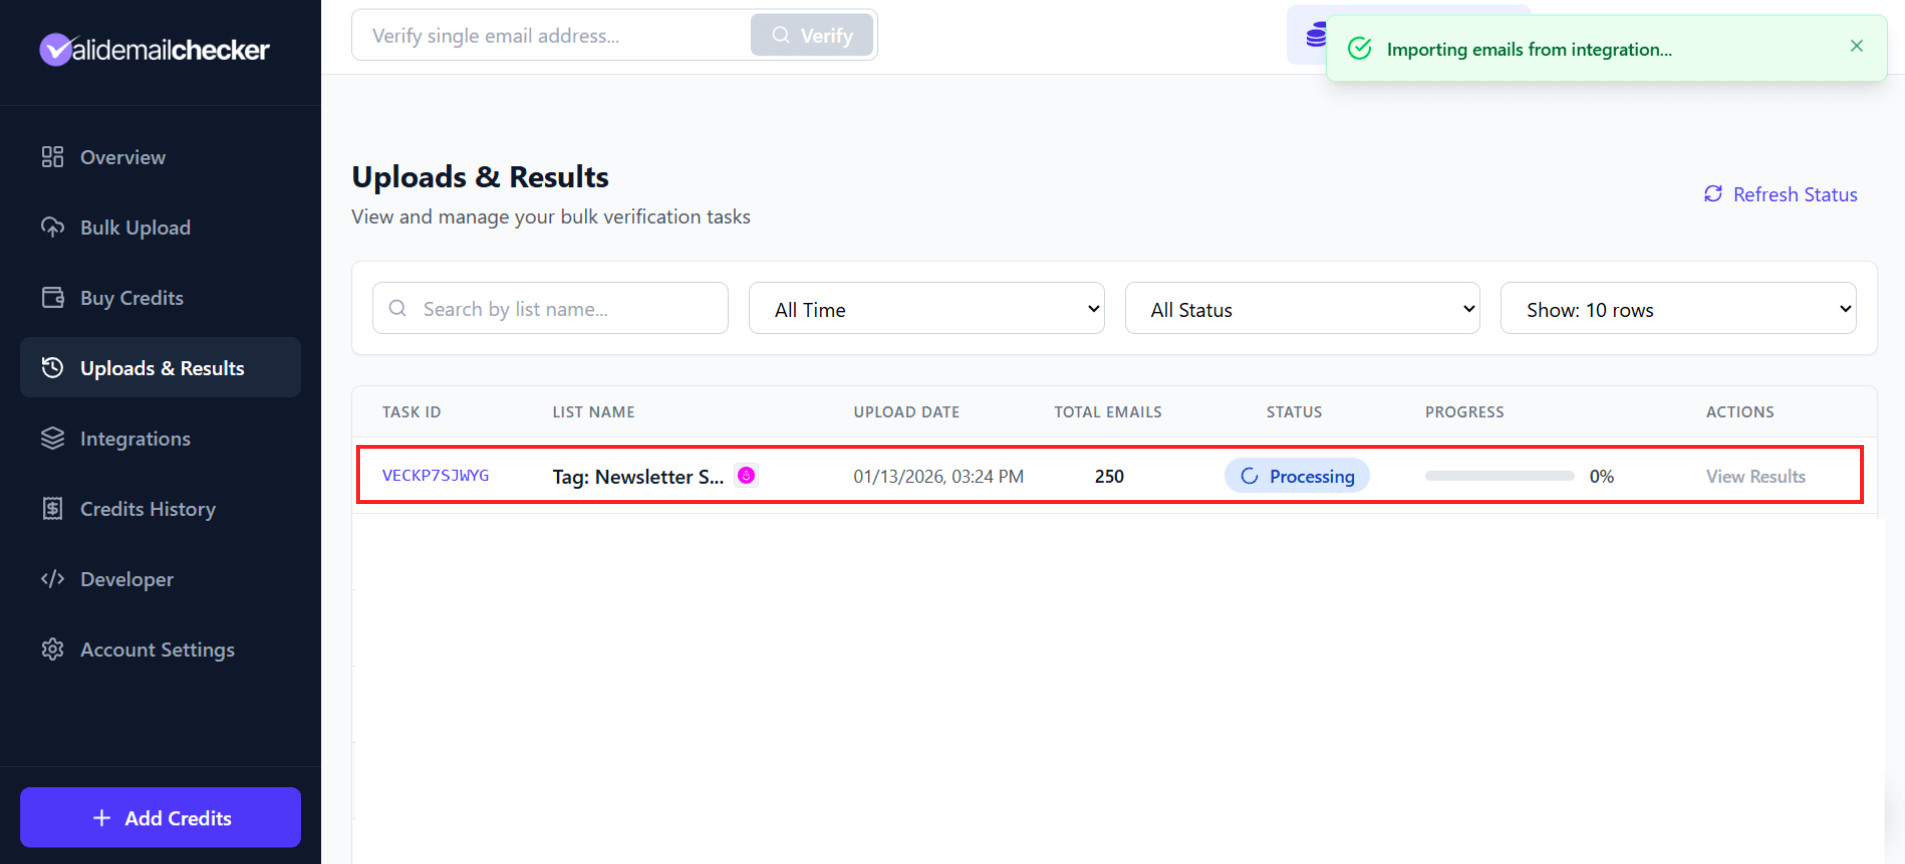
| Column | Description |
|---|---|
| Task ID | Unique identifier for this verification |
| List Name | Shows "Tag: [Name]" for tagged imports |
| Total Emails | Number of subscribers imported |
| Status | Processing, Completed, Completed with Warning, Failed, or Deleted |
| Progress | Percentage complete |
The Drip icon indicates this is an integration import (vs. a file upload).
The progress updates automatically. Go grab a coffee—we'll handle the verification.
Understanding Your Results
Once verification completes, click View Results to see the breakdown:
| Status | What It Means | Recommended Action |
|---|---|---|
| Safe | Valid, deliverable email | Keep and email confidently |
| Invalid | Doesn't exist, will bounce | Remove from Drip |
| Disposable | Temporary/throwaway email | Delete from Drip |
| Catch-all | Server accepts all addresses | Test carefully |
| Role | Generic address (info@, support@) | Keep but expect lower engagement |
| Unknown | Couldn't verify | Keep but monitor |
| Risky | May have issues | Proceed with caution |
For detailed explanations of each status, see Result Types Explained.
Managing Your Drip Connection
Viewing Connected Accounts
Go to Integrations to see all your connected Drip accounts:
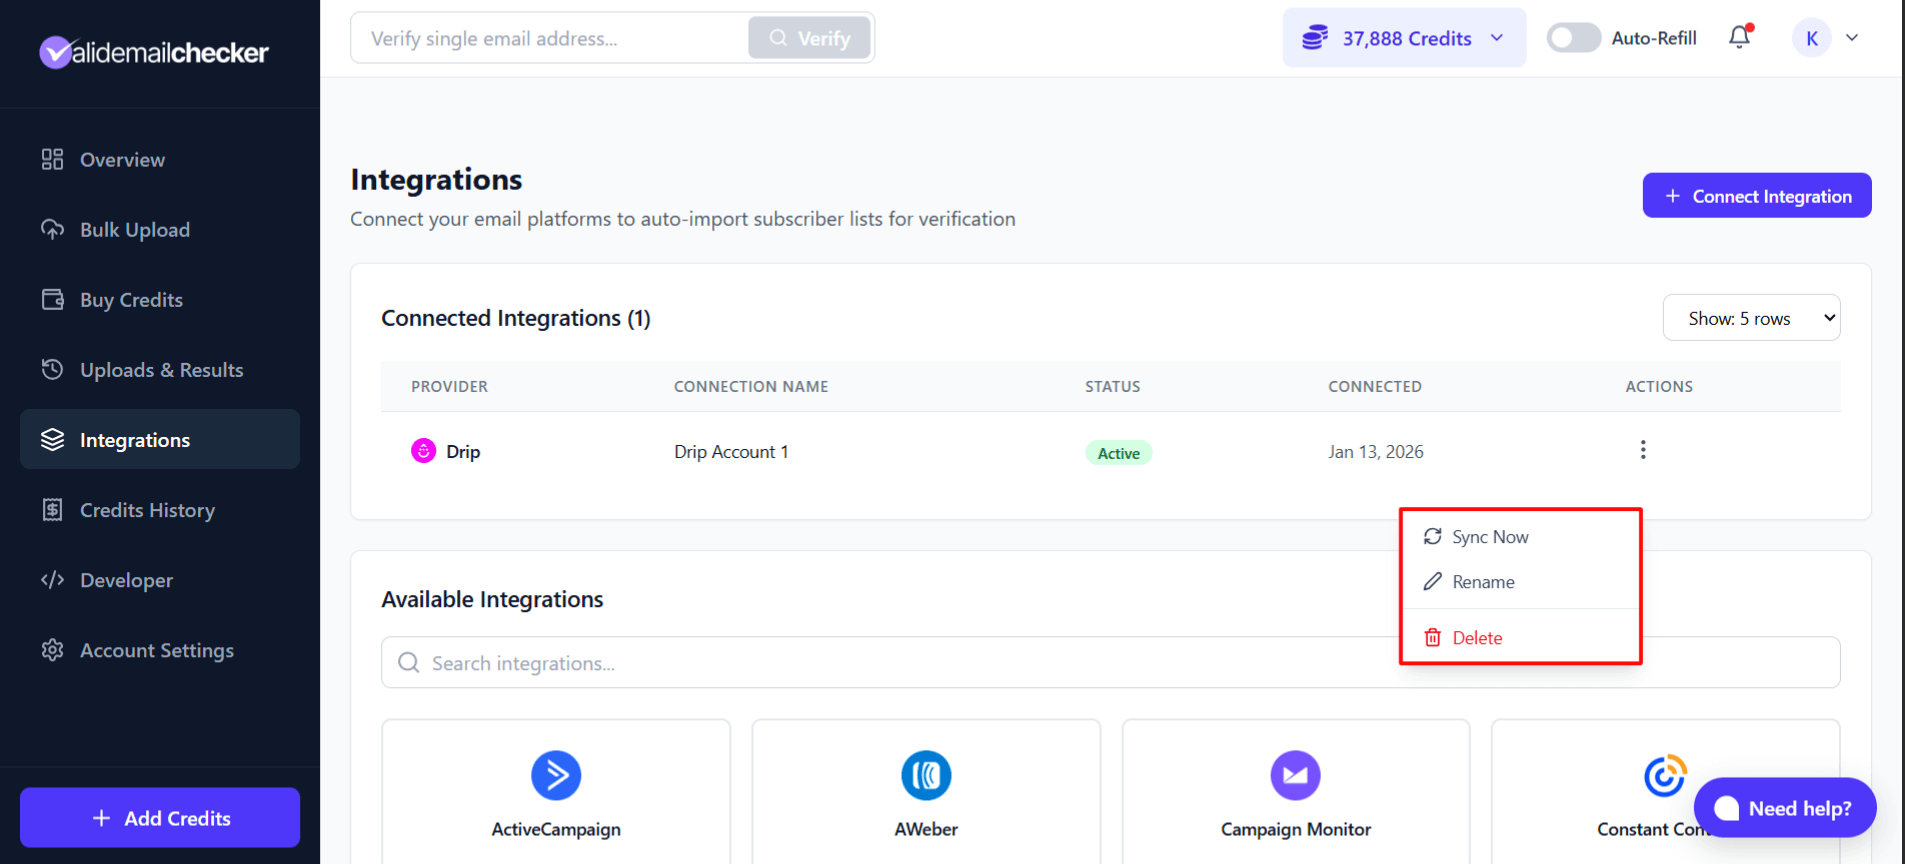
Available Actions
Click the three-dot menu on any connection:
| Action | What It Does |
|---|---|
| Sync Now | Refresh subscriber lists and counts from Drip |
| Rename | Change the connection name |
| Delete | Remove the connection (doesn't affect your Drip account) |
Connecting Multiple Accounts
Managing multiple Drip accounts or want to separate connections? Click + Add Another Account to connect additional Drip accounts.
Each connection needs a unique name so you can tell them apart.
Troubleshooting
"Invalid API Token" Error
- Double-check the token — Copy it again from Drip → Settings → User settings → API Token
- No extra spaces — Make sure you didn't accidentally copy whitespace
- Account access — Ensure your Drip user has API access enabled
No Subscribers Found
- Check your subscription status — Are subscribers set to "Active" in Drip?
- Sync again — Click the refresh icon to re-fetch from Drip
- Tag names — If filtering by tag, ensure the tag has active subscribers
Cleaning Actions Not Working
- API permissions — Your API token needs full account access
- Subscriber status — Only active subscribers can be modified
- Rate limits — Drip allows 3,600 API requests/hour; large lists are processed gradually
Tags Not Appearing
- Empty tags — Tags with no active subscribers won't appear
- Sync required — Click Sync Now to refresh tag data
- Tag sampling — For very large accounts, we sample tags from the first several thousand subscribers
Frequently Asked Questions
Does this affect my Drip automations?
- Verify only: No impact. Nothing changes in Drip.
- Clean automatically: Yes. Deleted/unsubscribed contacts will be removed from active workflows.
Can I verify subscribers in a specific workflow?
Currently, we import by account-wide subscribers or tags. To verify workflow-specific subscribers, add a unique tag to those contacts in Drip, then verify that tag in Valid Email Checker.
What's the difference between Delete and Unsubscribe in Drip?
| Action | Effect | When to Use |
|---|---|---|
| Delete | Permanently removes subscriber and all their data | Disposable/fake emails you never want back |
| Unsubscribe | Keeps record but stops all mailings | Invalid emails where you want to preserve history |
Can I reconnect a deleted integration?
Yes! Deleting a connection in Valid Email Checker only removes it from our system. Your Drip account is unaffected. Simply connect again with your API token.
Will this work with Drip's EU data center?
Yes. The Drip API handles routing automatically based on your account settings.
Next Steps
Now that your Drip integration is set up:
- Review your results — Download and analyze your verification data
- Understand catch-all emails — Learn how to handle these risky addresses
- Set up auto-refill — Never run out of credits mid-verification
- Check other integrations — Connect your other email platforms
Need Help?
Running into issues with your Drip integration? We're here to help:
- Live Chat — Click "Need help?" in the bottom-right corner
- Email — support@validemailchecker.com
- Help Center — Browse our troubleshooting guides