SendGrid Integration
SendGrid (now part of Twilio) is one of the most powerful email delivery platforms out there. Whether you're using it for transactional emails, marketing campaigns, or both, keeping your contact lists clean is essential for maintaining that stellar sender reputation SendGrid is known for.
This guide walks you through connecting your SendGrid account to Valid Email Checker so you can verify and clean your marketing contacts directly.
What You Can Do
With the Valid Email Checker SendGrid integration, you can:
- Import contacts directly from your SendGrid Marketing Campaigns
- Verify email addresses without downloading or uploading files
- Automatically clean lists by removing or unsubscribing bad emails
- Connect multiple SendGrid accounts if you manage several
- Sync anytime to verify new contacts as your lists grow
Before You Start
Make sure you have everything ready:
| Requirement | Details |
|---|---|
| SendGrid account | Free or paid plan with Marketing Campaigns enabled |
| API key | Full Access permission recommended |
| Valid Email Checker credits | Enough for your list size |
| Contacts in SendGrid | At least one list or contacts to verify |
Finding Your SendGrid API Key
SendGrid uses API keys for secure access. Here's how to create one:
Step 1: Access API Keys
Log in to your SendGrid account and navigate to:
Settings → API Keys

If you haven't created any API keys yet, you'll see the "Get started creating API Keys" message.
Step 2: Create a New API Key
Click the Create API Key button in the top right corner.
You'll see a modal with these options:
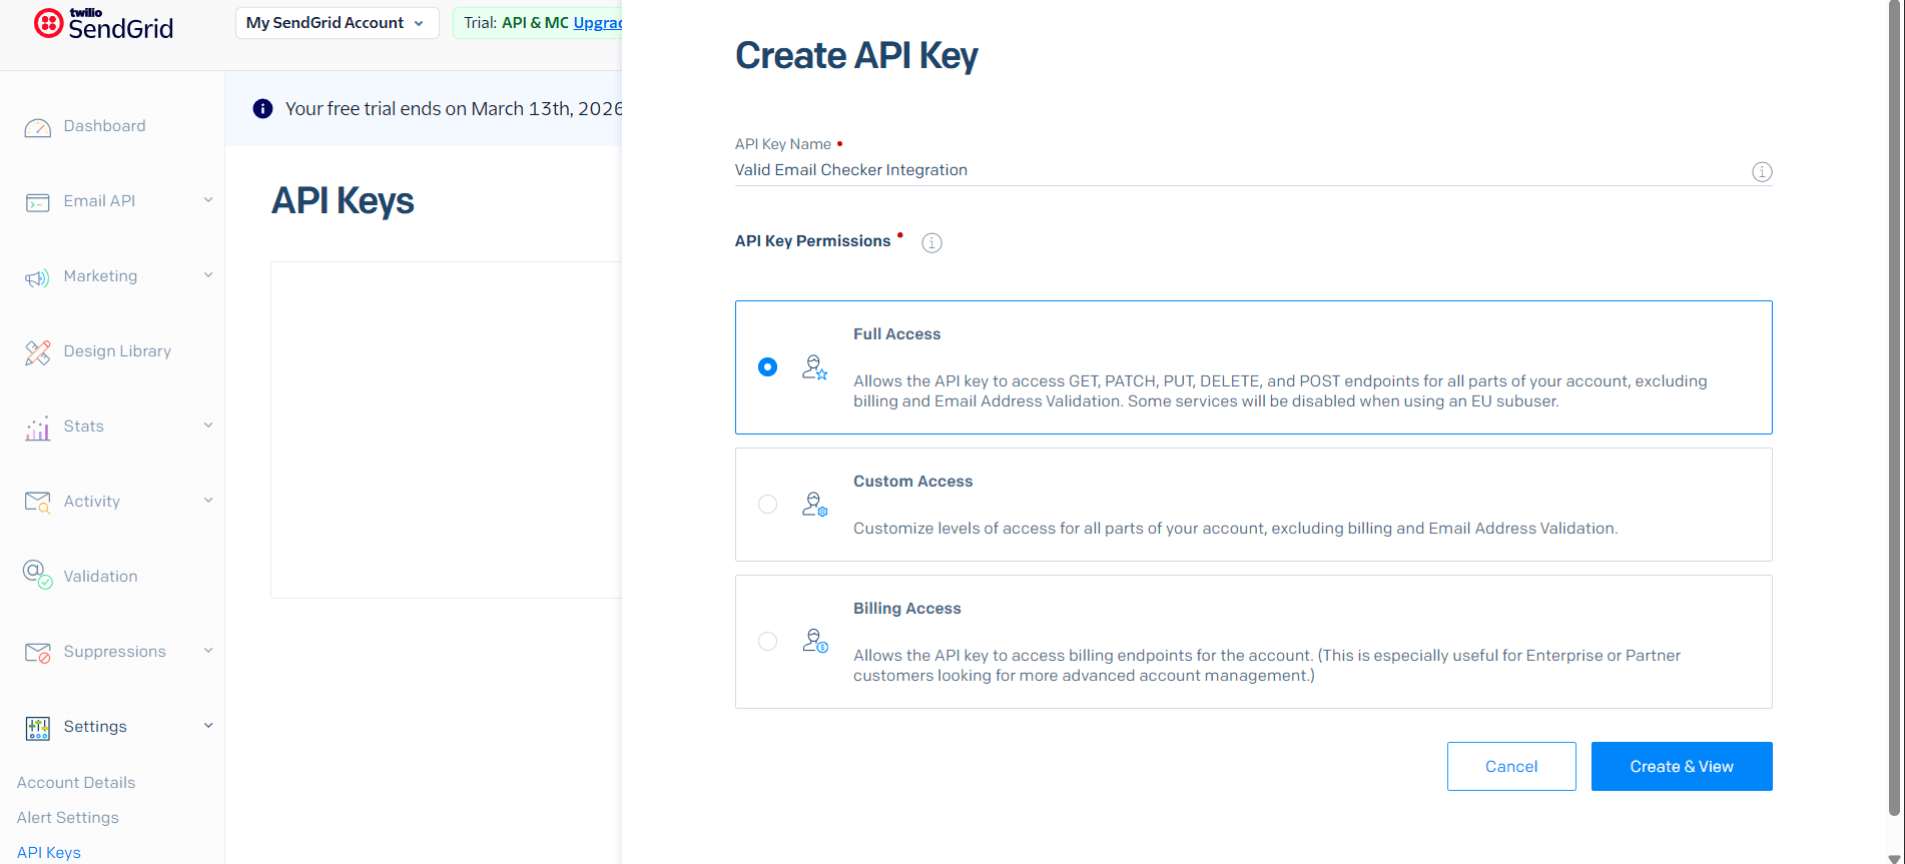
Fill in the details:
- API Key Name - Give it a descriptive name like "Valid Email Checker Integration"
- API Key Permissions - Select one of the following:
| Permission Level | Description | Recommended? |
|---|---|---|
| Full Access | Access to all account features except billing | ✅ Yes |
| Custom Access | Choose specific permissions | Works if you enable Marketing |
| Billing Access | Only billing endpoints | ❌ No |
For the smoothest experience, select Full Access. This ensures Valid Email Checker can read your contact lists and apply changes after verification.
Step 3: Save Your API Key
Click Create & View to generate your API key.
SendGrid only shows your API key once when you create it. Copy it immediately and store it somewhere safe. If you lose it, you'll need to create a new one.
Connecting Your SendGrid Account
Now let's connect SendGrid to Valid Email Checker.
Step 1: Open the Integration
You can connect from two places:
Option A: Go to Integrations in the sidebar → Click SendGrid
Option B: Go to Bulk Upload → Click Connect Email Platform → Select SendGrid
Step 2: Enter Your Credentials
The connection modal appears:
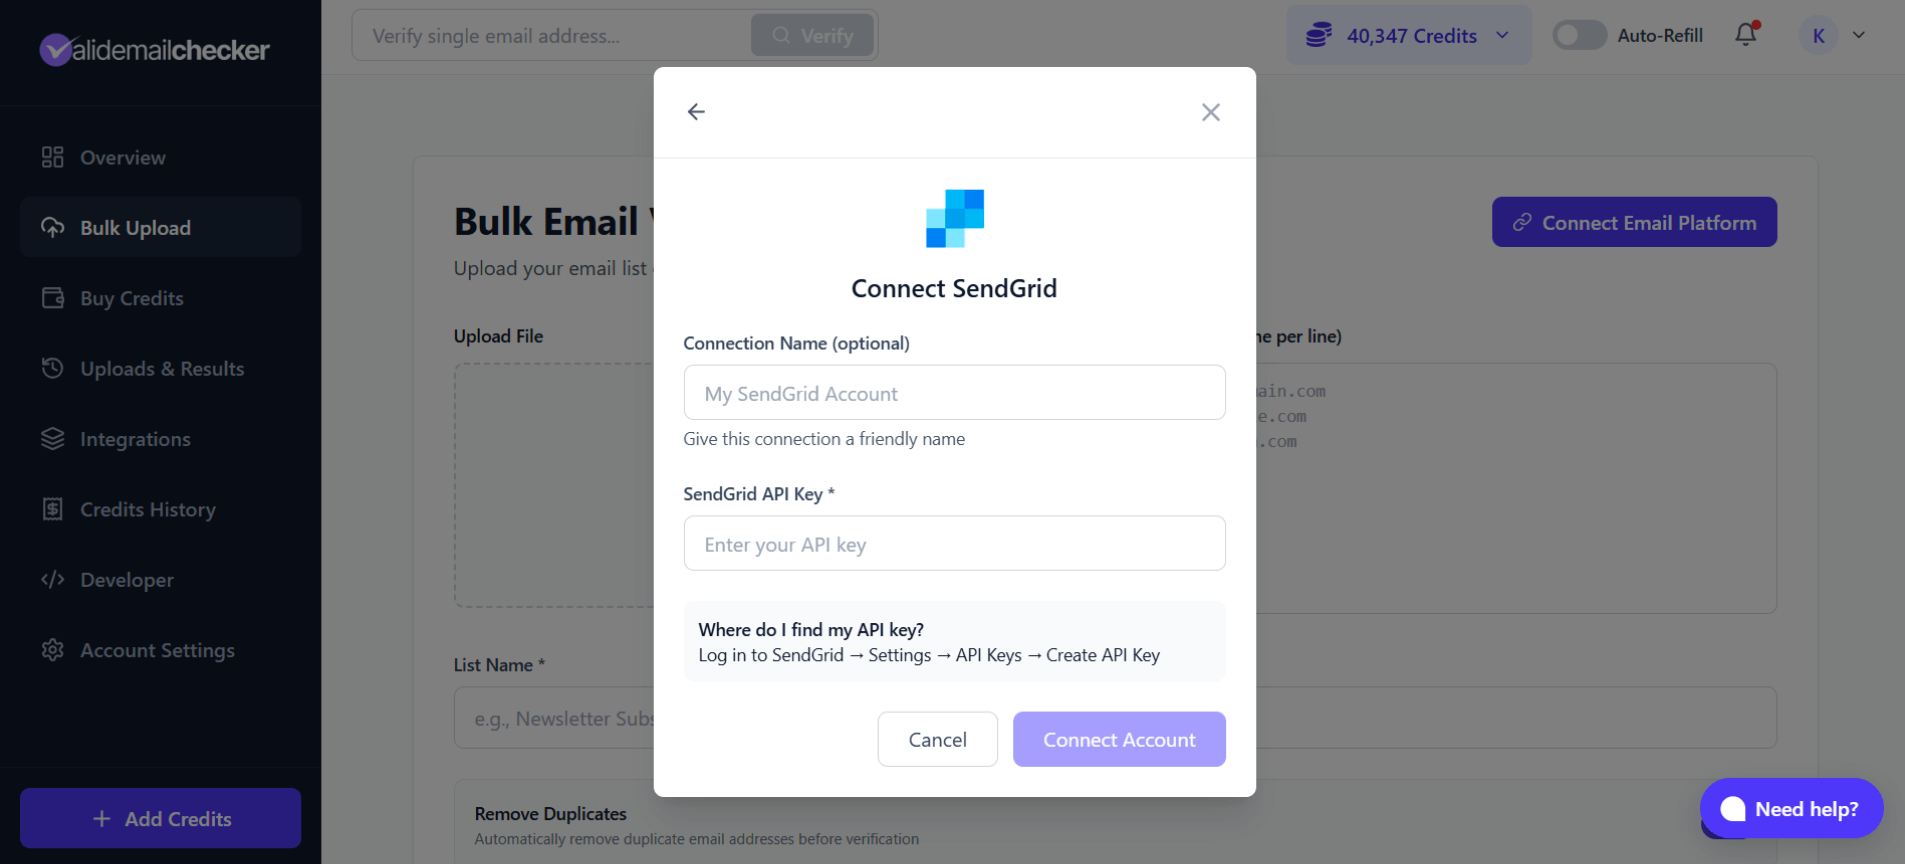
Fill in:
- Connection Name (optional) - A friendly name like "My SendGrid Account" or "Marketing SendGrid"
- SendGrid API Key - Paste the API key you created
The helper text reminds you: Log in to SendGrid → Settings → API Keys → Create API Key
Step 3: Connect
Click Connect Account. Valid Email Checker will:
- Validate your API key
- Connect to your SendGrid account
- Sync your available lists
Once connected, you'll see your SendGrid lists ready for verification.
Verifying Your SendGrid Lists
After connecting, you can start verifying your contacts.
Step 1: Select a List
The list selection modal shows your SendGrid contacts:
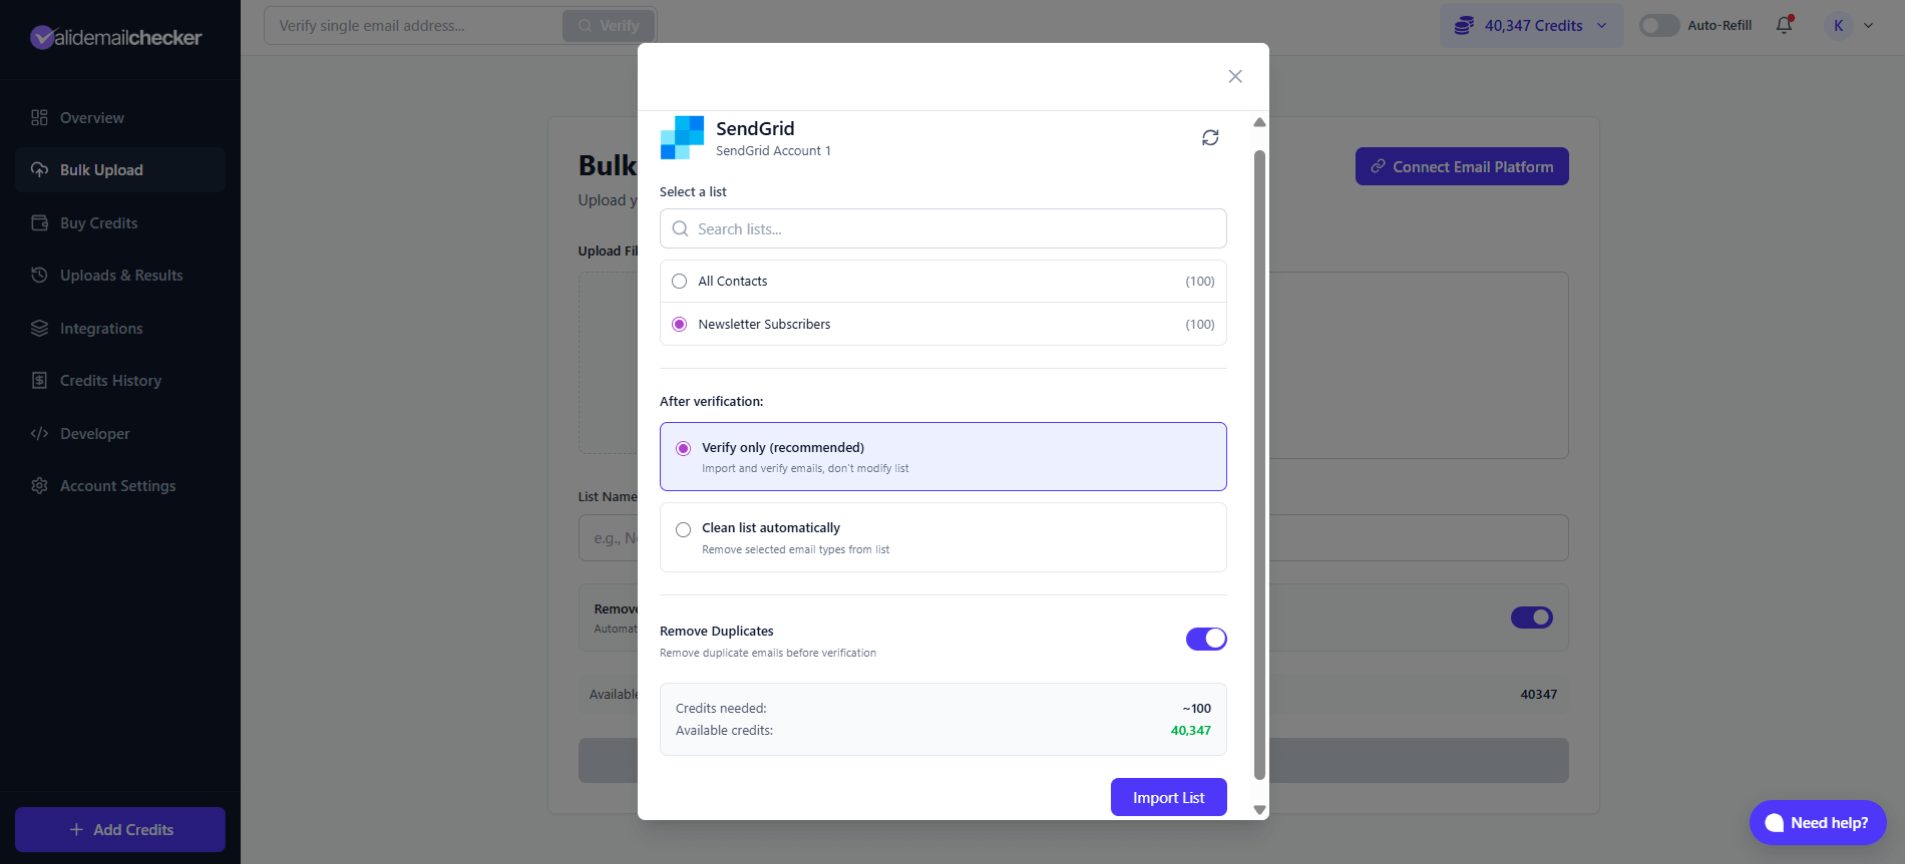
You'll see:
- All Contacts - Your entire SendGrid contact database
- Individual Lists - Specific lists you've created in SendGrid
Each option shows the contact count in parentheses.
Step 2: Choose Verification Mode
You have two options:
Option 1: Verify Only
Select Verify only to:
- Import and verify all emails
- Keep all contacts in SendGrid unchanged
- Review results before taking action
- Download results for your records
This is the safest choice when you want to see your list health first.
Option 2: Clean List Automatically
Select Clean list automatically to have Valid Email Checker take action on problem emails:
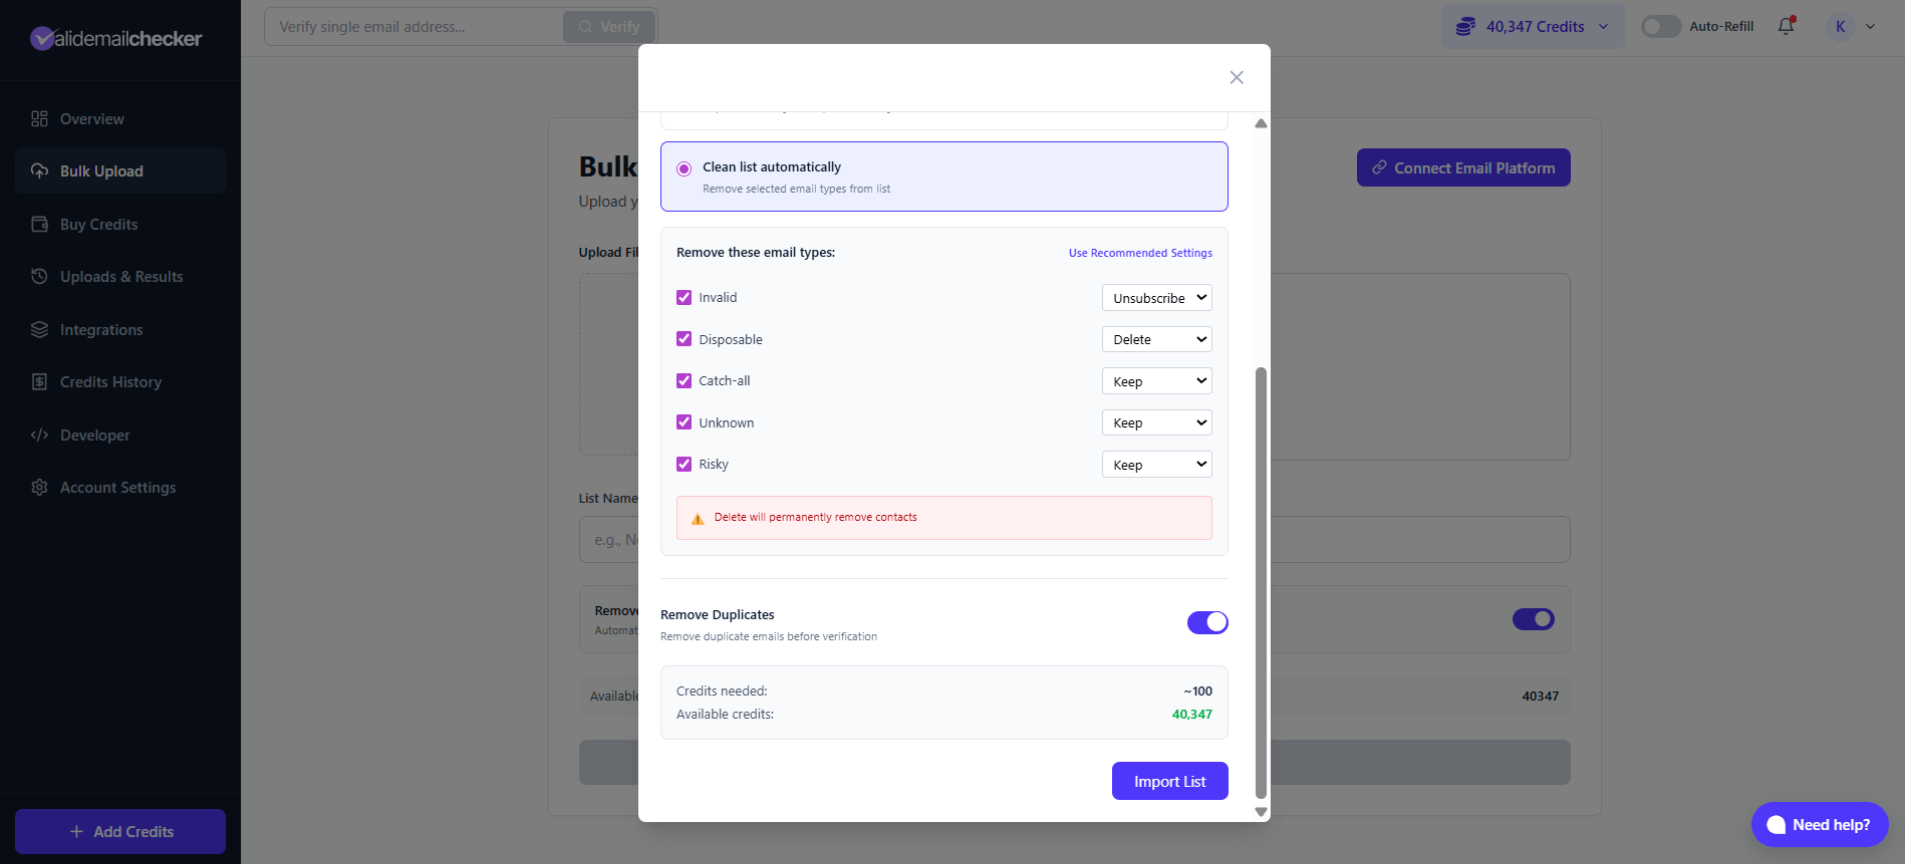
For each email type, choose an action:
| Email Type | Available Actions | Default |
|---|---|---|
| Invalid | Keep / Unsubscribe / Delete | Unsubscribe |
| Disposable | Keep / Unsubscribe / Delete | Delete |
| Catch-all | Keep / Unsubscribe / Delete | Keep |
| Unknown | Keep / Unsubscribe / Delete | Keep |
| Risky | Keep / Unsubscribe / Delete | Keep |
When you choose "Delete" for any email type, those contacts will be permanently removed from your SendGrid account. This cannot be undone. If you're unsure, choose "Unsubscribe" instead—it keeps the contact but prevents sending.
What each action does:
- Keep - Contact stays in SendGrid unchanged
- Unsubscribe - Contact is added to your SendGrid suppression list (won't receive emails)
- Delete - Contact is permanently removed from SendGrid
Step 3: Configure Additional Options
Remove Duplicates - Toggle this on (recommended) to skip duplicate email addresses. You won't be charged for duplicates.
Step 4: Check Credits and Import
Review the credit summary at the bottom:
- Credits needed - Estimated credits for this verification
- Available credits - Your current balance
Click Import List to start verification.
Monitoring Your Verification
After clicking Import List, you're redirected to the Uploads & Results page:
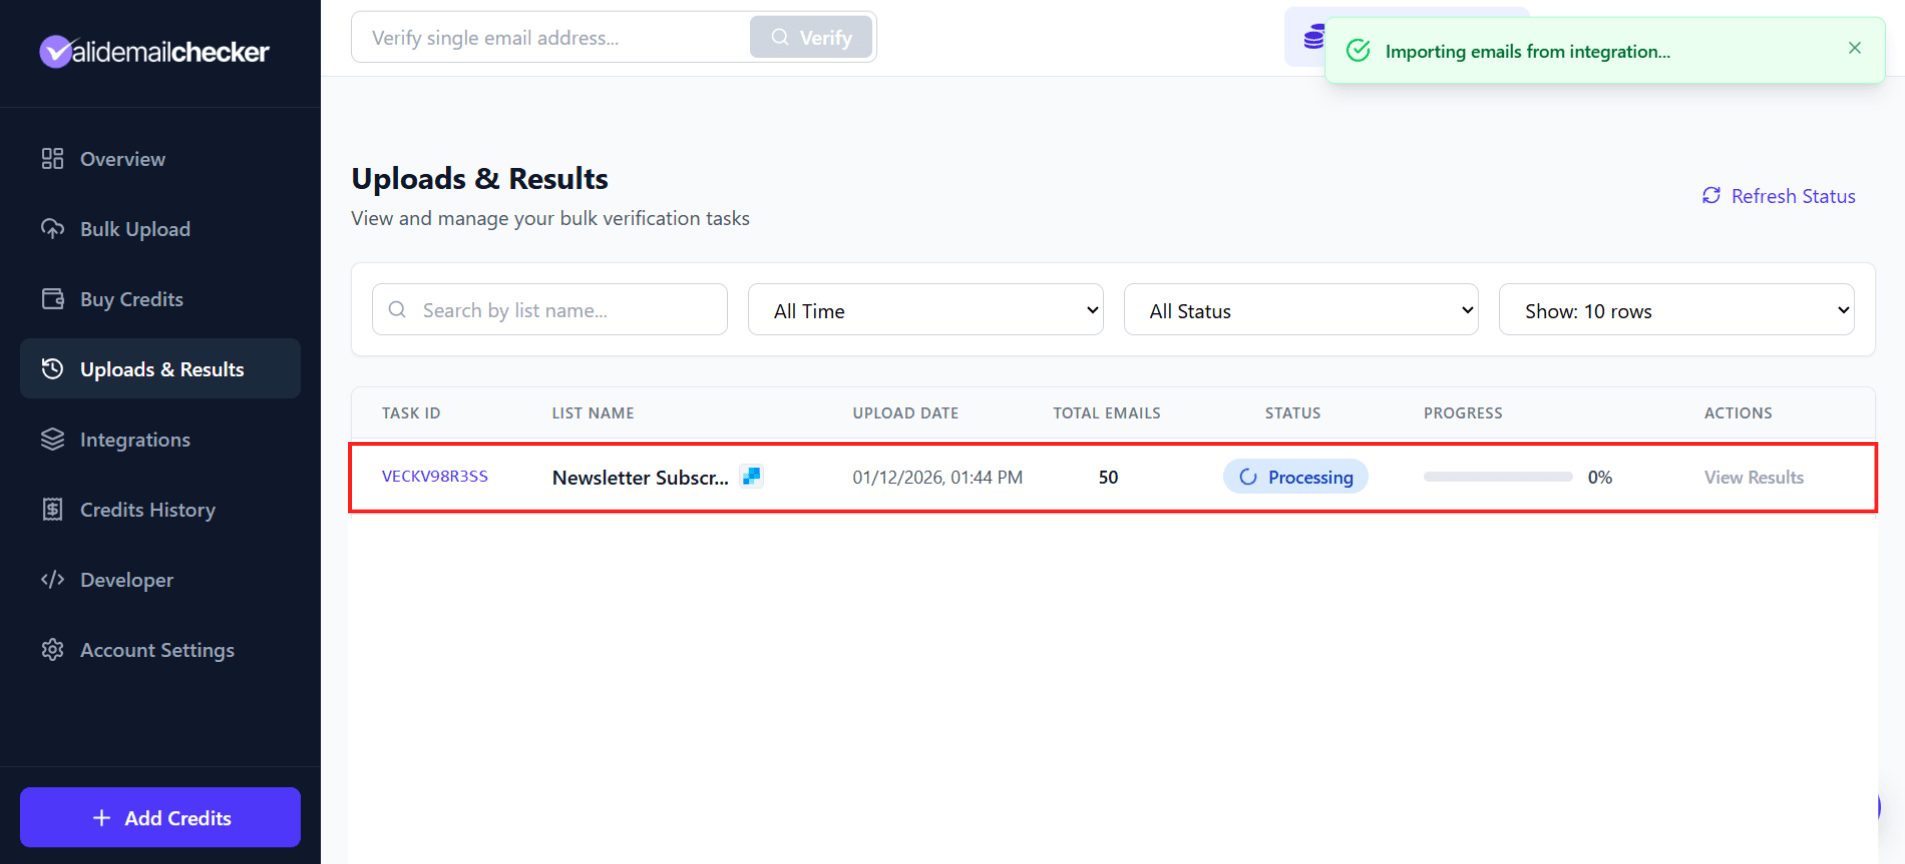
You'll see:
| Column | Description |
|---|---|
| Task ID | Unique identifier (e.g., VECKV98R3SS) |
| List Name | Your SendGrid list name with integration icon |
| Upload Date | When you started the verification |
| Total Emails | Number of contacts being verified |
| Status | Processing, Completed, Failed, or Deleted |
| Progress | Percentage complete |
| Actions | View Results when done |
The SendGrid icon next to your list name indicates this came from an integration (not a file upload).
A toast notification confirms: "Importing emails from integration..."
You can close this page and come back later. Verification continues in the background. Check Uploads & Results anytime to see progress.
Managing Your SendGrid Connection
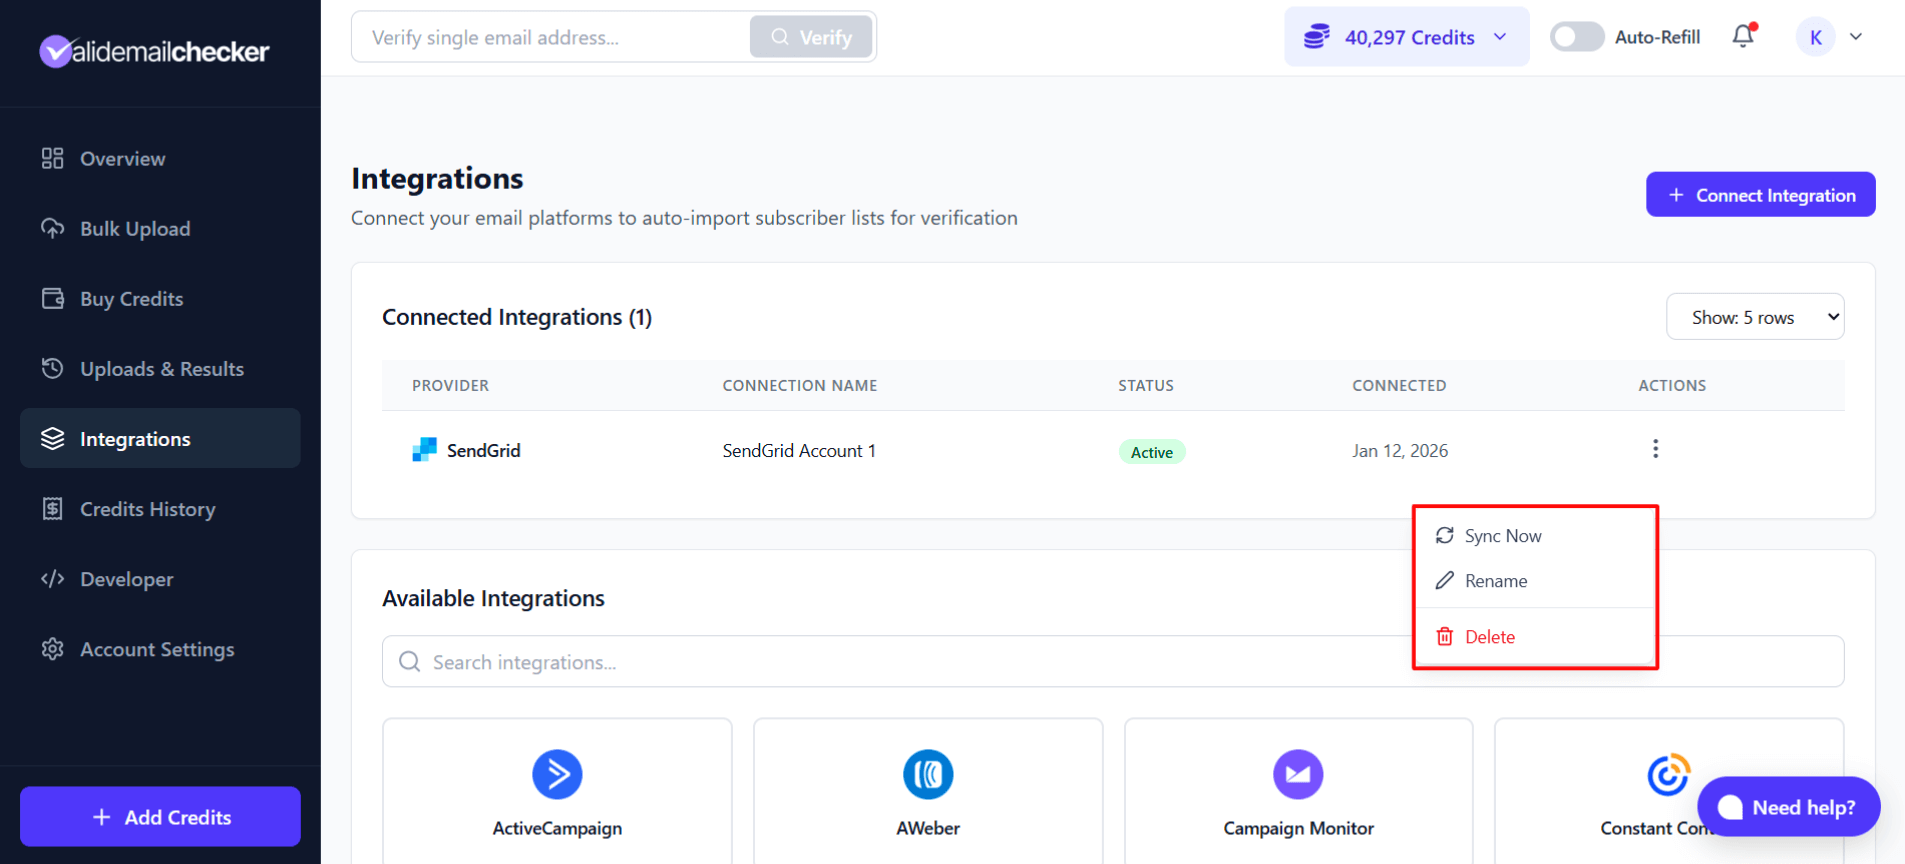
Viewing Connected Accounts
Go to Integrations in the sidebar to see all your connected platforms:
Your SendGrid connection shows:
- Provider - SendGrid with logo
- Connection Name - The name you gave it
- Status - Active (green badge)
- Connected - Date you connected
- Actions - Three-dot menu with options
Available Actions
Click the three-dot menu to see:
| Action | What It Does |
|---|---|
| Sync Now | Refresh your list data from SendGrid |
| Rename | Change the connection name |
| Delete | Remove this connection entirely |
When to Sync
Use Sync Now when:
- You've added new contacts in SendGrid
- You've created new lists
- You want to verify updated contacts
- It's been a while since your last sync
Connecting Multiple SendGrid Accounts
Managing multiple SendGrid accounts? No problem.
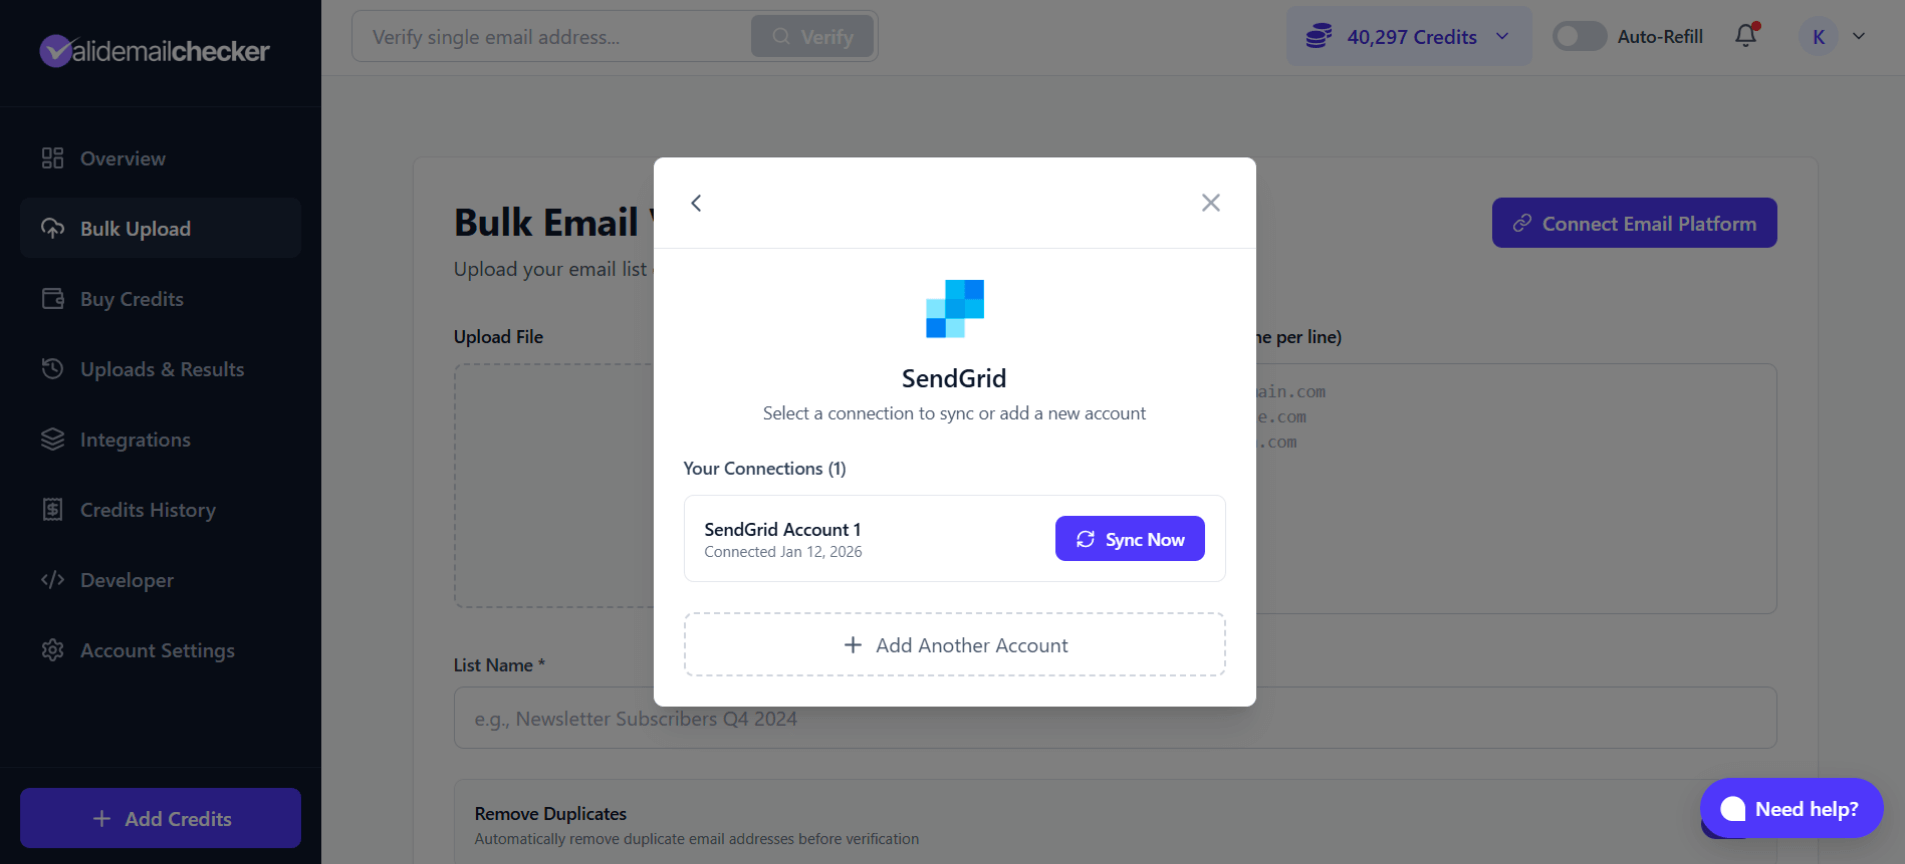
Adding Another Account
When you click SendGrid after already having one connected, you'll see:
This shows:
- Your Connections - Existing SendGrid accounts with connection dates
- Sync Now button - Refresh the existing connection
- + Add Another Account - Connect an additional SendGrid account
Naming Your Accounts
When connecting multiple accounts, give each a unique, descriptive name:
- "SendGrid - Main Brand"
- "SendGrid - Newsletter"
- "SendGrid - Client ABC"
- "SendGrid - EU Region"
This makes it easy to identify which account you're working with.
API Key Best Practices
- Create a dedicated key for Valid Email Checker instead of using a shared key
- Use Full Access for hassle-free integration
- Don't share keys between services
- Rotate keys periodically if you're security-conscious
- Delete unused keys to minimize risk
Dedicated IPs and List Hygiene
If you're using SendGrid's dedicated IP addresses, clean lists are even more important. Your IP reputation is built on your sending behavior, and sending to bad addresses can damage it quickly.
Regular verification with Valid Email Checker helps protect your dedicated IP investment.
Troubleshooting
"Invalid API Key" Error
Causes:
- API key was copied incorrectly (extra spaces or missing characters)
- API key was deleted in SendGrid
- API key doesn't have required permissions
Solutions:
- Create a new API key with Full Access
- Copy carefully—no extra spaces
- Paste directly into Valid Email Checker
"No Lists Found"
Causes:
- No contacts in your SendGrid account
- Marketing Campaigns not enabled
- API key lacks permission to read contacts
Solutions:
- Add at least one contact to SendGrid
- Enable Marketing Campaigns in your SendGrid plan
- Create a new API key with Full Access
Connection Timeout
Causes:
- SendGrid is experiencing issues
- Network connectivity problems
- Large contact list taking time to sync
Solutions:
- Wait a few minutes and try again
- Check SendGrid Status for outages
- Try connecting with a smaller list first
"Unsubscribe" Not Working
Causes:
- API key lacks write permissions
- Contact is already suppressed
- SendGrid API limitation
Solutions:
- Verify your API key has Full Access
- Check SendGrid's suppression lists manually
- Try "Delete" action instead (if appropriate)
Frequently Asked Questions
Does this work with SendGrid's free plan?
Yes! As long as you have Marketing Campaigns enabled and contacts in your account, the integration works with free and paid plans.
Will this affect my SendGrid sender reputation?
Only positively! Removing invalid and risky emails before sending improves your deliverability and protects your sender reputation.
How often should I verify my SendGrid lists?
We recommend:
- Before major campaigns - Always verify before big sends
- Monthly for active lists with new signups
- Quarterly for stable lists
- After importing new contacts from other sources
What happens to deleted contacts?
When you choose "Delete," contacts are permanently removed from SendGrid. They're gone—no recovery option. This is why we recommend "Unsubscribe" if you're unsure.
Can I undo the cleaning?
- Unsubscribed contacts - Can be removed from suppression lists in SendGrid
- Deleted contacts - Cannot be recovered (you'd need to re-add them)
Next Steps
Now that your SendGrid integration is set up:
- Understand verification results - Know what each status means
- Learn about catch-all emails - Handle these tricky addresses
- Set up auto-refill - Never run out of credits mid-verification
- Explore other integrations - Connect more platforms
Need Help?
Running into issues with your SendGrid integration?
- Live Chat - Click the chat bubble in the corner
- Email - support@validemailchecker.com
- Help Center - Browse our guides for more tips
We're here to help you get the most out of your Valid Email Checker integration!