Mailjet Integration
Mailjet is a powerful email delivery platform trusted by developers and marketers alike. But here's the thing - even the best email platform can't save you from sending to invalid addresses. That's where Valid Email Checker comes in.
Connect your Mailjet account to Valid Email Checker and verify your contact lists without ever leaving our platform. No exports, no imports, no spreadsheet gymnastics. Just clean, verified emails ready to deliver.
What You Can Do
With the Mailjet integration, you can:
- Import contact lists directly from your Mailjet account
- Verify emails in bulk without manual file exports
- Auto-clean your lists by removing or unsubscribing bad addresses
- Sync multiple Mailjet accounts from one Valid Email Checker dashboard
- Keep your lists fresh with on-demand syncing
Whether you're sending transactional emails or marketing campaigns, clean lists mean better inbox placement and a healthier sender reputation.
Before You Start
Make sure you have everything ready:
| Requirement | Details |
|---|---|
| Mailjet account | Free or paid - both work |
| API Key | Found in your Mailjet dashboard |
| API Secret | Generated alongside your API Key |
| Valid Email Checker credits | 1 credit per email verified |
| At least one contact list | In your Mailjet account |
Every new account gets 200 free credits to test things out. That's enough to verify a decent-sized list and see the results for yourself.
Finding Your Mailjet API Credentials
Mailjet requires both an API Key and an API Secret. Don't worry - finding them is straightforward.
Step 1: Access API Key Management
- Log in to your Mailjet account
- Click API in the left sidebar
- Select API Key Management
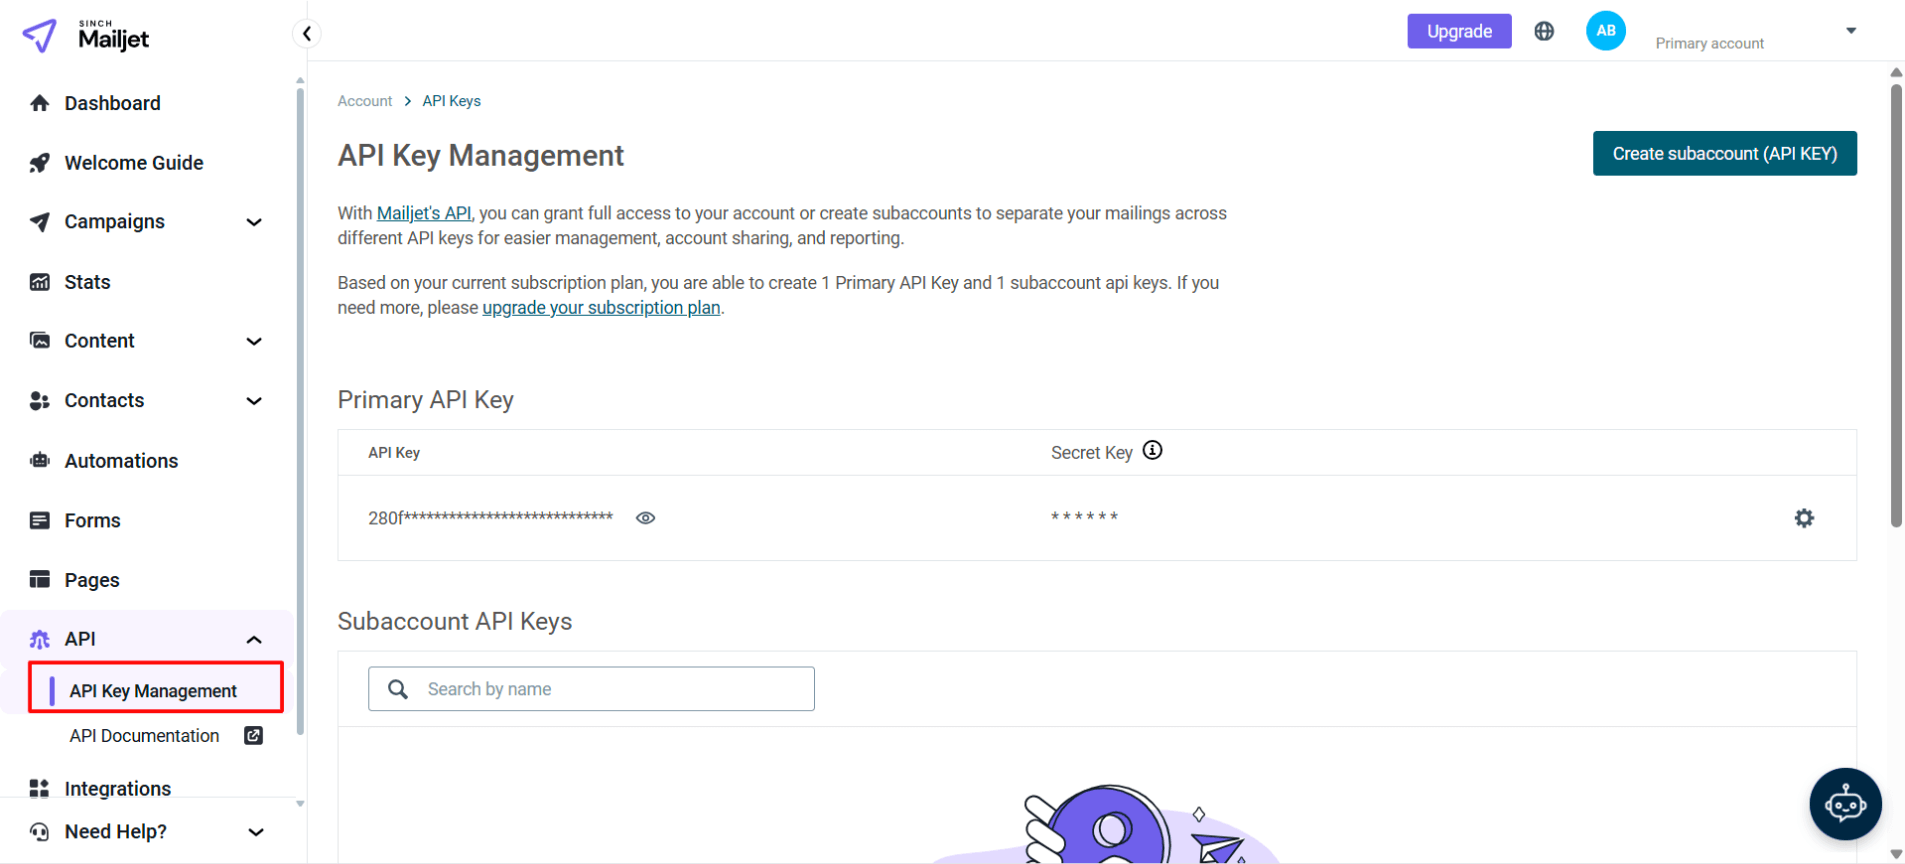
You'll see your Primary API Key listed here. The API Key itself is visible (though partially masked), but you'll need to generate or view the Secret Key.
Step 2: Get Your Secret Key
Click on the settings icon next to your API Key to view or reset your Secret Key.
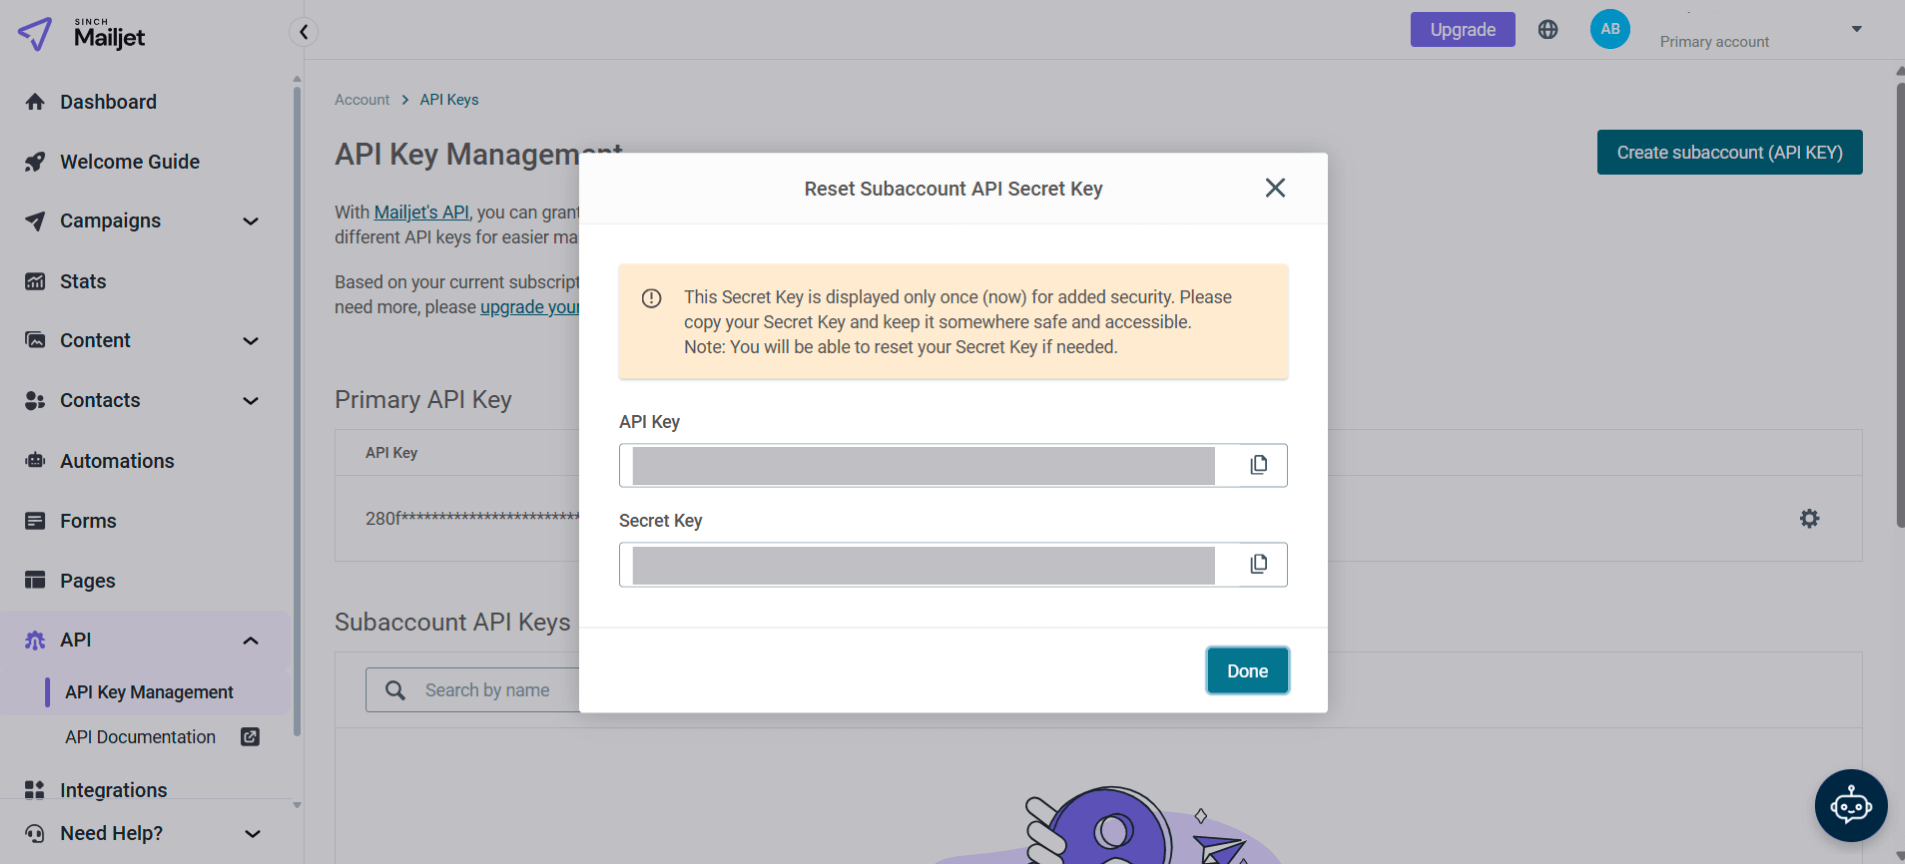
Mailjet only shows your Secret Key once when it's generated. Copy it immediately and store it somewhere safe. If you lose it, you'll need to reset it (which generates a new one).
Copy both values:
- API Key - The public identifier (looks like
280f8b***********************) - Secret Key - The private key (looks like
5a335************************)
You'll need both to connect your account to Valid Email Checker.
Connecting Your Mailjet Account
Now let's link everything up. You've got two ways to start the connection.
Option A: From the Integrations Page
- Click Integrations in the sidebar
- Find Mailjet in the Available Integrations section
- Click on the Mailjet card
Option B: From Bulk Upload
- Go to Bulk Upload
- Click the Connect Email Platform button
- Select Mailjet from the list
Both paths lead to the same place - the connection modal.
Enter Your Credentials
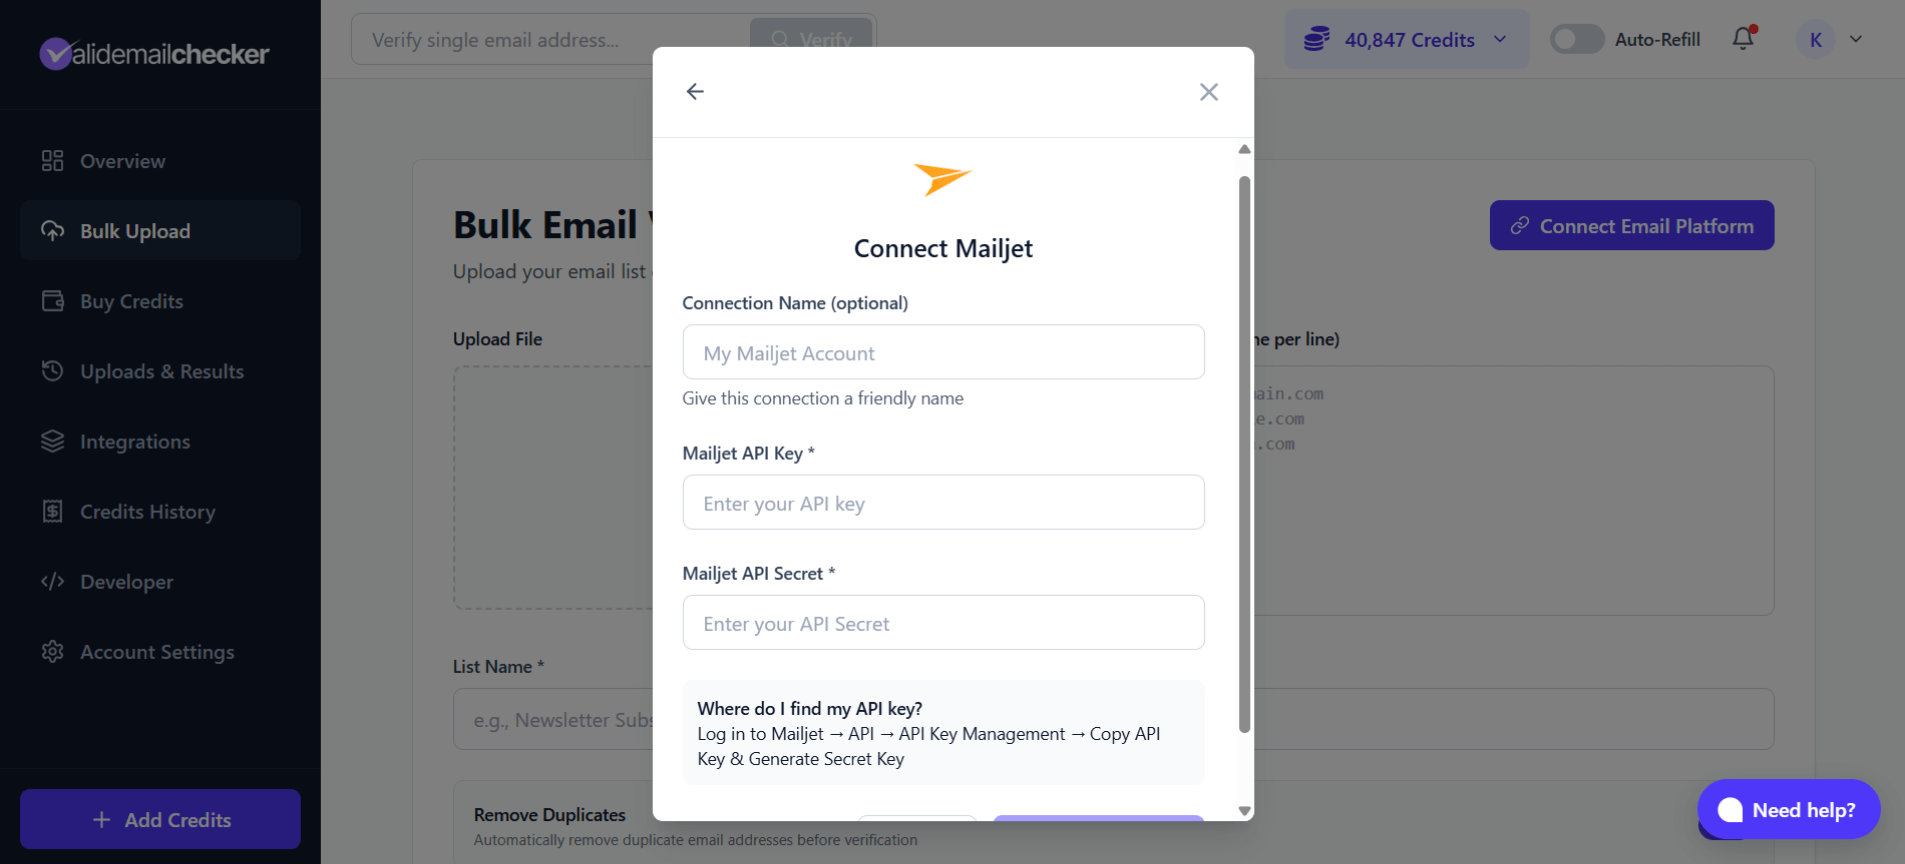
Fill in the connection form:
| Field | What to Enter |
|---|---|
| Connection Name | A friendly name like "My Mailjet Account" or "Marketing Mailjet" (optional but helpful if you'll connect multiple accounts) |
| Mailjet API Key | Paste your API Key from Mailjet |
| Mailjet API Secret | Paste your Secret Key from Mailjet |
Click Connect Account and Valid Email Checker will verify your credentials and sync your lists.
The initial sync pulls all your contact lists from Mailjet. Depending on how many lists you have, this might take a few seconds.
Verifying Your Mailjet Lists
Once connected, you can start verifying. Here's where the magic happens.
Step 1: Select a List
After connecting (or clicking Sync Now on an existing connection), you'll see all your Mailjet contact lists.
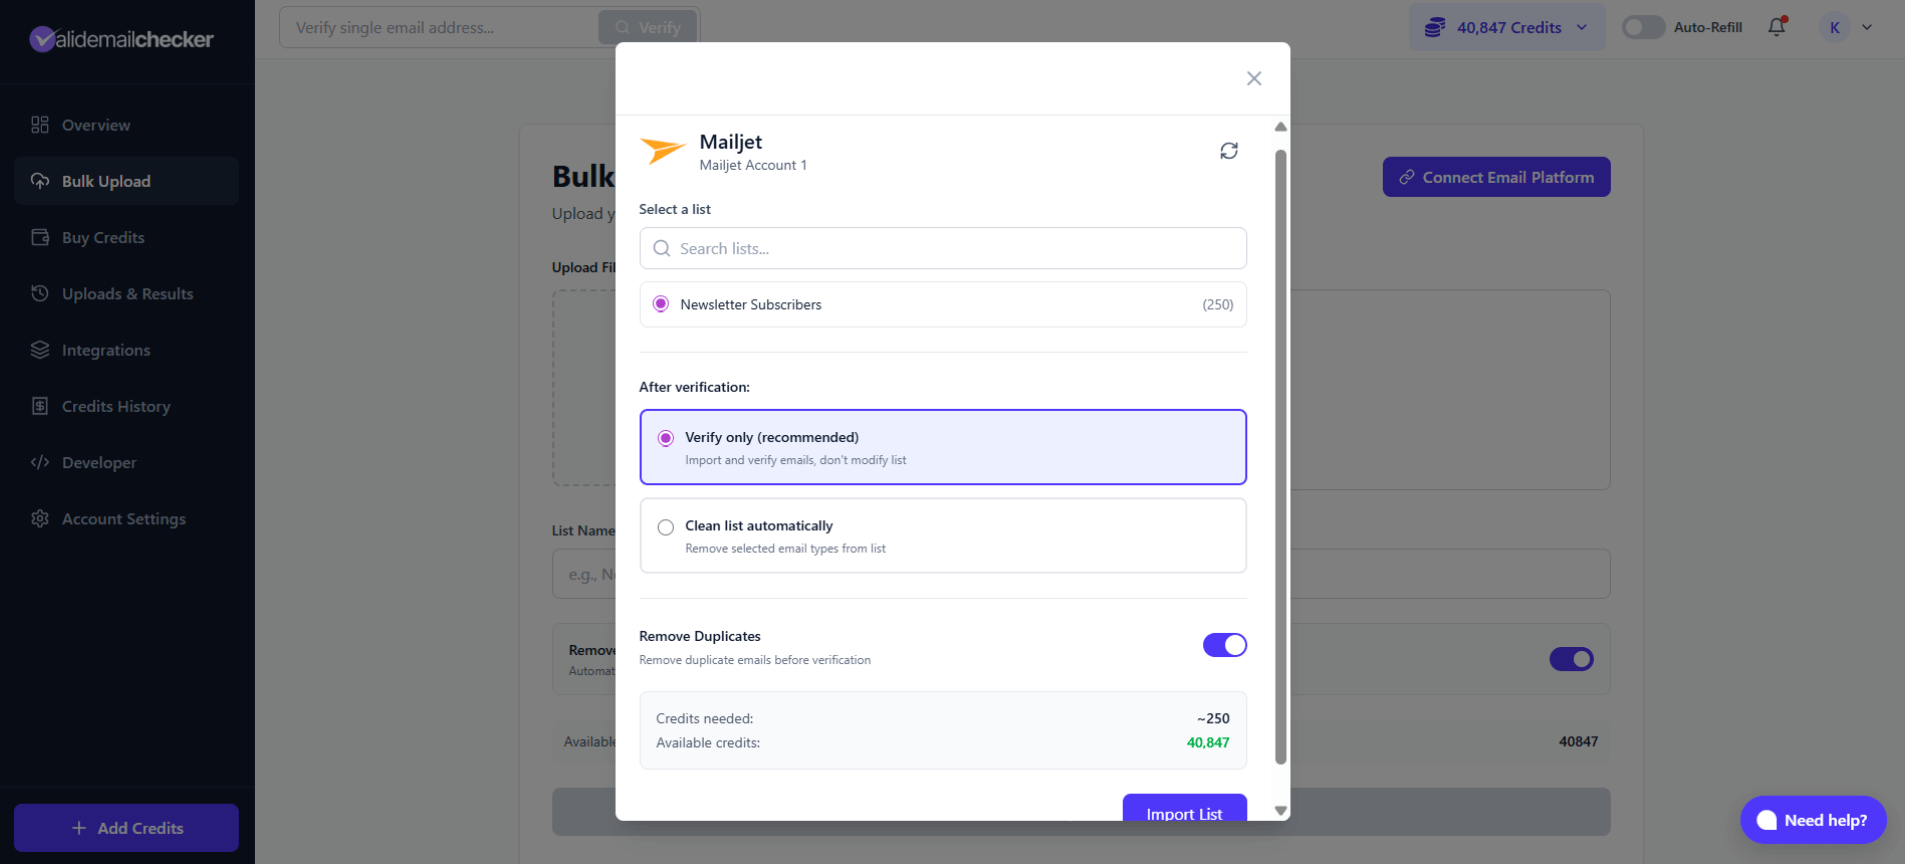
Each list shows:
- List name - As it appears in Mailjet
- Contact count - Number of emails in the list
Select the list you want to verify by clicking on it.
Step 2: Choose Your Verification Mode
You've got two options here, and they're quite different:
Option 1: Verify Only
This is the safer choice if you want to review results before making changes.
What happens:
- Emails are imported and verified
- Results are saved to your Valid Email Checker account
- Your Mailjet list stays untouched
- You can download or export the results
This is perfect when you want to see what's in your list before deciding what to do with the bad addresses.
Option 2: Clean List Automatically
This is the power move. Verify AND clean in one shot.
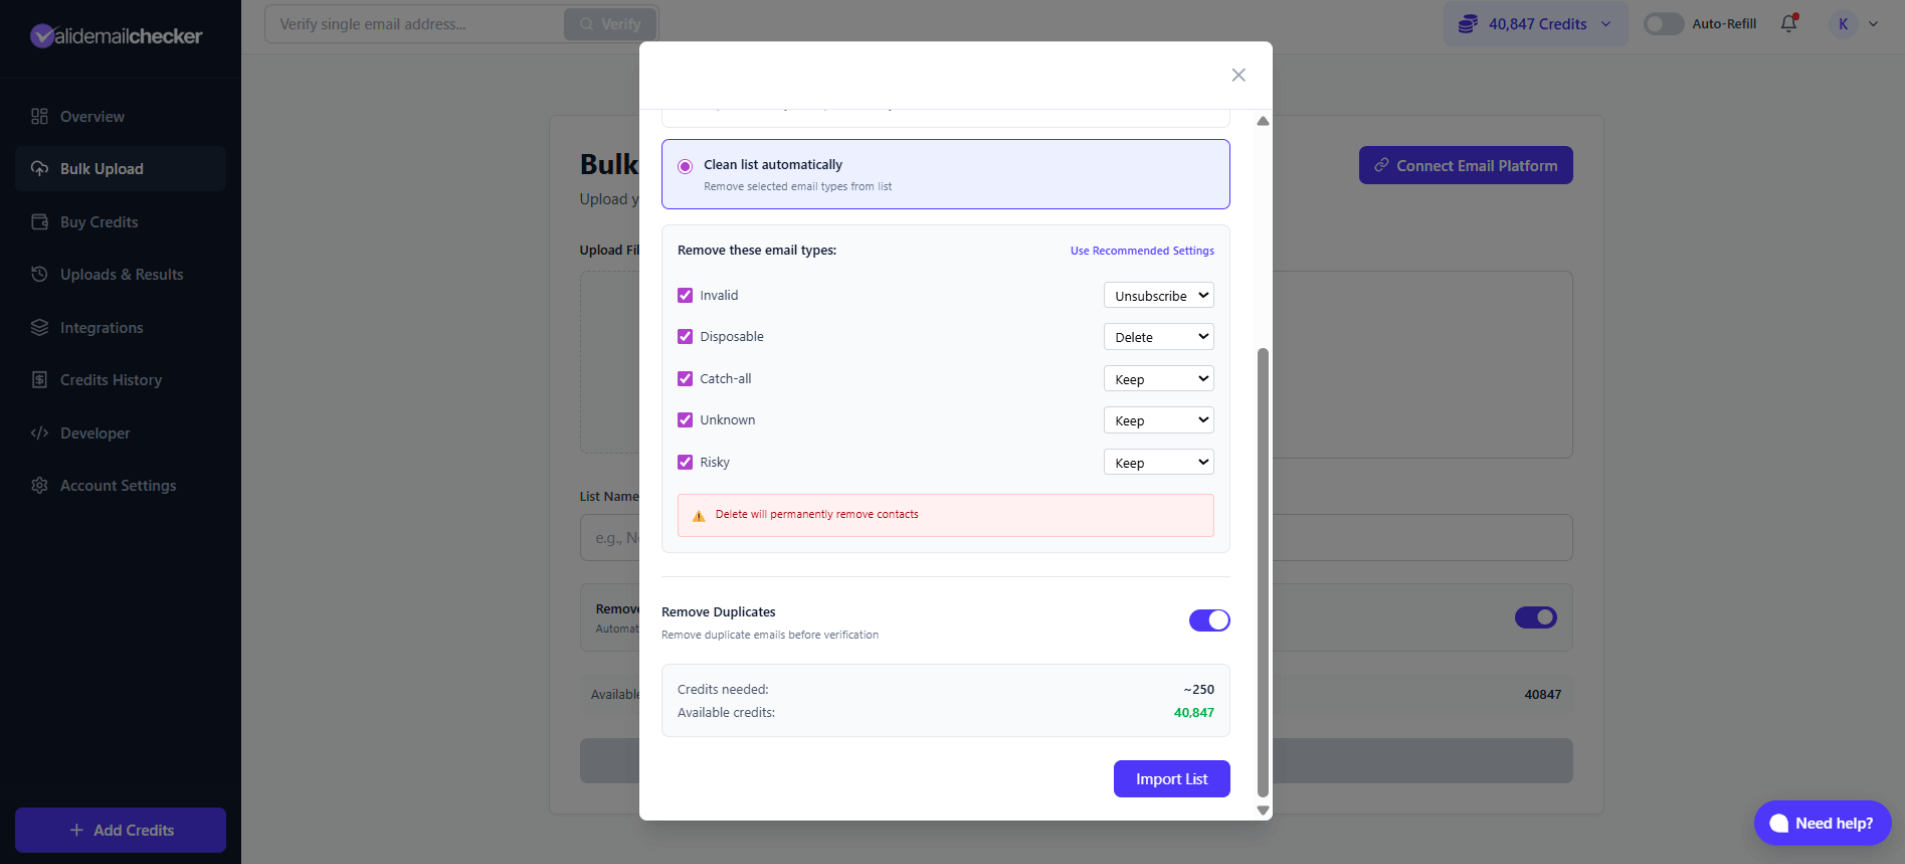
When you select this option, you choose what happens to each type of problematic email:
| Email Type | What It Means | Your Options |
|---|---|---|
| Invalid | Mailbox doesn't exist - will definitely bounce | Keep, Unsubscribe, or Delete |
| Disposable | Temporary email address - probably abandoned | Keep, Unsubscribe, or Delete |
| Catch-all | Domain accepts all emails - risky to send | Keep, Unsubscribe, or Delete |
| Unknown | Couldn't verify - server didn't respond | Keep, Unsubscribe, or Delete |
| Risky | Multiple warning signs - proceed with caution | Keep, Unsubscribe, or Delete |
Action meanings:
- Keep - Leave the contact in your Mailjet list as-is
- Unsubscribe - Mark as unsubscribed in Mailjet (contact remains but won't receive emails)
- Delete - Permanently remove from your Mailjet list
When you choose "Delete," those contacts are removed from Mailjet for good. There's no undo. If you're unsure, start with "Unsubscribe" - you can always delete later.
Step 3: Configure Options
Before clicking Import, check these settings:
Remove Duplicates - Enabled by default. This removes duplicate email addresses before verification, saving you credits. Leave it on unless you have a specific reason not to.
Credits Summary - Shows:
- Credits needed - Estimated credits for this verification
- Available credits - Your current balance
If you don't have enough credits, you'll need to purchase more before proceeding.
Step 4: Import and Verify
Click Import List to start the process. You'll be redirected to the Uploads & Results page where you can watch the verification progress.
Monitoring Your Verification
After importing, you'll see your task in the Uploads & Results page.
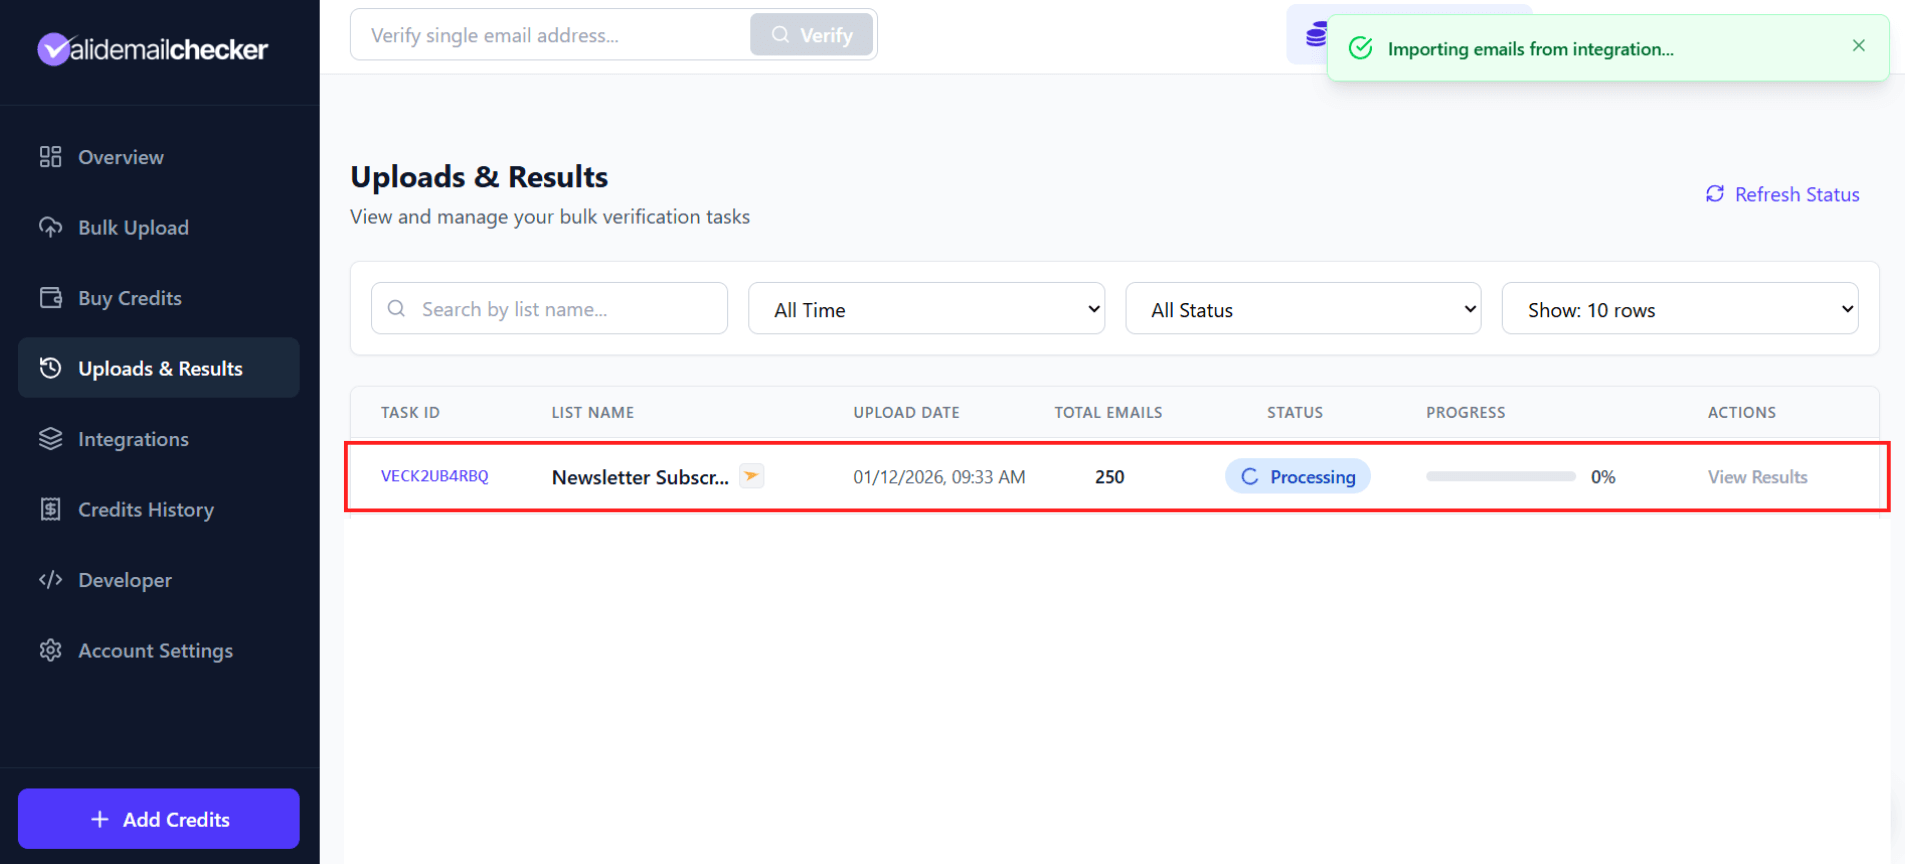
What you'll see:
| Column | Description |
|---|---|
| Task ID | Unique identifier (e.g., VECK2UB4RBQ) |
| List Name | Name from your Mailjet list |
| Upload Date | When you started the verification |
| Total Emails | Number of contacts being verified |
| Status | Processing, Completed, Failed, or Deleted |
| Progress | Percentage complete with visual bar |
| Actions | View Results, Delete |
The page updates automatically - no need to refresh. You'll see that progress bar fill up in real-time.
Lists imported from integrations show a small icon next to the list name. This helps you distinguish between file uploads and platform imports.
When Verification Completes
If you chose "Verify Only":
- Click View Results to see the breakdown
- Download results in CSV, XLSX, JSON, or TXT
- Decide what to do with the bad addresses
If you chose "Clean List Automatically":
- The actions you selected are applied to your Mailjet list
- Invalid/disposable/risky contacts are unsubscribed or deleted based on your settings
- Click View Results to see the breakdown
Managing Your Mailjet Connection
Once connected, you can manage your Mailjet integration from the Integrations page.
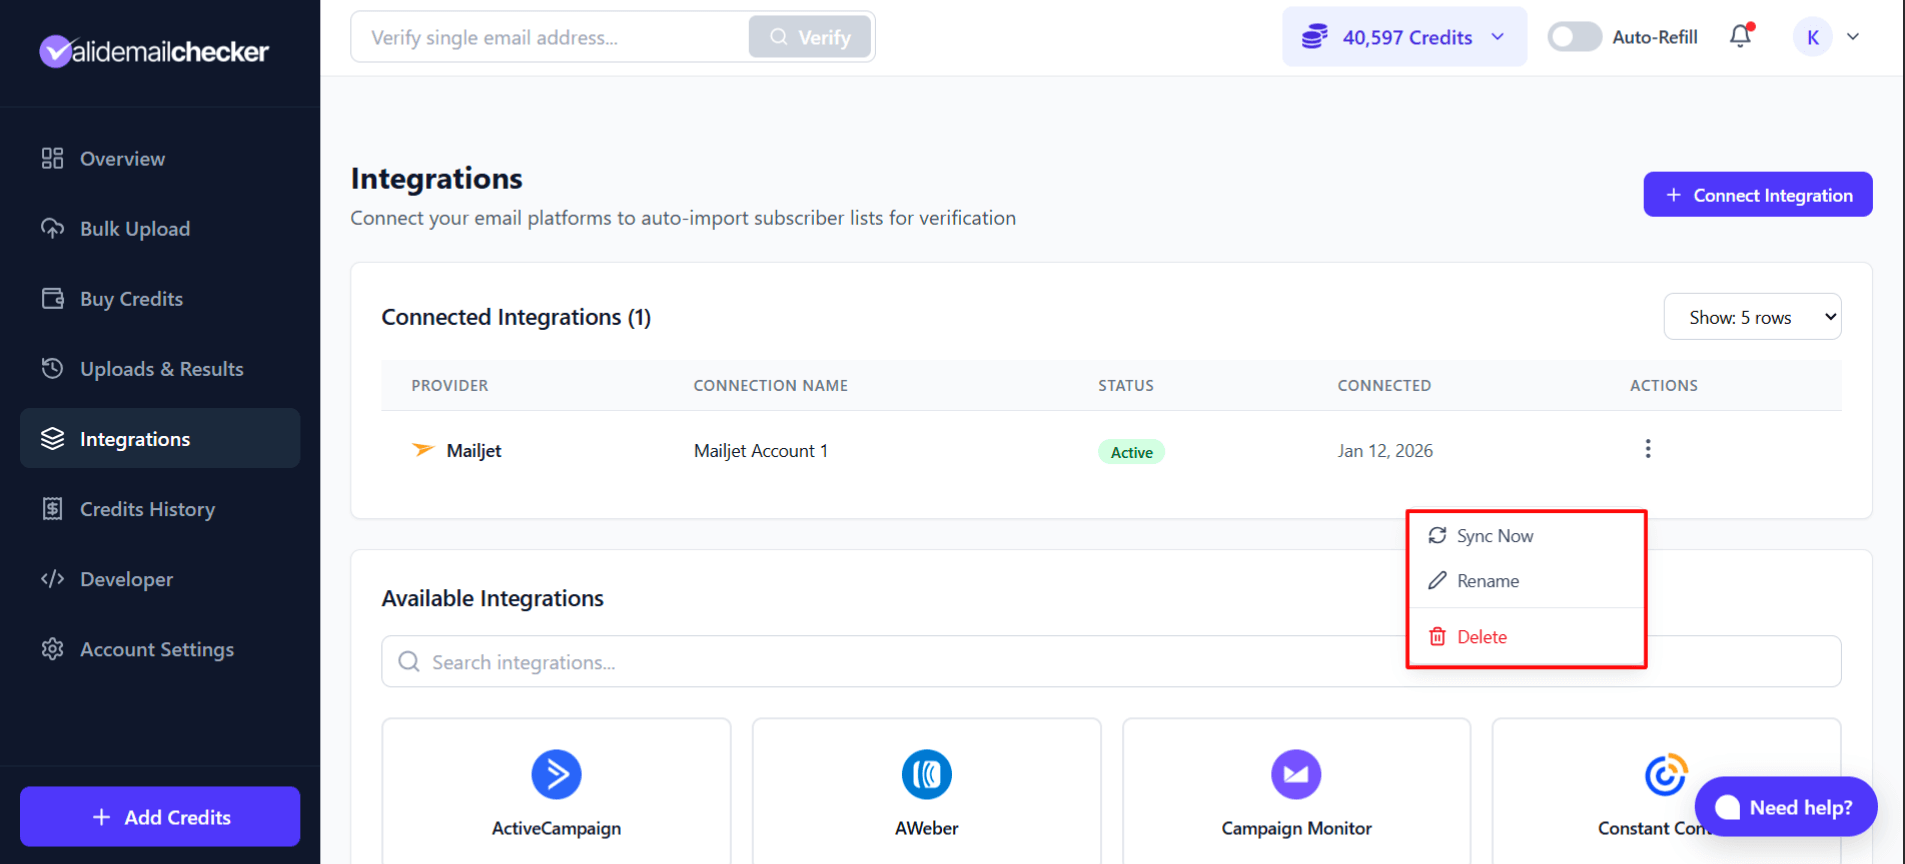
Your Options
Click the three-dot menu on your connection to access:
| Action | What It Does |
|---|---|
| Sync Now | Pull the latest lists from your Mailjet account |
| Rename | Change the connection name |
| Delete | Remove this connection entirely |
When to Sync
Hit that Sync button when:
- You've added new contact lists in Mailjet
- You've added lots of new subscribers to existing lists
- It's been a while since you last verified
- You're about to run a big campaign
The sync pulls fresh data from Mailjet, so you're always working with current numbers.
Connecting Multiple Mailjet Accounts
Managing email for multiple brands? Different clients? Separate departments? You can connect them all.
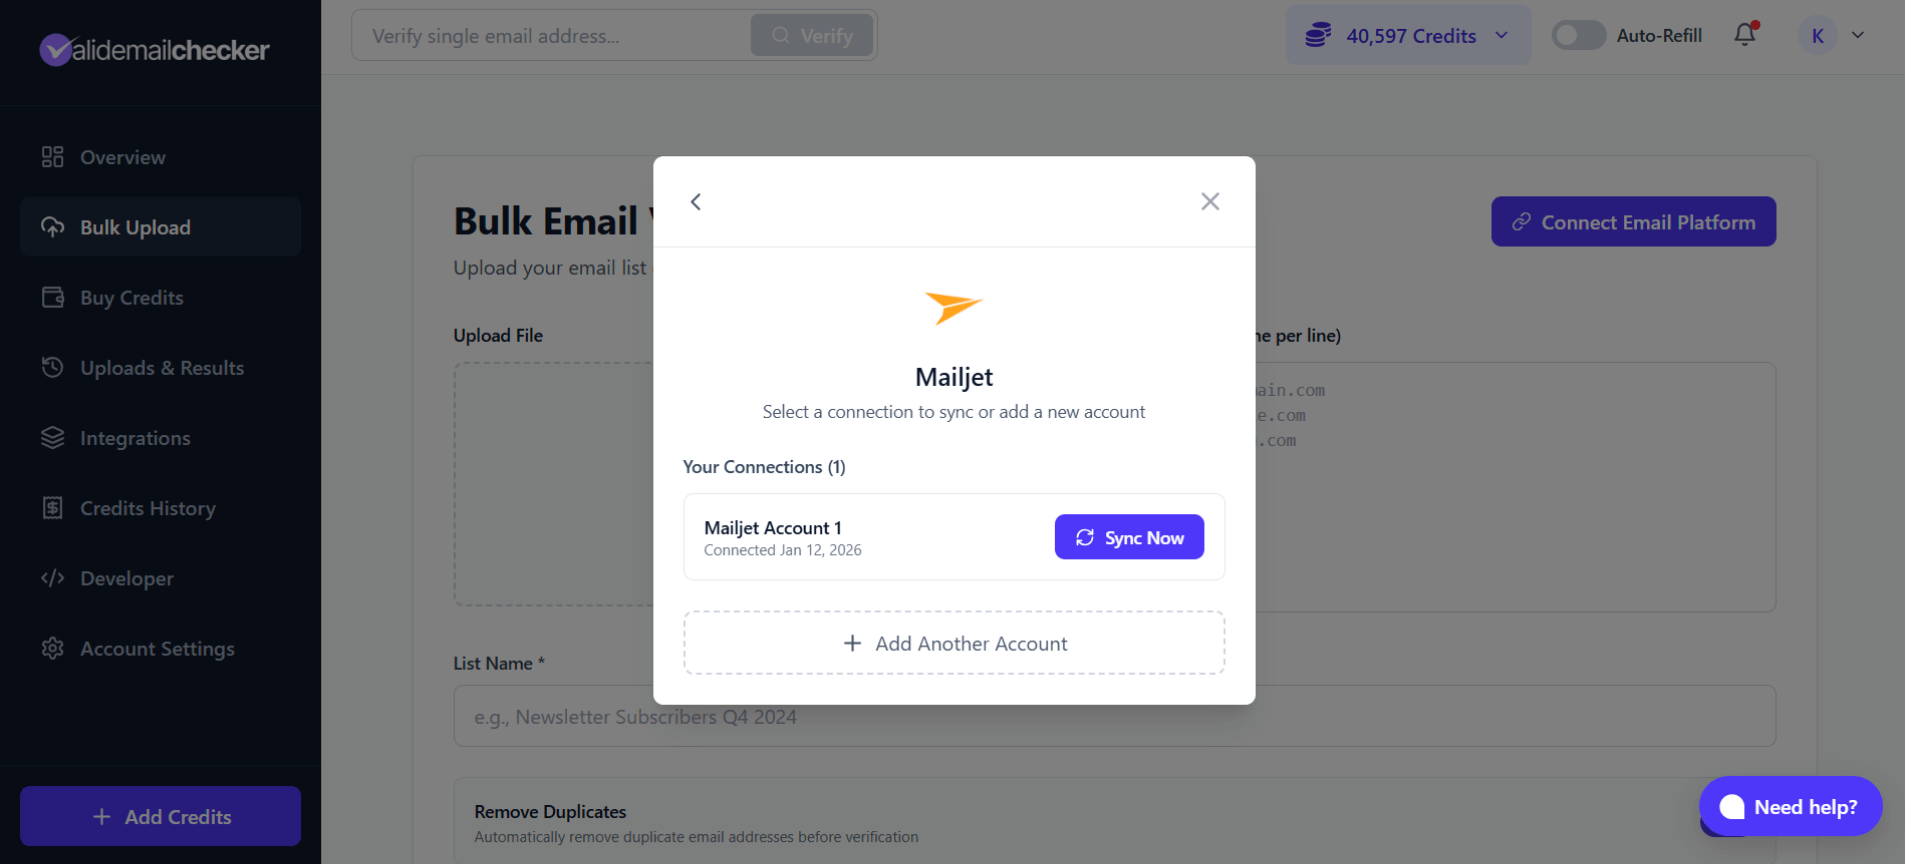
Adding Another Account
- Click on Mailjet (it will show as "connected")
- You'll see your existing connections listed
- Click + Add Another Account
- Enter the new API Key and Secret
- Give it a unique name (this is important - helps you tell them apart)
Managing Multiple Connections
Each connection appears separately in:
- The connection selection modal
- The Integrations page under Connected Integrations
You can sync, rename, or delete each connection independently.
Use descriptive names like "Marketing Team Mailjet" or "Client - Acme Corp" instead of generic "My Mailjet Account." Future you will thank present you.
Troubleshooting
"Invalid API credentials"
Causes:
- Typo in API Key or Secret
- Copy/paste grabbed extra spaces
- Using a deactivated API key
Fixes:
- Go back to Mailjet and copy credentials fresh
- Make sure you're copying both API Key AND Secret (not just one)
- Check if your API key is still active in Mailjet
"No lists found"
Causes:
- Your Mailjet account has no contact lists
- API key doesn't have permission to view lists
Fixes:
- Log in to Mailjet and verify you have at least one contact list
- Check API key permissions
- Try creating a test list with a few contacts
"Connection failed"
Causes:
- Network issues
- Mailjet API temporarily unavailable
- Rate limiting
Fixes:
- Wait a moment and try again
- Check if Mailjet is experiencing issues (status.mailjet.com)
- Try from a different network
Lists Not Updating After Sync
Causes:
- Mailjet's API cache
- Recent changes haven't propagated
Fixes:
- Wait a few minutes and sync again
- Check in Mailjet that the changes are actually saved
- Try disconnecting and reconnecting (last resort)
Clean Actions Not Applied
Causes:
- API key lacks write permissions
- Mailjet rate limiting on modifications
Fixes:
- Verify your API key has full permissions in Mailjet
- Check Mailjet's activity logs for errors
- Try cleaning a smaller batch first
Frequently Asked Questions
Does connecting to Valid Email Checker affect my Mailjet sending?
Not at all. We only read your contact lists and (if you choose) update contact statuses. Your email sending, campaigns, and automations continue normally.
Will my Mailjet contacts know they were verified?
No. Email verification happens entirely on our end. We check if addresses are valid without sending any emails to your contacts. They have no idea anything happened.
How long does verification take?
Depends on list size:
| List Size | Estimated Time |
|---|---|
| 100 emails | Seconds |
| 1,000 emails | 1-2 minutes |
| 10,000 emails | 5-10 minutes |
| 100,000 emails | 15-30 minutes |
| 1,000,000 emails | 1-2 hours |
You can close the browser and come back - verification continues in the background.
What happens to safe emails during auto-clean?
Nothing! Safe emails are left completely alone. Only the email types you selected (invalid, disposable, etc.) are affected by your chosen actions.
Can I verify the same list multiple times?
Absolutely. Email lists decay over time - people change jobs, abandon accounts, providers shut down. Regular verification is actually recommended, especially for active marketing lists.
Does Valid Email Checker store my Mailjet contacts?
We store verification results for 15 days so you can access and download them. After that, the data is automatically deleted. Your original contacts remain safely in Mailjet regardless. See our data and privacy policy for details.
What if I disconnect my Mailjet account?
The connection is removed from Valid Email Checker, but:
- Your Mailjet account and contacts are unaffected
- Past verification results remain accessible (for 15 days)
- You can reconnect anytime with the same or different credentials
Next Steps
Now that your Mailjet integration is set up:
- Understanding Result Types - Learn what each verification status means
- Catch-All Emails Explained - Special handling for these tricky addresses
- Credit System - How credits work for integrations
- Auto-Refill Setup - Never run out during big verifications
- Browse All Integrations - Connect your other email platforms