Moosend Integration
Connect your Moosend account to Valid Email Checker and verify your subscriber lists without leaving our platform. No file exports, no manual uploads—just seamless list verification.
What You Can Do
With the Moosend integration, you can:
- Import lists directly from your Moosend account
- Verify subscribers without exporting files
- Auto-clean lists by removing or unsubscribing bad emails
- Keep Moosend in sync with freshly verified data
- Connect multiple accounts if you manage several Moosend workspaces
Before You Start
Make sure you have everything ready:
| Requirement | Details |
|---|---|
| Moosend account | Any plan (free or paid) |
| API key | Found in More → Settings → API key |
| Valid Email Checker credits | At least 1 credit per email to verify |
Finding Your Moosend API Key
Here's how to grab your API key from Moosend:
Step 1: Access Settings
- Log in to your Moosend account
- Click More in the top navigation
- Select Settings from the dropdown
Step 2: Copy Your API Key
- In the left sidebar, click API key
- Your API key is displayed under "Your API key"
- Click the Copy button to copy it to your clipboard
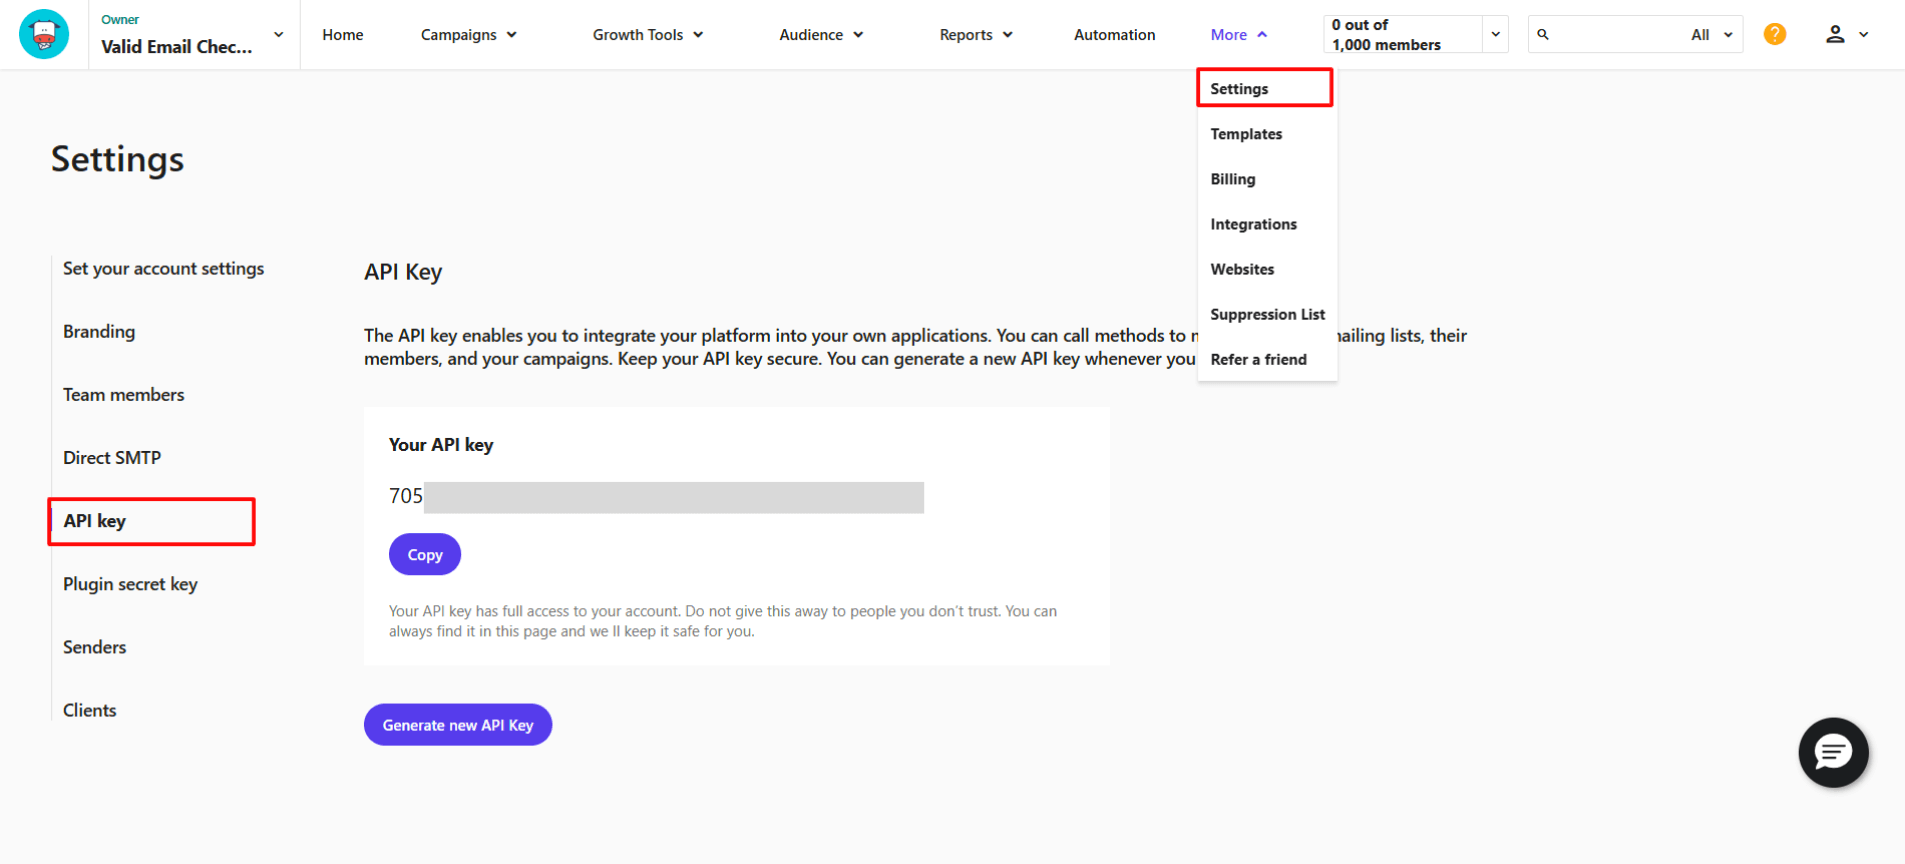
Your Moosend API key has full access to your account. Never share it publicly or commit it to version control. If you think it's been compromised, click Generate new API Key to create a fresh one.
Connecting Your Moosend Account
Now let's connect Moosend to Valid Email Checker.
Step 1: Open the Integration
You have two ways to start:
Option A: From Integrations Page
- Click Integrations in your dashboard sidebar
- Find Moosend in the Available Integrations section
- Click on the Moosend card
Option B: From Bulk Upload
- Go to Bulk Upload
- Click Connect Email Platform in the top right
- Select Moosend from the list
Step 2: Enter Your Credentials
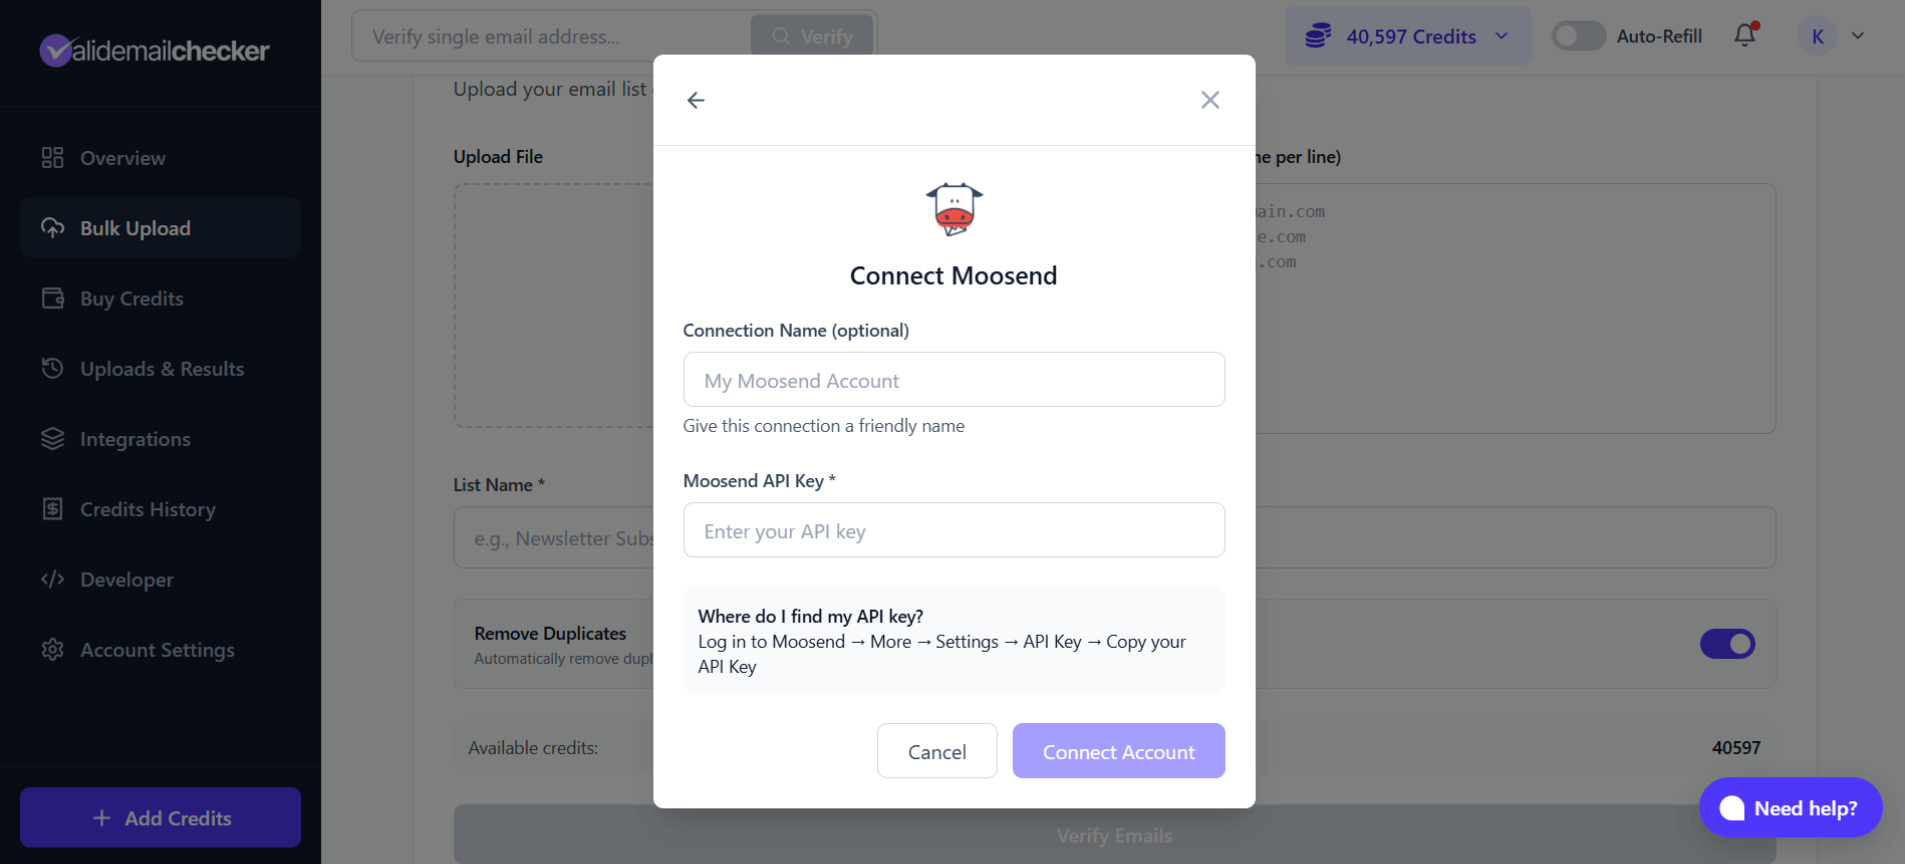
- Connection Name (optional): Give this connection a friendly name like "Marketing Account" or "Client Lists". Default is "My Moosend Account"
- Moosend API Key: Paste the API key you copied earlier
- Click Connect Account
Valid Email Checker will verify your credentials and sync your available mailing lists.
The initial sync fetches all your Moosend mailing lists. This usually takes just a few seconds, but larger accounts with many lists may take a moment longer.
Verifying Your Moosend Lists
Once connected, you're ready to verify your subscriber lists.
Step 1: Select a List
After connecting (or clicking Sync Now on an existing connection), you'll see all your Moosend mailing lists:
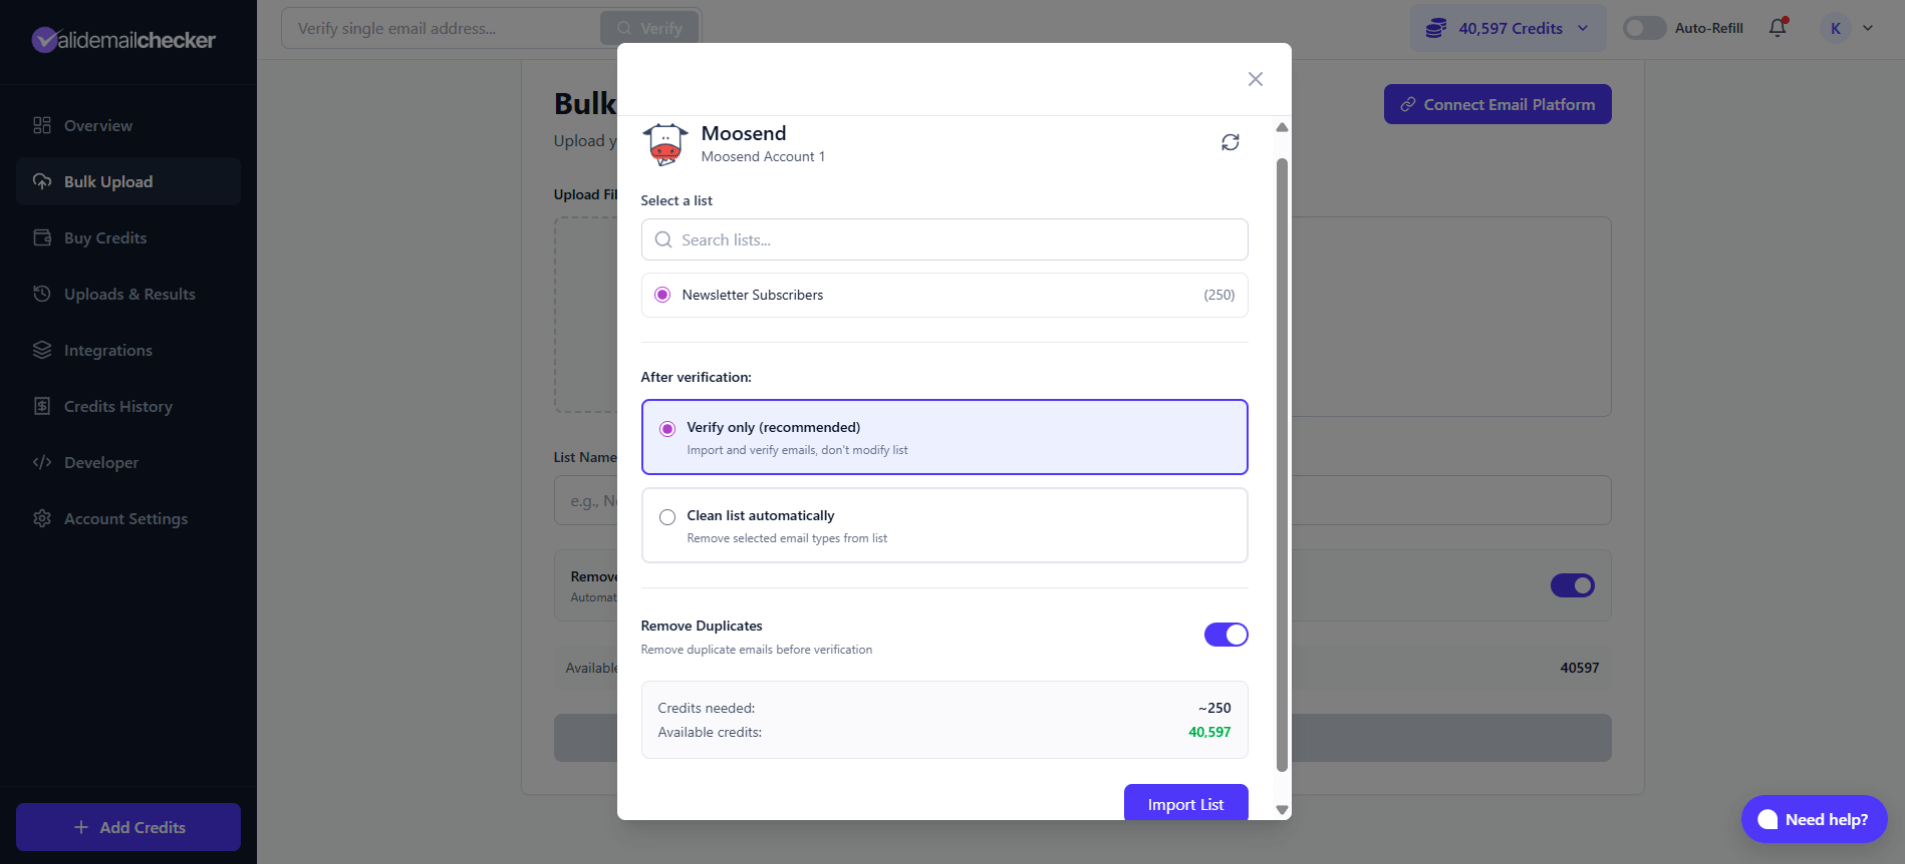
- Use the search box to find a specific list
- Click on the list you want to verify (e.g., "Newsletter Subscribers")
- The number in parentheses shows how many subscribers are in each list
Step 2: Choose Your Verification Mode
You have two options for what happens after verification:
Option 1: Verify Only
Select Verify only to:
- Import and verify all emails in your list
- Keep your Moosend list unchanged
- Review results before taking any action
- Download a detailed report of all verification statuses
This is the safest choice if you want to review the results before making changes to your list.
Option 2: Clean List Automatically
Select Clean list automatically if you want Valid Email Checker to update your Moosend list after verification:
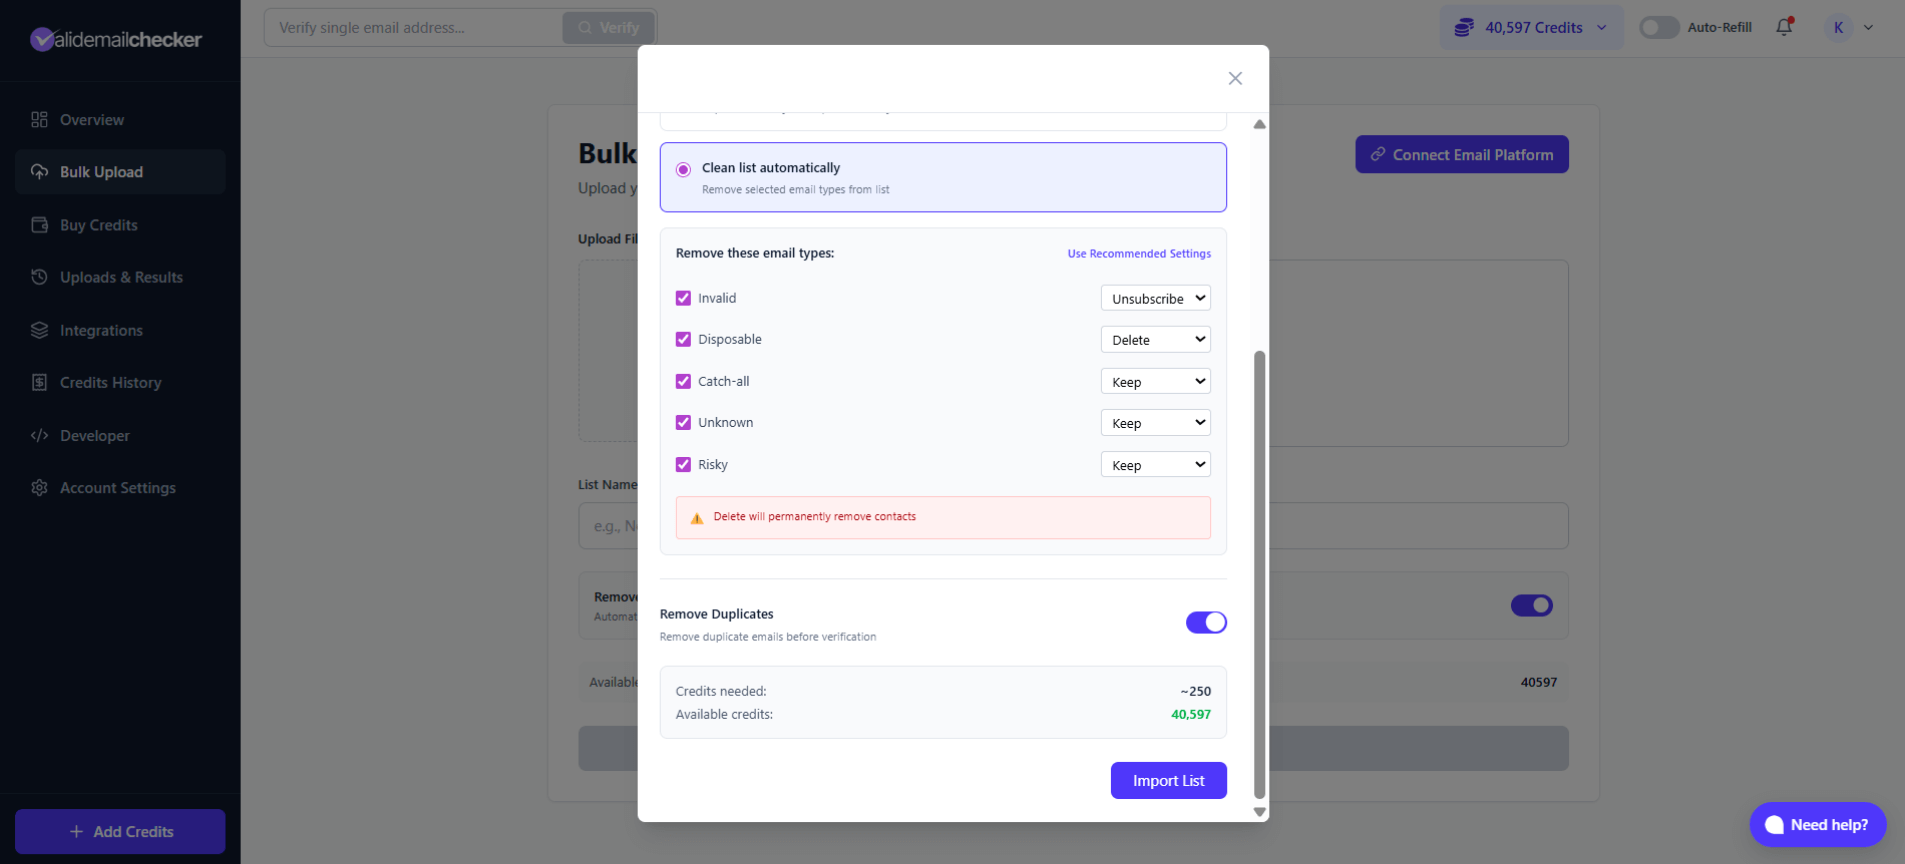
For each email type, choose what action to take:
| Email Type | Available Actions | Default |
|---|---|---|
| Invalid | Keep, Unsubscribe, Delete | Unsubscribe |
| Disposable | Keep, Unsubscribe, Delete | Delete |
| Catch-all | Keep, Unsubscribe, Delete | Keep |
| Unknown | Keep, Unsubscribe, Delete | Keep |
| Risky | Keep, Unsubscribe, Delete | Keep |
When you select Delete for any email type, those contacts will be permanently removed from your Moosend list. This cannot be undone. If you're unsure, start with Unsubscribe instead—it stops emails without losing the contact data.
Step 3: Configure Options
Before importing, you can:
- Remove Duplicates: Toggle on (default) to automatically remove duplicate email addresses before verification. This saves credits and ensures accurate counts.
Step 4: Review and Import
Check the credit summary at the bottom:
- Credits needed: Estimated credits for this verification
- Available credits: Your current credit balance
Click Import List to start the verification process.
Monitoring Your Verification
After clicking Import List, you'll be redirected to the Uploads & Results page.
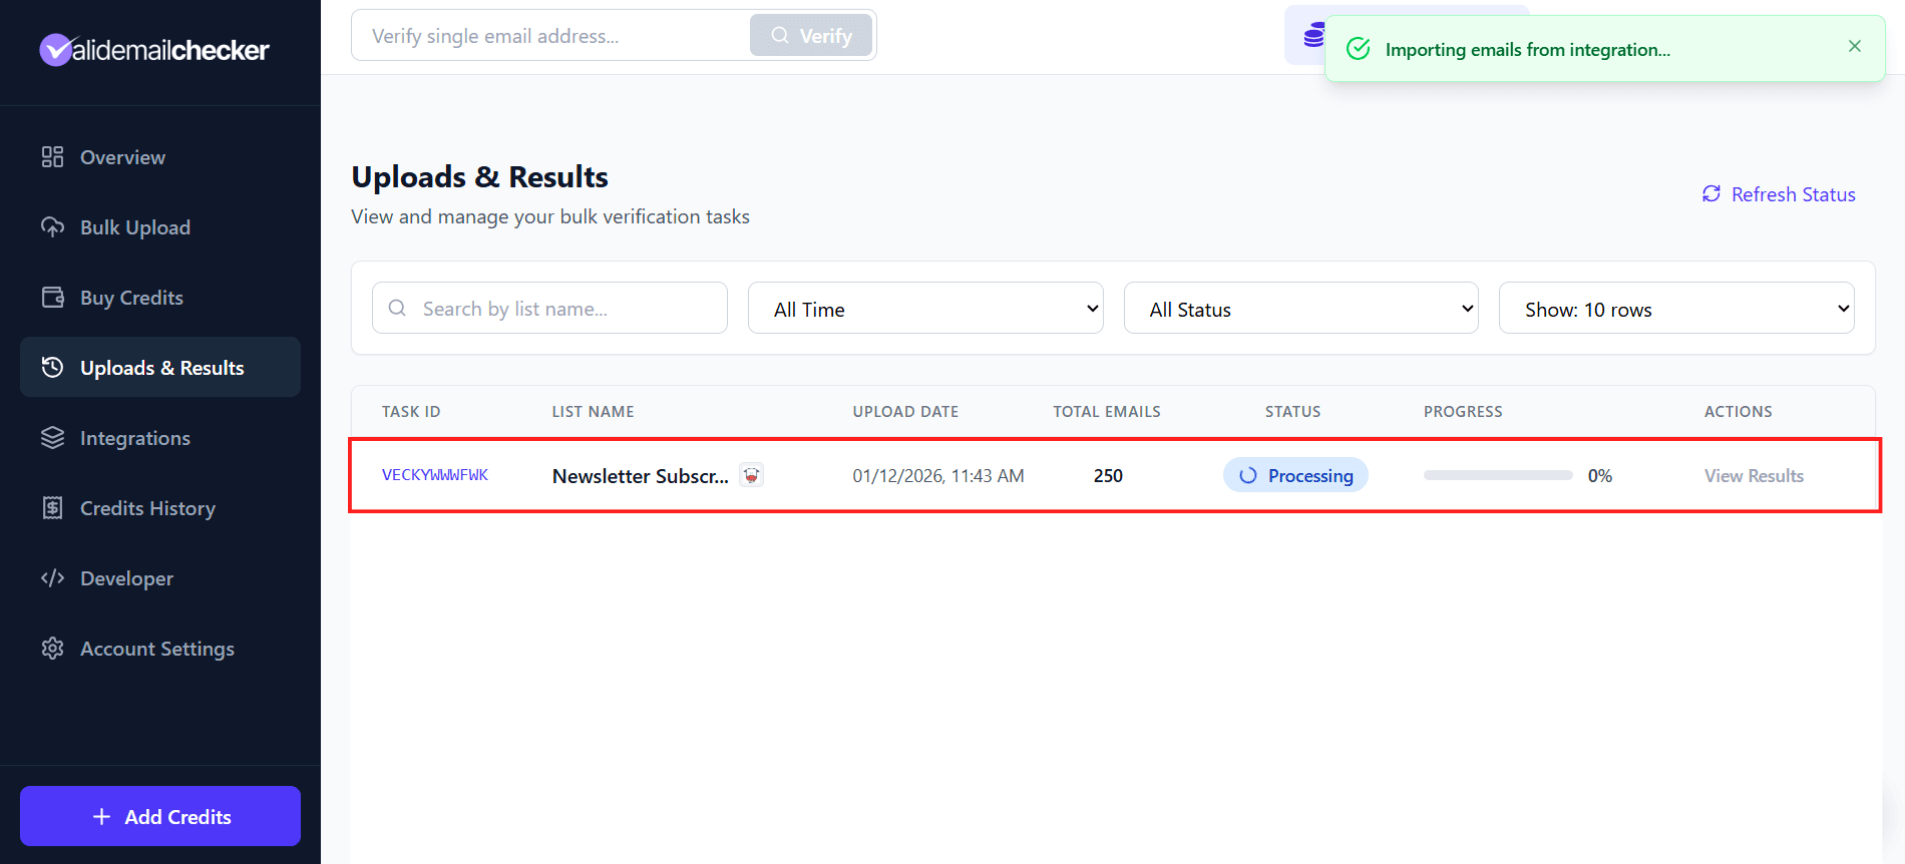
Here's what you'll see:
| Column | Description |
|---|---|
| Task ID | Unique identifier (e.g., VECKYWWWFWK) |
| List Name | Your list name with Moosend icon |
| Upload Date | When verification started |
| Total Emails | Number of emails being verified |
| Status | Processing, Completed, Failed, or Deleted |
| Progress | Percentage complete |
| Actions | View Results when complete |
The page updates in real-time—no need to refresh. You'll also see an "Importing emails from integration..." notification while the import is in progress.
When Verification Completes
Once status shows Completed:
- Click View Results to see the detailed breakdown
- If you selected "Verify only", review the results and decide what action to take
- If you selected "Clean list automatically", your Moosend list has already been updated
Managing Your Moosend Connection
Viewing Connected Accounts
Go to Integrations in your sidebar to see all your connected platforms.
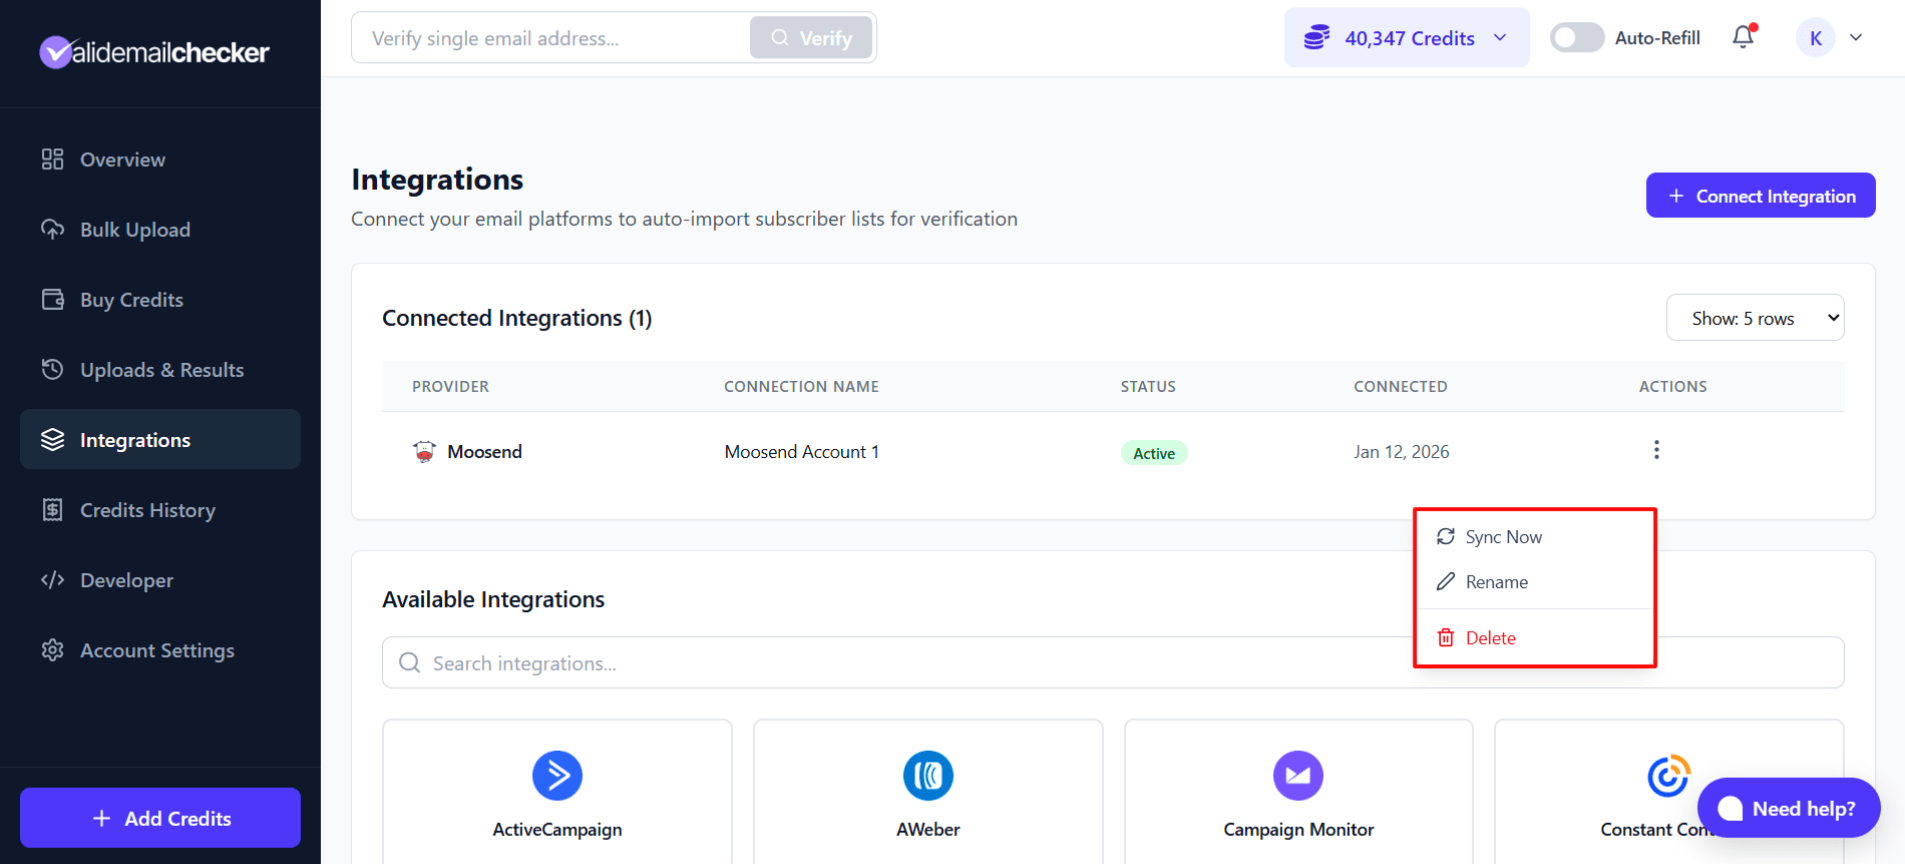
Your Moosend connection displays:
- Provider: Moosend with its icon
- Connection Name: The name you gave this connection
- Status: Active (green)
- Connected: Date you connected
- Actions: Menu with management options
Available Actions
Click the three-dot menu (⋮) on any connection to:
| Action | What It Does |
|---|---|
| Sync Now | Refresh your list data from Moosend |
| Rename | Change the connection name |
| Delete | Remove this connection entirely |
When to Sync
Hit Sync Now when you want to:
- See newly created lists in Moosend
- Update subscriber counts after list changes
- Refresh data before starting a new verification
Multiple Moosend Accounts
Managing multiple Moosend accounts? No problem.
Adding Another Account
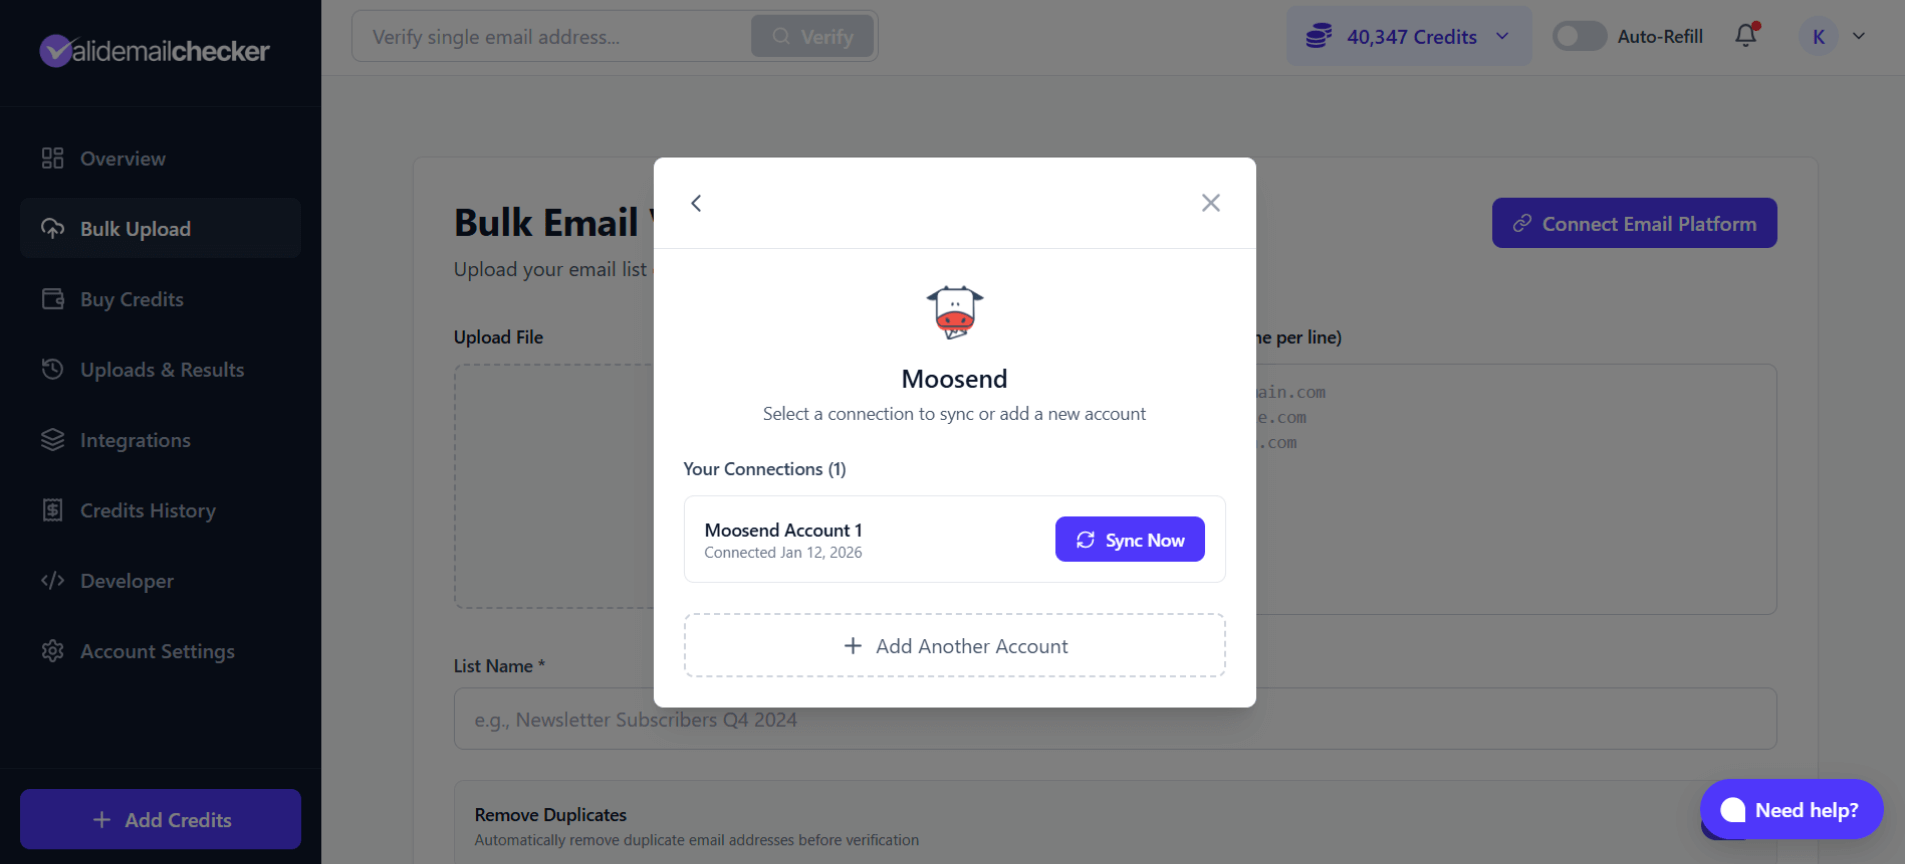
- Click Connect Email Platform or select Moosend from Integrations
- If you already have a connection, you'll see "Your Connections" with existing accounts
- Click + Add Another Account
- Enter a unique connection name (e.g., "Client A Account", "Agency Backup")
- Paste the API key for the new account
- Click Connect Account
Managing Multiple Connections
Each connection appears separately in your Integrations list with its own:
- Connection name (for easy identification)
- Status indicator
- Connection date
- Independent action menu
Use descriptive names like "Newsletter Account", "Client XYZ", or "E-commerce Store" to quickly identify which account you're working with.
Troubleshooting
"Invalid API Key" Error
Cause: The API key wasn't copied correctly or has been regenerated.
Fix:
- Go to Moosend → More → Settings → API key
- Copy the full API key (it's a long string)
- Make sure there are no extra spaces before or after
- If still not working, click Generate new API Key in Moosend and try the new one
No Lists Appearing
Cause: Your Moosend account might not have any mailing lists yet.
Fix:
- Log in to Moosend directly
- Create at least one mailing list with subscribers
- Return to Valid Email Checker and click Sync Now
"Connection Failed" Error
Cause: Usually a temporary network issue or Moosend API downtime.
Fix:
- Wait a few minutes and try again
- Check Moosend's status page for any ongoing issues
- Verify your API key is still valid in Moosend
Changes Not Reflecting in Moosend
Cause: There may be a delay in syncing changes back to Moosend.
Fix:
- Wait a few minutes for sync to complete
- Refresh your Moosend dashboard
- Check that the correct list was selected for cleaning
- Ensure you selected "Clean list automatically" (not "Verify only")
Subscriber Count Mismatch
Cause: Moosend shows total contacts while we import verified subscribers.
Fix:
- This is normal—Moosend's count may include unsubscribed or bounced contacts
- Our import focuses on email addresses that can be verified
- The difference is usually unsubscribed contacts or system entries
Frequently Asked Questions
Does verifying affect my Moosend sending reputation?
No. Valid Email Checker verifies emails using our own infrastructure. We never send actual emails to your subscribers, so your Moosend sender reputation stays untouched.
Can I verify a list while a campaign is running?
Technically yes, but we recommend against it. For best results:
- Pause any active campaigns
- Run the verification
- Review and apply changes
- Resume campaigns with your cleaned list
What happens to custom fields when cleaning?
When using "Clean list automatically":
- Unsubscribe: Keeps all contact data including custom fields, just changes subscription status
- Delete: Removes the entire contact record including all custom fields
Next Steps
Now that your Moosend account is connected:
- Understanding Result Types - Learn what each verification status means
- Catch-All Emails Explained - Special handling for catch-all addresses
- Credit System - Understand how credits work
- Auto-Refill Setup - Never run out of credits during verification
- View All Integrations - Connect your other email platforms
Running into issues with your Moosend integration? Our support team is here to help. Click the chat icon in the bottom right or email support@validemailchecker.com.